Thursday, December 23, 2010

Black And White Smock/Maternity Top

My, it's been a while. And 2 days till Christmas! I've been busy busy busy-tidying up house, getting rid of unused things, doing some spring cleaning, running after my Little Wyld Man, who isn't so little anymore. And also, I'm pregnant again! In between getting all of these done, I managed to pull together a simple smock from a Burda magazine, using some left over material from my maternity/nursing cocktail dress.

I was itching to sew something, but was too lazy to draft from scratch, so I decided I must make something quick and simple. I had some Burda magazines from the library and this little number caught my eye.


I love the simple lines, the yoke, and the pleats, which will allow for a growing belly. This is how it was made up in the magazine-in plaid.


I wasn't too big on it, but I really liked the stylelines, and decided to make it.


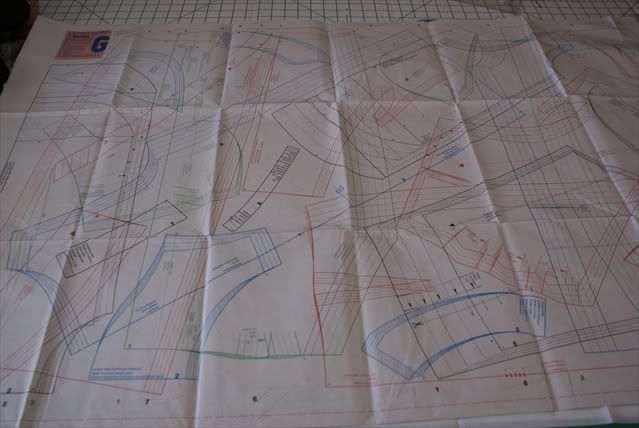
This is the pattern sheet. You have to find the correct colour codes for the  pattern which can get confusing. In this case, I'm using the patterns outlined in blue. Burda patterns come without seam allowances, so you have to add them yourself.


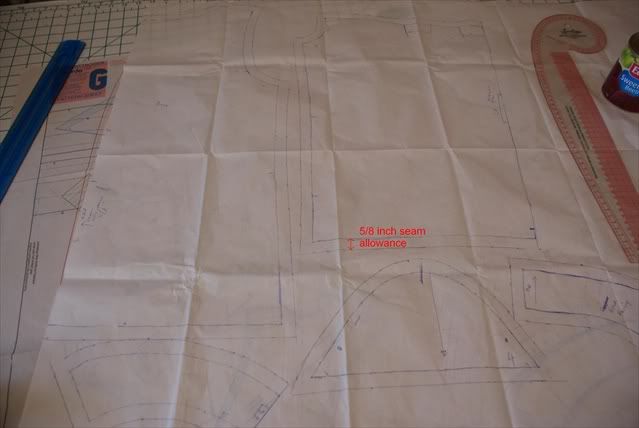
I traced out the pattern using some tracing paper, and added a 5/8 of an inch seam allowance. You can use anything see through that is big enough, such as cheap sew-in interfacing, or even freezer paper taped together.


I've cut out my pattern pieces. This is a simple pattern, so only 6 pieces altogether.  Should come together pretty quickly. I've labelled each piece so that you'll know what I'm referring to below.

The pattern markings must be marked onto the fabric at this point. I used to use tailor's tacks, but now I just make a 3/5 inch snip into the seam allowance to mark centre points, pleating points, etc.


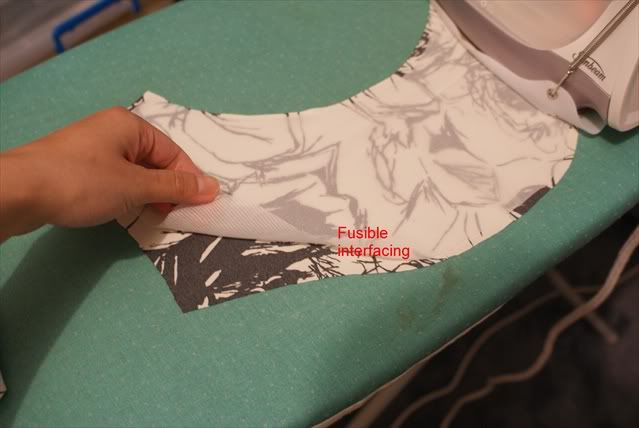
I've also cut out fusible interfacing for the facing front and back pieces, as well as the yoke. The fusible interfacing I'm using is a tricot knit, which is suitable for most light and medium weight materials. The interfacing serves to stabilise the area, and by this I mean that it will stop the fabric from stretching as you sew and handle it. It also prevents wrinkles and gives a bit more body to the fabric, although you don't want to use interfacing that is too heavy, as this will change the hand/feel of the fabric undesirably. The interfacing should be cut using the same pattern piece, or slightly smaller.

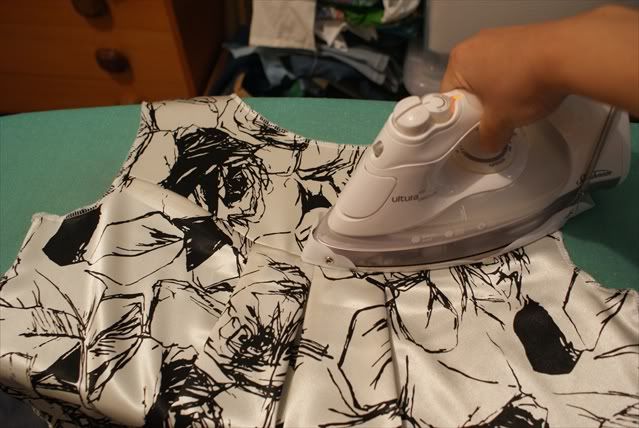
To fuse, press with an up-down motion on a steam and wool setting till it fuses to the fabric. Wait till cool before moving.

Before stitching anything together, I finish the edges with my overlocker. Or you can use a zigzag stitch with a normal sewing machine.


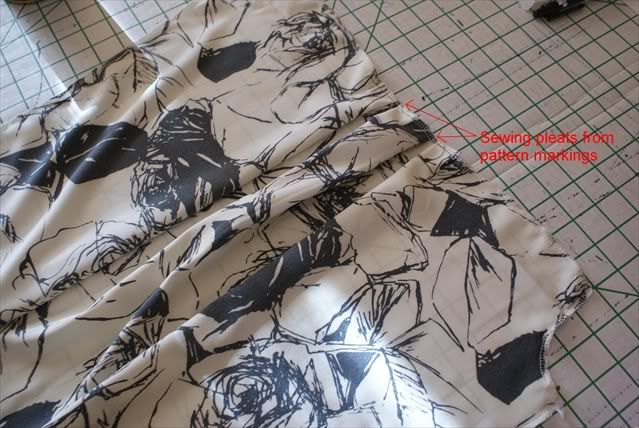
Here, I've stitched the pleats in the front first. My order of construction is always to finish the details on the front garment, piece all front pieces together, then finish back details such as the zipper, and joint the front to the back at the shoulder seams and side seams. The sleeves  and hem are last.

In stitching the pleats, the pattern markings and centre points guide me and I don't struggle to measure the pleating afterwards. I stitch vertically at each pleat to keep the pleats together, then horizontally across the pleats and the whole neckline.


The front yoke is joined to the main front, matching the centre points in the middle. The seam allowance is pressed upwards at the back.


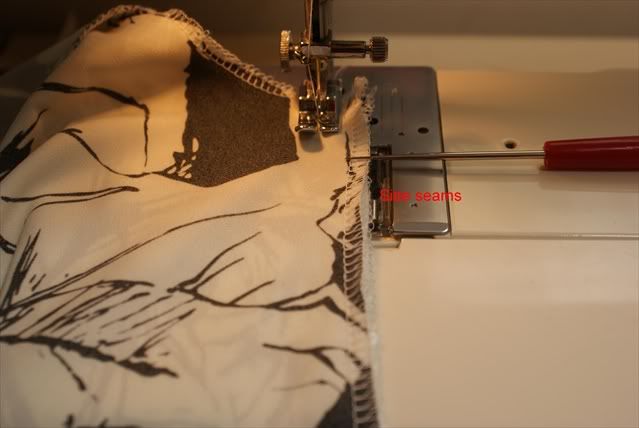
Here's I'm stitching the side seams. The shoulder seams are next. When this is done, test for fit. As this was a loose smock, the fit aside from the shoulders, weren't essential. This top was drafted with a zipper in the back. When I tried it on, I found that it slipped easily over my head and shoulders, so I decided to omit the zipper.

Press the seams open and flat.


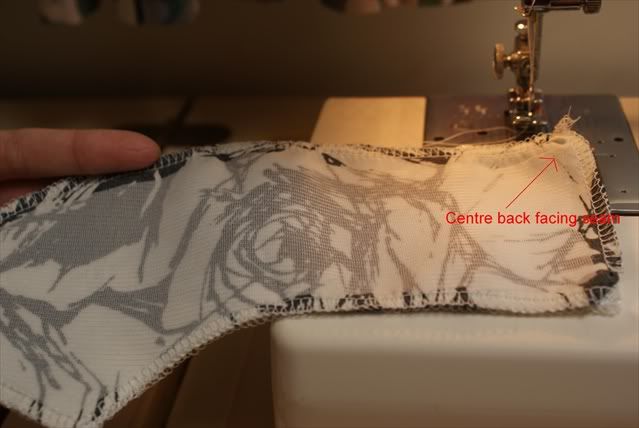
Here, I'm stitching the back neck facings together at the centre back seam. Next the back neck facing is joined to the front neck facing at the shoulder seams.


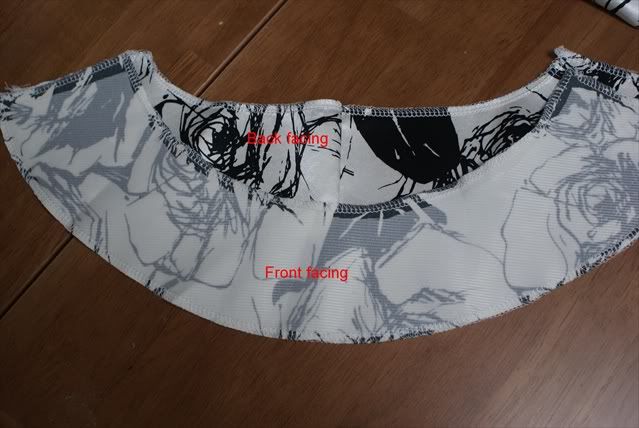
This is what it looks like. Press the seams open and flat. Remember, sew and press as you go.


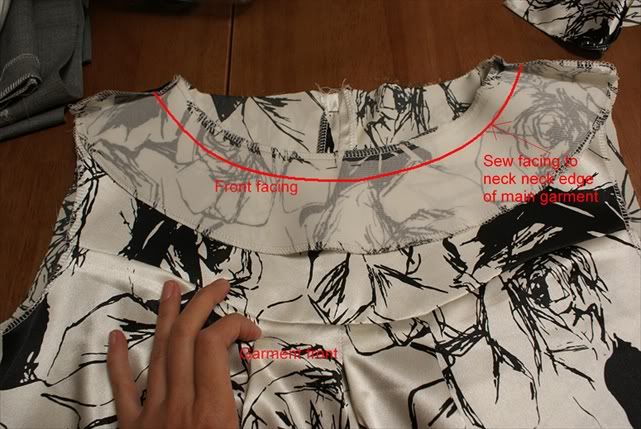
Join the facing to the main garment at the neck edge, lining shoulder seams on both facing and main garment together. Make sure the centre points of the facing matches the centre point on the main garment. Sew with 5/8 inch seam allowance.

When this is done, turn the facing underneath and this finishes the neckline edge. However, you will find that it flips upwards very inconveniently. To remedy, you'll need to understitch.


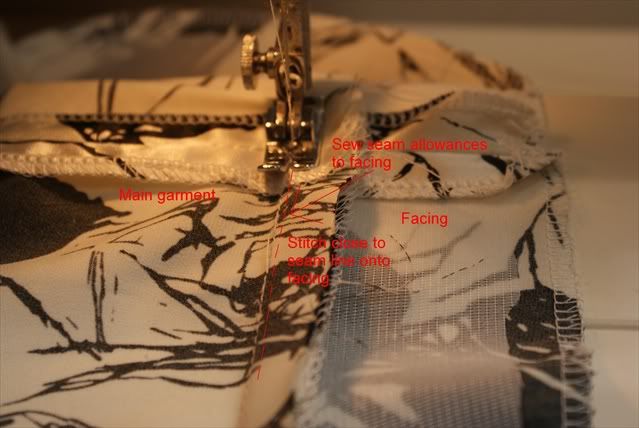
Open up the facing, and use your fingers to press the seam allowance towards the facing. Position your needle so that it is close to the seam line, but not on it, towards the facing. Sew the seam allowances to the facing. This is called understitching. This keeps the facing from flipping up a certain extent. However, you'll need to clip the seam allowance as per below.


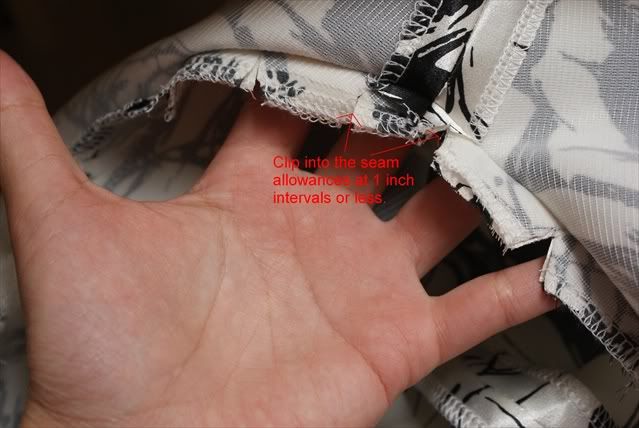
Clip at 1 inch intervals, or less where there is a sharper curve. This releases the fabric and lets it lie flat when you turn the facing under. Be careful to clip close to, but not onto the stitching line.

Next, we finish the hem on the sleeve.


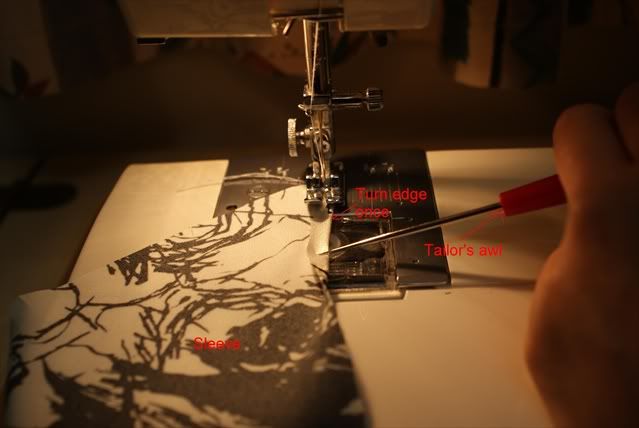
I'm doing a double rolled hem by hand-you can do it by a narrow hemming foot, but I wanted to try this technique instead. Turn the edge wrong sides together around 1/4 inch and sew close to the edge. Using the tailor's awl helps immensely as the sharp point guides the hem under the presser foot.


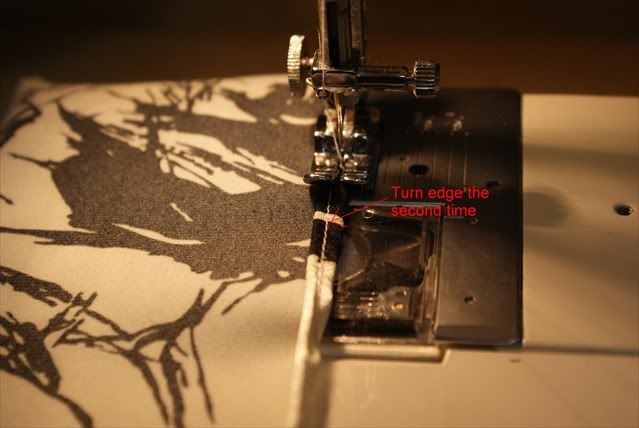
Now turn over the second time and do the same. Press the hem flat.

Before sewing the sleeve into the armhole, you have to prepare the sleeve for 'easing'. The sleeve cap is drafted with extra length, usually about 1-2 cm longer than the armhole. The extra fabric must be eased into the armhole without puckering. This can be a challenge, but with practice comes perfection. To prepare the sleeve, sew a gathering stitch (I use the longest stitch length) inside the seam allowance.


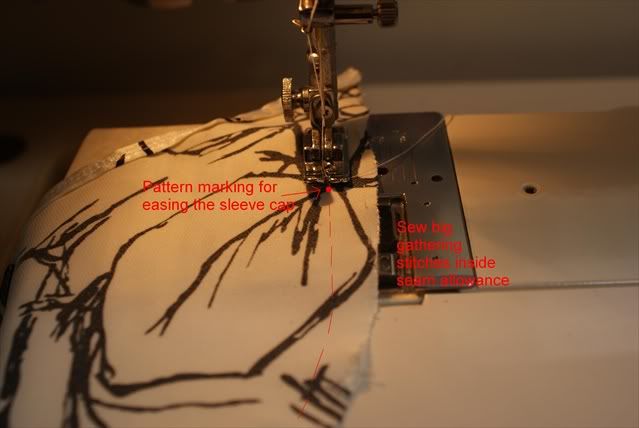
The pattern will have a dot/mark where easing begins. Sew from this point with big stitches. Do not backstitch. Leave a long thread length at each end.


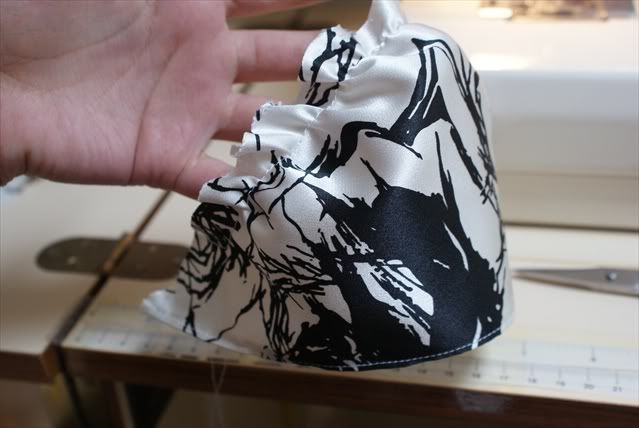
Pull the gathering threads and gather the sleeve cap evenly. The gathers must be 'gentle' rather than 'hard'.


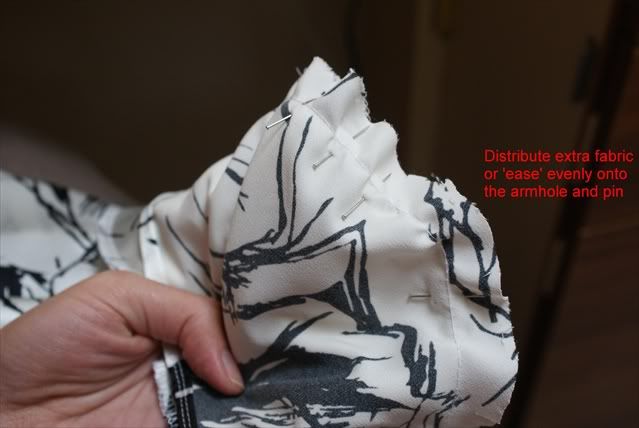
Pin the sleeve cap onto the armhole wtih as many pins as you need. As this is a cap sleeve, and not a full sleeve, find the markings on the armhole where the sleep cap begins and ends. The 1/3 of the lower armhole will be finished with a bias binding. Stitch sleeve to armhole at 5/8 inch seam allowance.


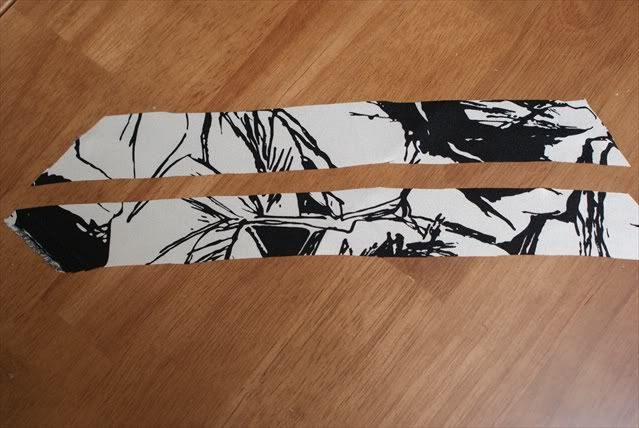
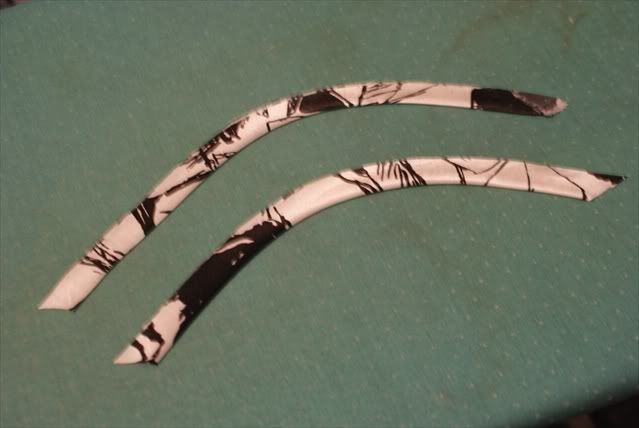
For the bias binding, I cut 1 inch strips on the bias, 16cm in length. These need to be folded in half and pressed. As this is on the bias, it is stretchy and can be shaped into a curve by pressing, as per below.


To attach the binding to the lower armhole, pin the so that the folded edge sits 2.7cm from the armhole edge.


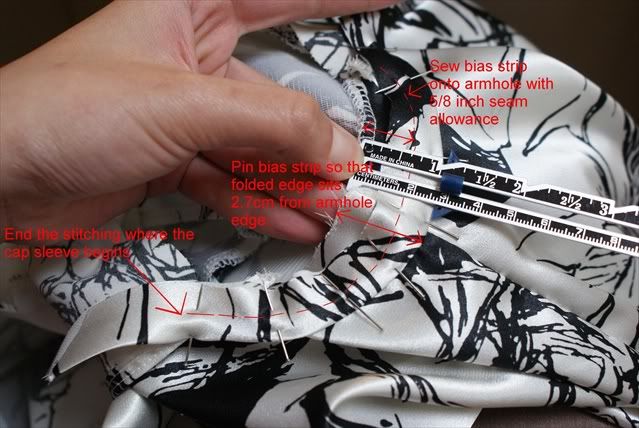
Why 2.7cm? Because it is 5/8 inch plus 1cm. And when you stitch it in 5/8 inch from the armhole edge,and turn the bias binding under, it will match the finished edge of the cap sleeve perfectly. Magic!


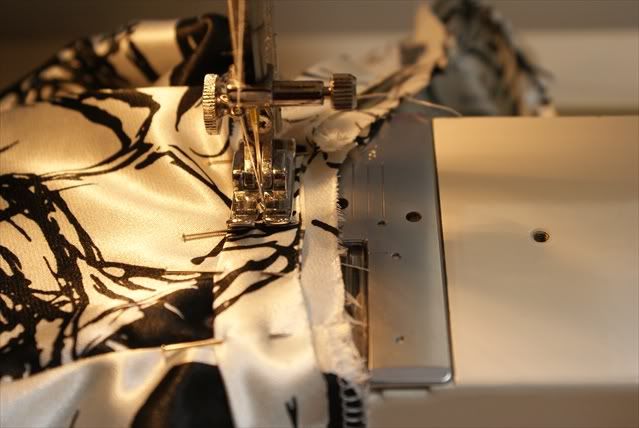
Sew 5/8 inch from the edge of the armhole, catching the middle of the bias binding.


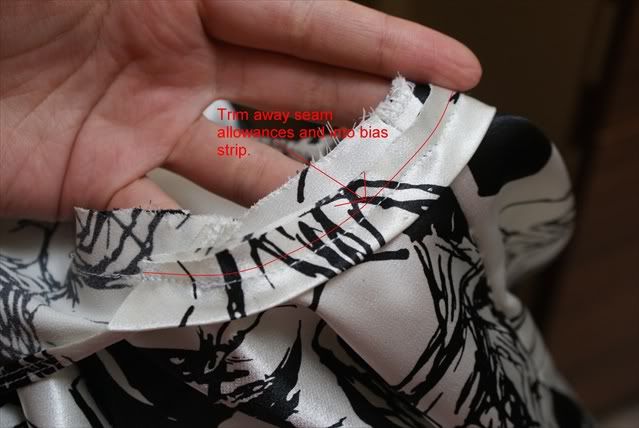
Trim aways the ends of the binding, and the seam allowance so that only 1/4 of the bias binding remains.


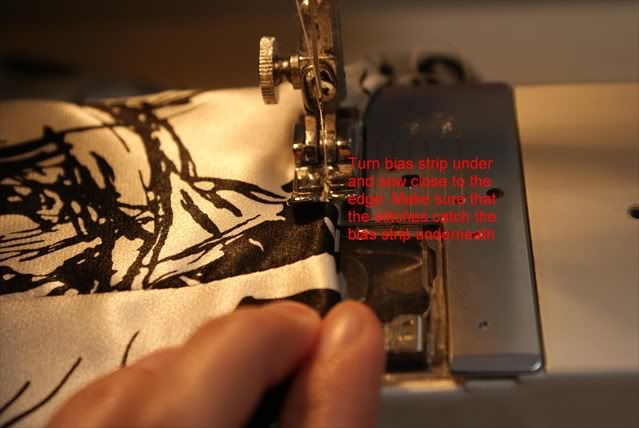
Turn under and edgestitch close to the edge, making sure the stitching catches and holds the bias binding underneath. Press flat.

Hem the bottom with a double rolled hem.

Finito!


Front view.


Back view.


Closeup of the front.

I'm rather pleased with this top. However, the neckline does gape a bit. So the next time I use this pattern, I'll do a slight gaposis adjustment. But for now, Merry Christmas everyone!

Wednesday, November 24, 2010

Homemade Turkish Delight

I went to a middle-eastern store the other day and bought some handmade Turkish Delight. I've never come across it in Malaysia, and wondered what all the fuss was about in the Narnia film when Edmund betrays his siblings for some Turkish Delight. I tried some that day and understood. The Turkish Delight was soft but chewy and so  deliciously perfumed. Wyld Man enjoyed them so much that I decided to learn how to make them from scratch.

Making Turkish Delight isn't that hard, as long as you follow the instructions to the letter, and have the correct tools on hand.

I got the recipe online here, but decided to make it red-food-colouring-free.

First, the lineup of ingredients.

[caption id="" align="alignnone" width="639" caption="Ingredients"][/caption]

  • Neutral tasting oil/butter (not shown)

  • 4 cups castor sugar

  • 3 cups water

  • 1 cup juice (I used undiluted apple mango juice) (or omit this and just use 4 cups water)

  • 2 tbs freshly squeezed lemon juice

  • 3 tbs gelatine powder

  • 1 cup cornflour

  • 1 tsp cream of tartar

  • 2 tsp rosewater essence

  • 4 tbs beetroot juice

  • 2 cups icing sugar


You'll also need to set out your tools.

[caption id="" align="alignnone" width="639" caption="Tools"][/caption]

You'll need :

  • baking paper (not shown)

  • whisk

  • spatula

  • sugar thermometer

  • measuring spoons and cups

  • 2 large saucepans

  • 1  28cm x 17cm slice pan


One essential tool is a sugar thermometer, which is a thermometer that clips onto your pot, with a scale showing the correct temperature to produce soft and hard forms of sugar/candy. I went and got mine specially for making Turkish Delight.

[caption id="" align="alignnone" width="1504" caption="Sugar Thermometer"][/caption]

First off, slice the lemon in half.

[caption id="" align="alignnone" width="639" caption="Lemon"][/caption]

Then get your macho, handsome husband to squeeze it for you with his strong hands.

[caption id="" align="alignnone" width="639" caption="Squeeze"][/caption]

Line the slice pan with baking paper with sides overhanging. To make the baking paper stick, oil the pan completely  first.

[caption id="" align="alignnone" width="639" caption="Like this"][/caption]

Set one saucepan on the stove, and fill with 1 cup water, 1 cup juice and 4 cups sugar and stir over low heat.

[caption id="" align="alignnone" width="639" caption="Adding sugar to juice and water"][/caption]

Clip on the sugar thermometer and heat till completely dissolved. Increase heat to medium and keep watch till sugar reaches 125 degrees Celsius (firmball stage) which should take about 25 minutes. Some sources say 115 degrees Celsius is enough (softball stage). At this point, I've got a confession to make. I copied the recipe by hand, and instead of writing 125, I wrote 25. I was 100 degrees off the mark! But mine turned out ok in the end. Phew! So do what I say, not what I do.

Stir in the 2 tbs of lemon juice and remove from heat.

[caption id="" align="alignnone" width="639" caption="Lemon Juice"][/caption]

Take the other saucepan and fill with the the remaining 2 cups of water, cornflour (1cup), gelatine powder (3 tbs)  and cream of tartar (1tsp).  Turn heat to low and whisk briskly to remove any lumps. Gradually increase heat to medium and keep stirring till mixture boils and thickens as per below. Do not burn. This should take about 3-5 minutes.

[caption id="" align="alignnone" width="639" caption="Miracle mix"][/caption]

Don't you just love cornflour? I use it for thickening soups, tenderising meat, coating meat for frying, vanilla slice and now turkish delight. It's a miracle powder. You can also use it under your arm as a substitute for deodorant as well as use it as baby powder. Aside from that, you can starch your white shirts with a mixture of cornflour and water instead of using commercial aerosol spray starch.

Now pour the contents of the first saucepan into the cornflour mixture.

[caption id="" align="alignnone" width="639" caption="Pour 1 into 2."][/caption]

Stir to incorporate everything evenly. Whisk constantly to remove any lumps. My source said to pour through a sieve into another saucepan but I didn't find that necessary. Over low heat, simmer for an hour or till temperature reaches 110 degrees Celsius. The mixture should look very golden-like this.

[caption id="" align="alignnone" width="639" caption="Almost ready"][/caption]

Add the rosewater essence (2 tbs) and beetroot juice (4 tbs), and stir thoroughly. Pour into the lined slice pan. It should look like this.

[caption id="" align="alignnone" width="639" caption="Peel off the baking paper"]

Isn't using beetroot juice just brilliant? My mother-in-law uses it instead of red-food-colouring and told me about it.

Cool to room temp and then put in fridge to set overnight. The next morning, dust your chopping board liberally with icing sugar and cornflour and turn the Turkish Delight onto it. It should be pretty firm.
[/caption]

To cut, put a sharp knife under hot running water and butter the end. Then run it through the jelly. Like this.

[caption id="" align="alignnone" width="639" caption="Slicing"][/caption]

Slice it through lengthwise, into strips and separate. Dust with more icing sugar and cornflour. Cut into cubes and dust the ends as well.

[caption id="" align="alignnone" width="639" caption="Homemade Turkish Delight"][/caption]

Yummy!

It turned out amazingly well for a first effort, and despite the temperature blunder. Compared to the ones I bought, the texture wasn't as chewy because I didn't let the sugar form to the hardball stage before I added the cornflour. But it still is softly chewy.

To store, keep refrigerated in single layers. I found that mine did not like being kept outside the fridge.

Thursday, November 4, 2010

Apple Mango Muffins

I used to dread baking because I always made a floury mess on the kitchen counter. But I went to visit a friend once who had just baked muffins in the morning like it was an everyday affair after which her kitchen seemed so clean and I thought, why can't I do it too? So I went and bought a box of muffin premix-just add water and bake. It was soo easy. And I found that as long as you use ONE big bowl to mix everything in, and close all your containers as you use them, it won't seem like such a mess, and not THAT much to clean up. And then later I figured I can make better muffins for less than the bought premix-duh. And that's how I started baking muffins. All the time. I've got 50 muffins sitting in the freezer.

I looked at a few muffin recipes online and found a common denominator between all of them-one cup of sugar, two cups self-raising flour,  half cup of olive oil, one cup milk, one cup any mashed fruit, and any other seasoning like cinnamon etc. So I've been making up muffin recipes with that as a base. By the way, I love self-raising flour. I didn't bake much in Malaysia, and didn't use self-raising flour, so everytime I did attempt to bake I had to sift baking soda and bicarbonate of soda through it and nothing ever came out right coz I didn't sift it evenly. And I made a floury mess.

So you can use this recipe (I call it the Universal Muffin Recipe) to make any fruit flavored muffin. Just be creative! I've used leftover carrots and zuchinis and it's tasted great.

This is what you need.

Ingredients
  • 1 cup Castor sugar
  • 2 cups self raising flour
  • 1/3 cup olive oil
  • 1 cup milk (I've been using powdered milk-1/3 cup milk, 2/3 cups water)
  • 1/2 cup water
  • 1 apple
  • 1 can mangos+juice (1. You can eat up to 3 pieces of mango MAX. 2. If not using juice, substitute with 1 egg or half cup water)
  • Paper muffin cups

Before you start, preheat the oven to 180 degrees Celsius.

Slice and dice the apples.


Add mangos and use a blender/food processor to puree. The canned mango juice helps with the pureeing. If using other fruits, use half cup water or an egg and blend to a pulp.


Add 1 cup castor  sugar.


Add  2 cups flour.


Drizzle in olive oil. I'm not exact about how much olive oil I use. About 1/3 cup sounds right.


Mix everything together but don't beat the heck out of it.  10-15 strokes with a spatula should  be enough. It should still be a bit lumpy and personable.


If the mix is too dry, add the half cup of water slowly and stop to mix again. The consistency is about right when you need two spoons of the batter to fill the muffin tin.

Because I'm lazy, I prefer to use muffin cups instead of greasing each hollow in the muffin tin. Fill each cup till 2/3 full.


Bake at 180 degrees Celsius for 30-40 minutes. If not using a fan-forced oven, turn the  muffins around after 25 minutes. Muffins are done when a toothpick in the centre comes out clean and tops are golden.


I overfilled the cups and the muffins are joined at the top. But they tasted great nonetheless!

Muffins are great for freezing. Just Gladwrap each one individually and freeze. To defrost, microwave on high for 30 seconds. I find that muffins left to defrost on its own in Gladwrap gets a bit soggy, but a microwaved one comes out perfect like it was just baked.