I had some red 4 way stretch jersey in my stash. I can't remember where I picked it up. But it was really soft and stretchy. I had used up quite a lot for an All Saints Day costume night, and I didn't think I'd have enough to make a top. But surprise, surprise! I needed only around 1 metre.
This post will be a tutorial on how I put this top together, as well as how to convert it to a nursing top with hidden access as well.
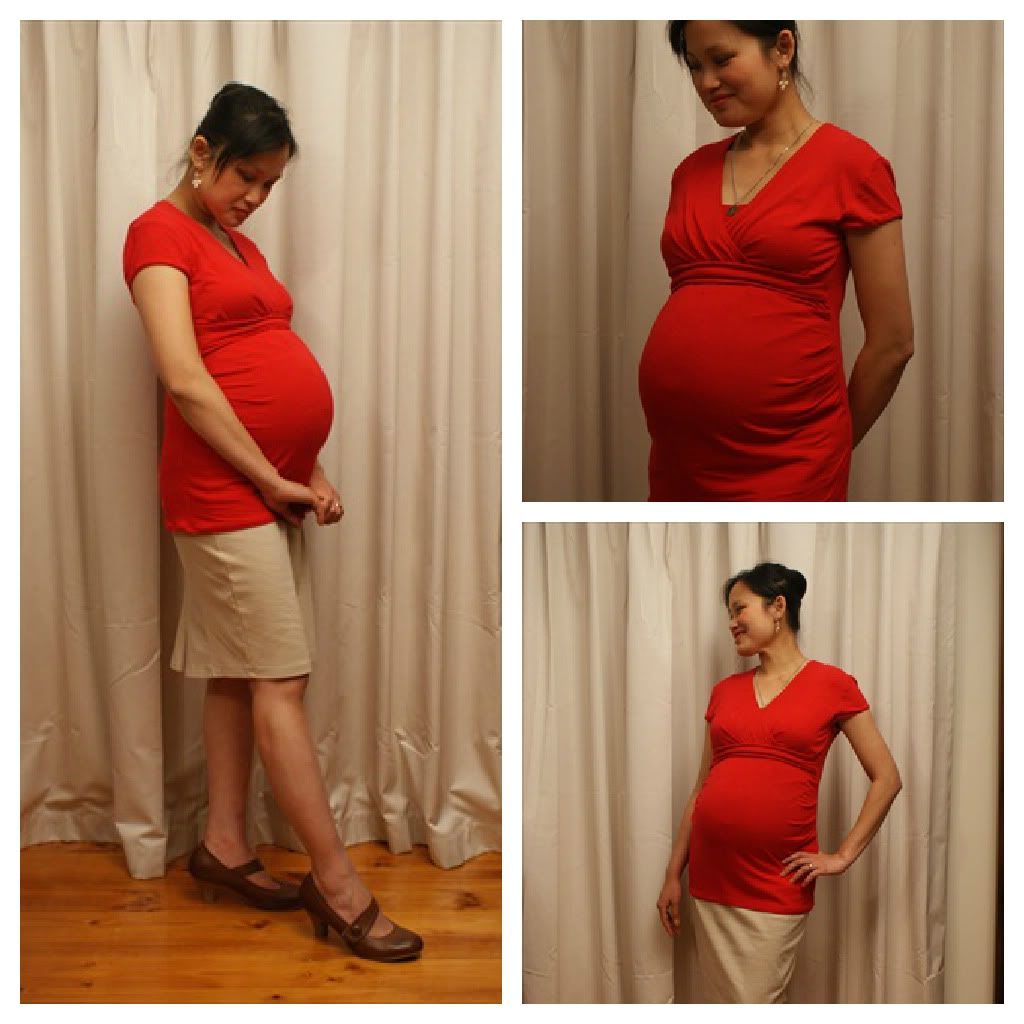
The Burda maternity top is from the June 2010 issue, number 131.
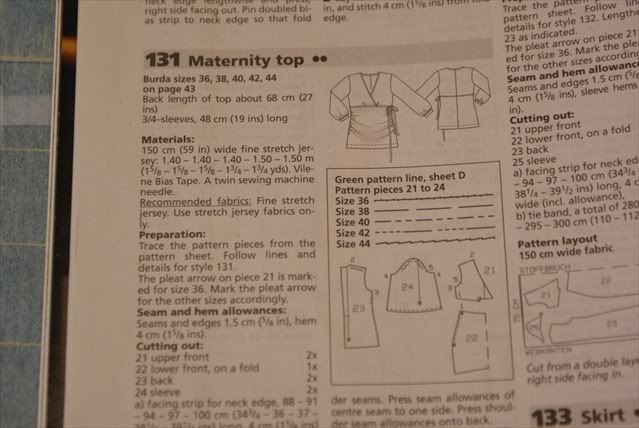
The sizing I chose was based on my high bust measurement (around the top of your ribcage rather than around the bustline). I cut out size 38, but had to shorten the length a total of 4cm, as it was drafted for a person much taller.

In the above, you can see where I slashed the pieces horizontally to reduce length at several different places, to distribute the adjustments more evenly. Also, I anticipated a gaping neckline, a problem I had before with a Burda top.
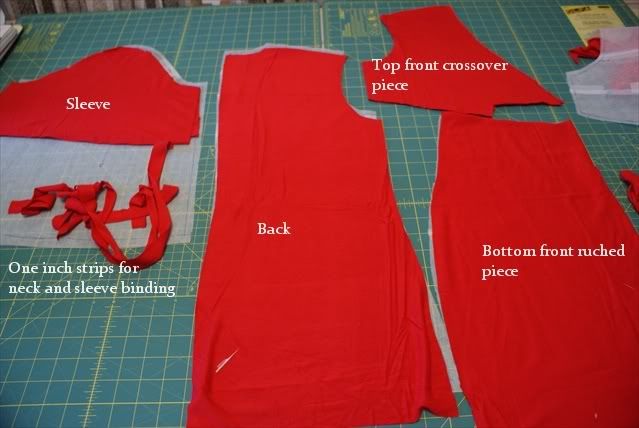
I cut out my pieces with a rotary cutter. Love that tool! Cutting out isn't a chore anymore. At this point I also decided to make this a nursing top, and I added a nursing panel.

I didn't make a pattern for it, just based it on the crossover piece. I cut on folded lengthwise and width wise, with the latter fold on the centre front line of the crossover piece. The side seam was angled to match the side of the crossover piece once the dart was taken in.
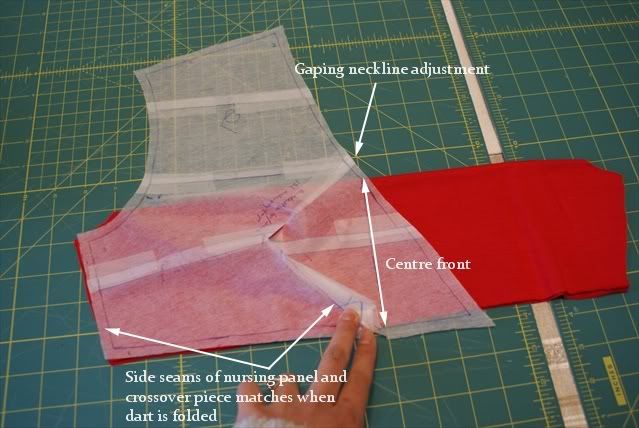
Once you open it up, you can see that it matched the crossover piece at the side seams.
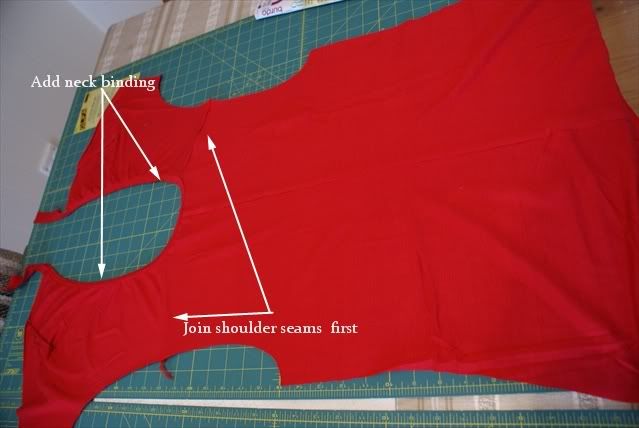
First step is to join the shoulder seams of the crossover pieces to the back piece. I wasn't very careful and stretched the jersey a bit here. In hindsight I would have used a walkingfoot on the sewing machine with long basting stitches, or handstiched it with backstitches at every inch interval.
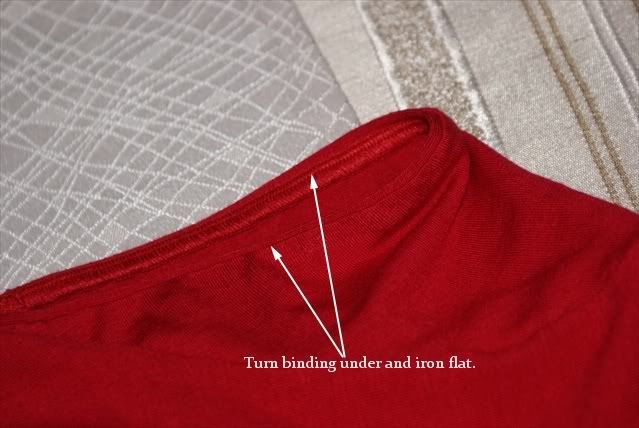
I also used the 1 inch strips, folded over and overlocked it to the neckline, binding on top. Then turn over and iron flat.
However, I made the mistake of stretching the binding as I sewed, which means that the neckline shrank too much. I had to compensate by using a decorative stretch stitch to even out the neck binding, stretching the neckline as I sewed.
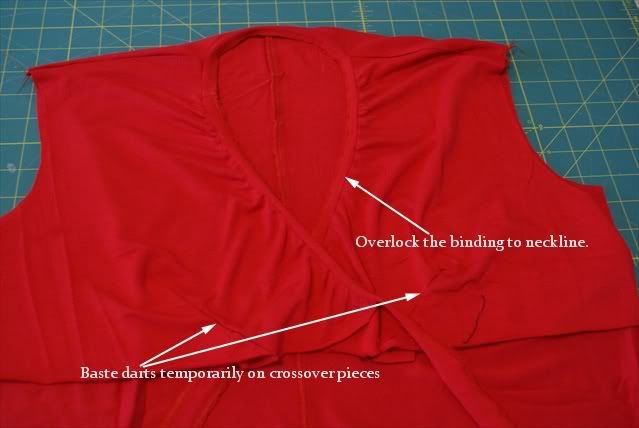
The darts are then basted temporarily.
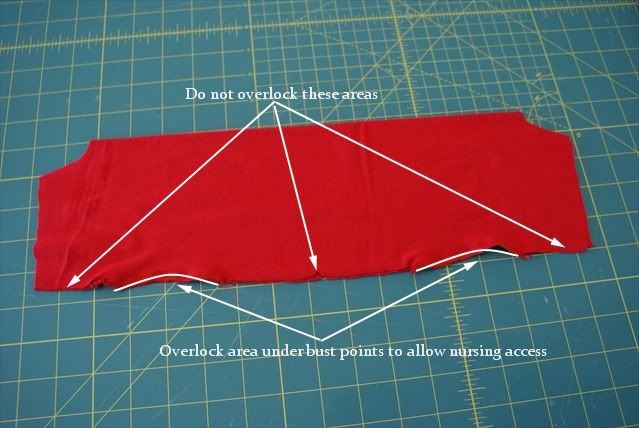
With the nursing panel, I overlocked around 3 inches of the bottom under the bust points. These areas will hang free, the other remaining areas will be sewn onto the crossover and bottom front ruched piece.
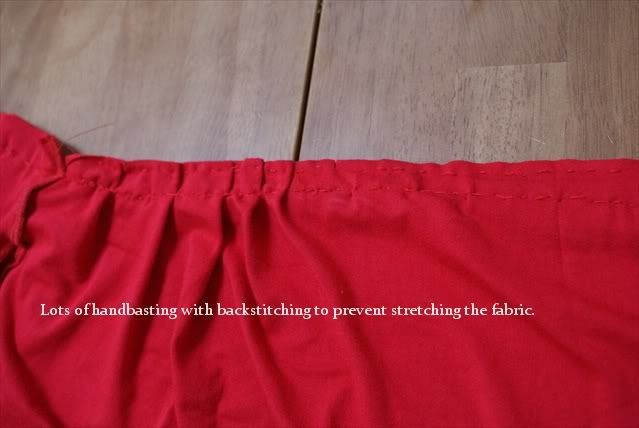
The ruched piece had to be gathered to produce the darts. I did this by handbasting and backstitching, adjusting it to fit the back pattern piece. The backstitching again helps to reduce stretching the fabric during overlocking.

Here I've attached the bottom front ruched piece to the crossover, as well as the nursing panel. But I hand basted the side seams first to try on the fit. It was too large, so I took in about 1 1/2 inches from both side seams. Also, I noticed that the underbust seam was stretched out, which made it look bunched up. There were 4 layers of fabric going under the overlocker and it shifted and stretched like crazy. At this point I decided to add a little belt under the bustline to hide the weird look going on there.
To make the belt, I just cut out a double layer of fabric, a little shorter in width to the underbust line, about 4 inches wide. Foldover (so that there is now 4 layers instead of just two), and overlock, then turn inside out. I chose to use 4 layers instead of 2 because I wanted it to maintain it's shape. I felt that having less layers would probably mean the belt will bunch up and fold onto itself, and lose definition.
I inserted the ends of the belt to the side seams, making sure that it was positioned to hide the ugly underbust seam.
I tried the fit and had to redo the side seams several times to get a really good fit. Basting is so important! It is easier to do by hand, because it is easier to rip out than machine stitching. Also, with handstitching, you control the stretch-machine stitching is liable to stretch the fabric out of shape.
At this point I basted the sleeves and decided that I wanted cap sleeves instead of the original t-shirt sleeves I'd cut out. So I cut away the excess as per below.
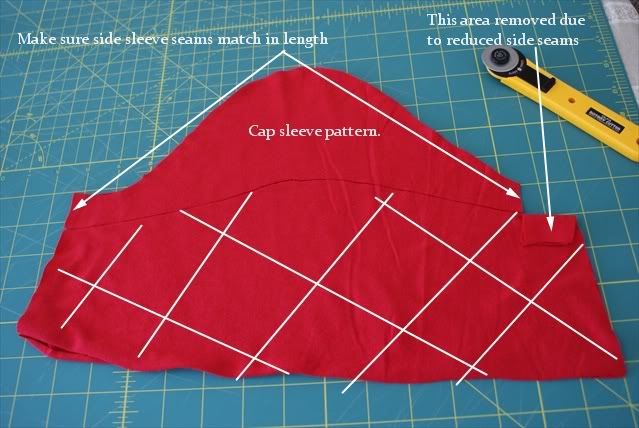
Because the side seams of the main bodice had reduced substantially, I had to remove the under sleeve seam area too to match the new sleeve hole.
To make the sleeve, I folded the 1 inch strips over, and overlocked it to the sleeve, binding side up. Then iron flat.

Depending on the look you want, you can either stretch the binding as you sew, or not. If you stretch it out, the cap sleeve will look gathered. I decided not to. Here is what the sleeve looks like attached to the bodice.
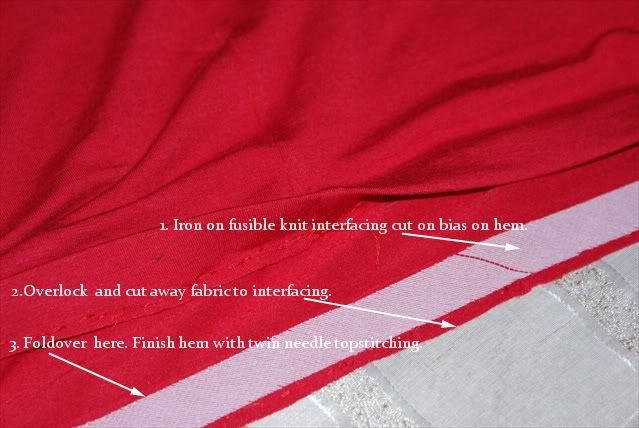
To finish the hem, I cut out 1 inch bias strips of knit fusible interfacing, fused it to the hem, overlocked it, then foldover, and topstitch with twin needles.
And iron every seam.
Voila!
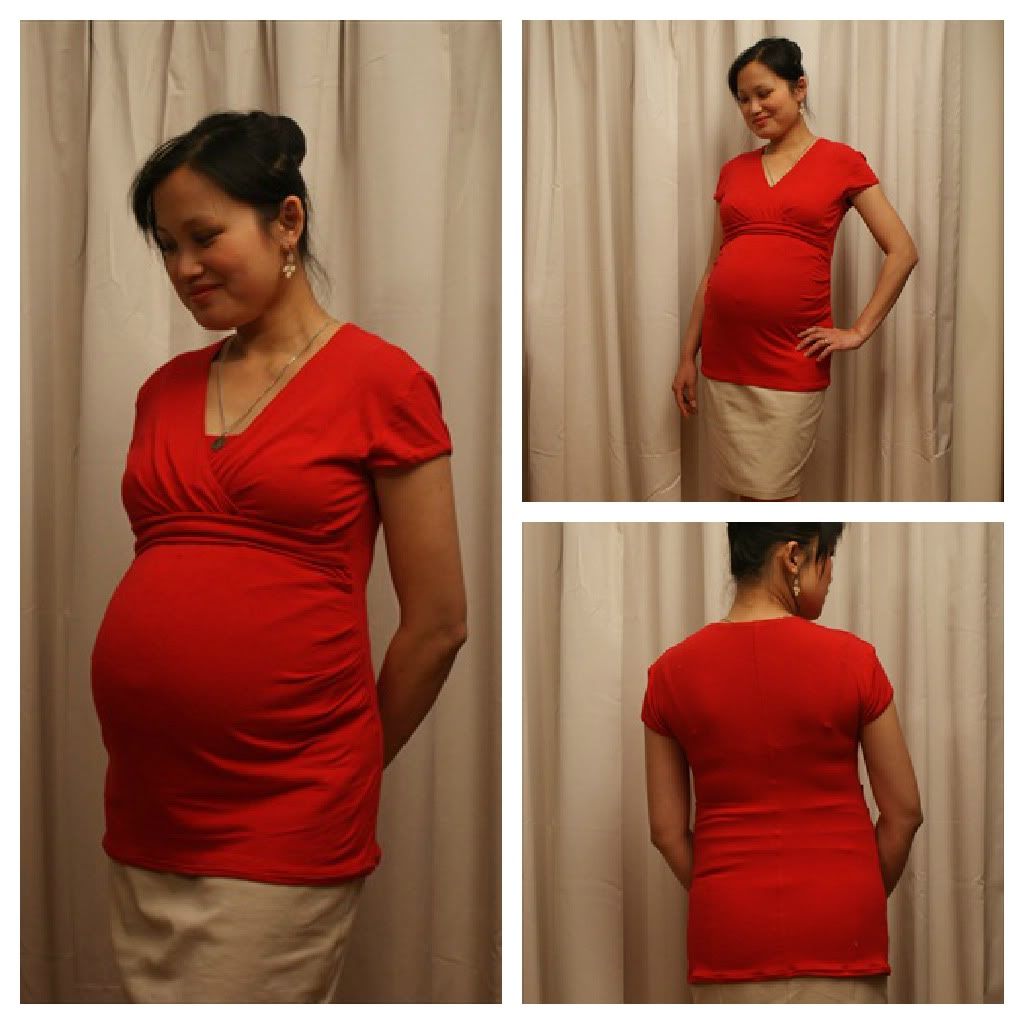
I hope to wear this after the birth-hopefully the bottom ruched bit won't sag too much! The nursing access would be really handy to have. Tops like these got for $70-80 at maternity boutiques, and around $30 at Target. So I've saved heaps!
I hope this tutorial was useful to you! If it was, please leave a comment! I'd love to hear from you!
so clever!!! ;) of course, congrats on ur bub - when are u due? #2 or 3?? planning to sew baby things or not?
ReplyDeleteyvy @ mistyeiz
http://stitch2stitch.net
Hello Yvy, thanks! I'm due in 6 weeks. I don't know about sewing baby things-I just get them from op shops or second hand. They outgrow things so fast and second hand is cheaper to buy than to make from fabric from Spotlight! However, I have made things like sleeping bags that are expensive to buy and I can't find second hand...
Delete