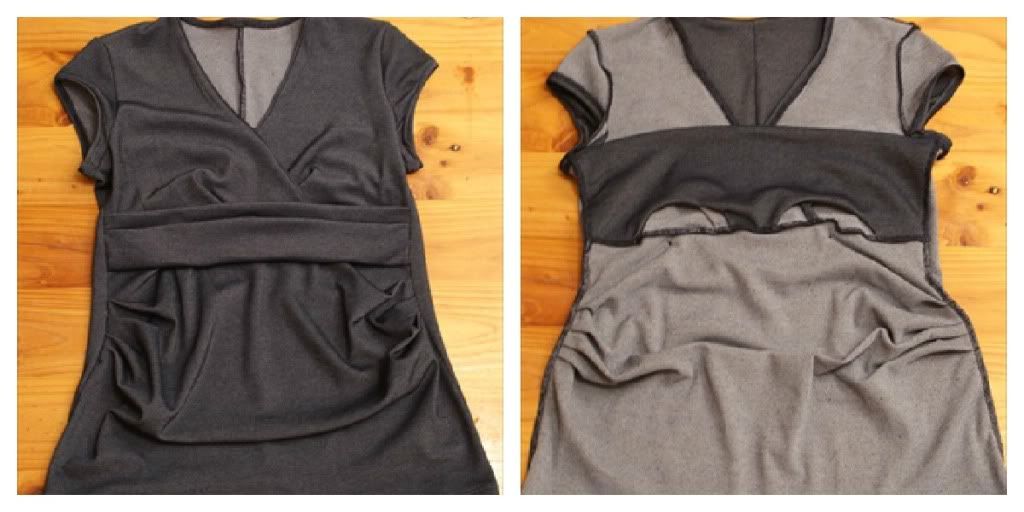
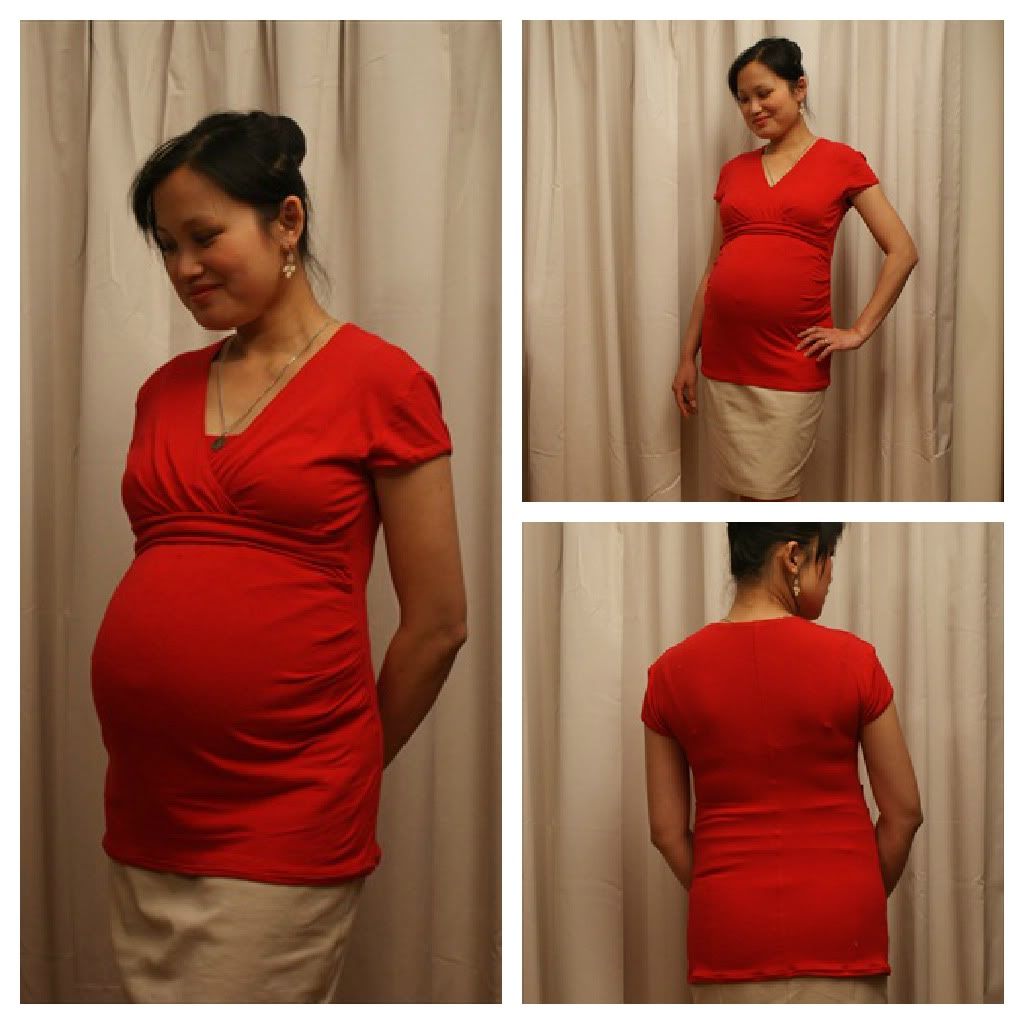
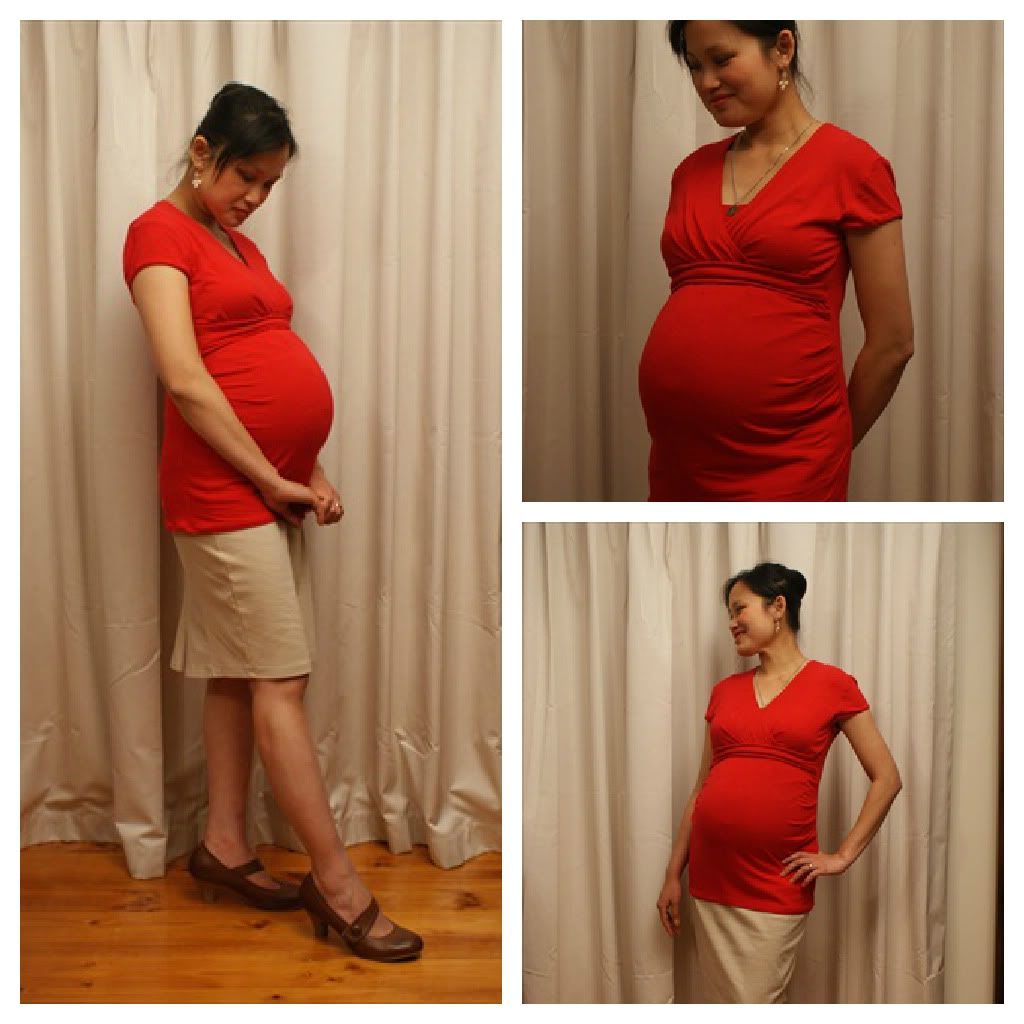
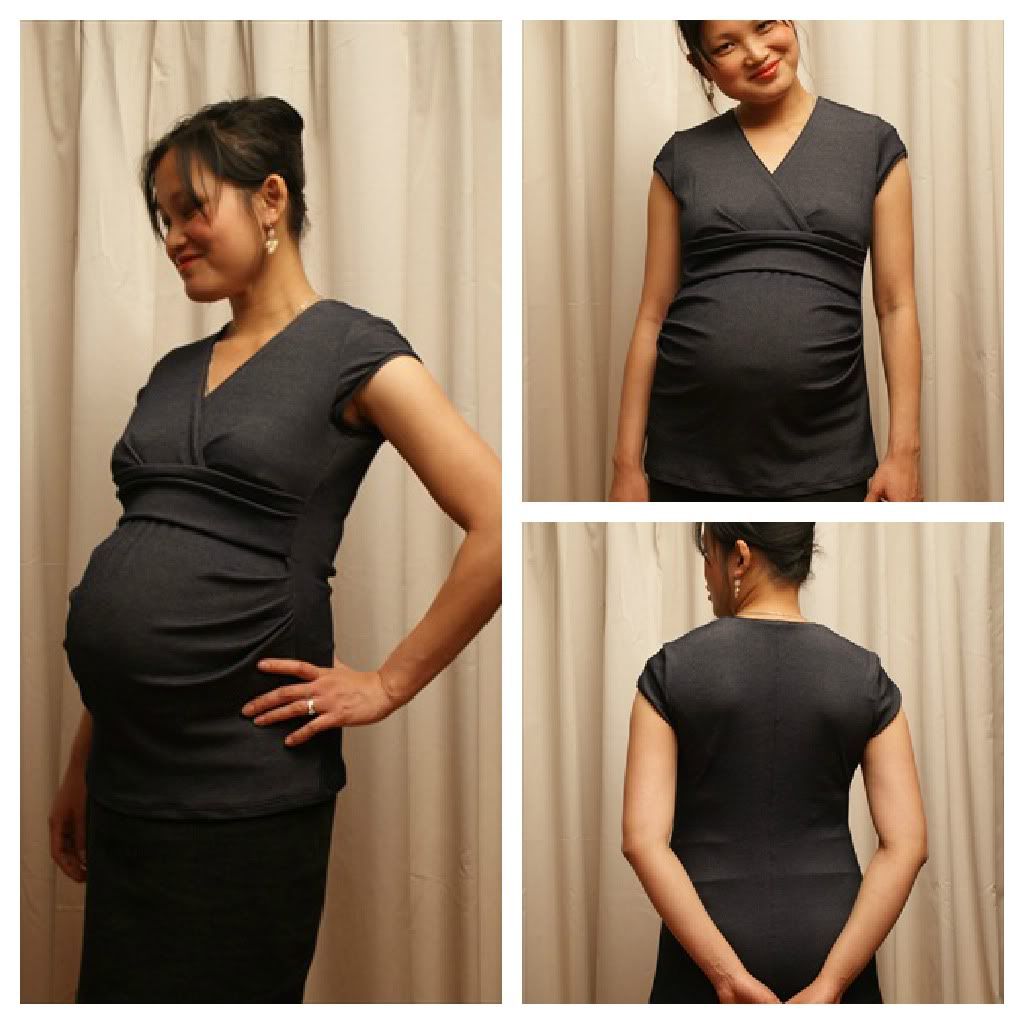
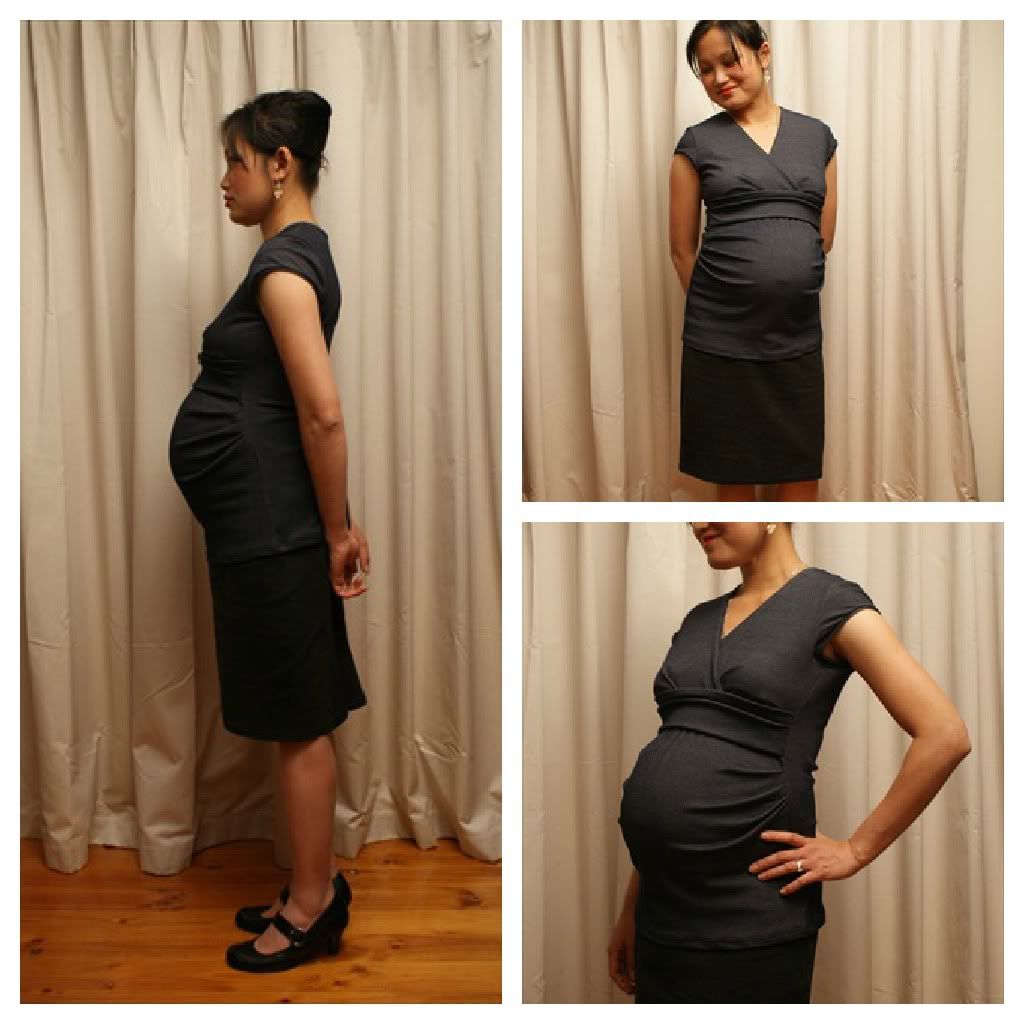
I loved how my red Burda maternity top turned out so much that I raided my stash and found something suitable to make another. I picked it up at Spotlight eons ago and meant to use it for the maternity panels in skirts. I did use up a tiny bit, but there was at least 1.4 metres of the stuff left. I'm not sure what it's made of, but it's a denim-look knit of medium weight.
Construction was very similar to the red Burda top, and I finished it in one day, despite massive amounts of handsewing.
The only real difference is the belt-I folded it so that it sort of looks like a cummerbund. Also, my nursing access is larger and neater, the latter because I sewed around the nursing area, then turned it inside out and ironed it, so that when you're looking at it from the inside, there are no raw edges.
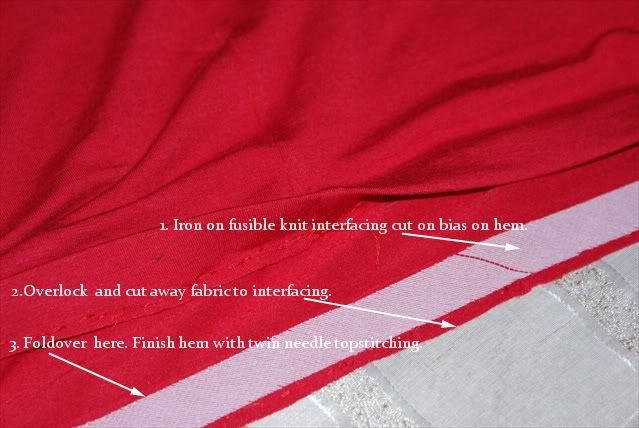
However, my hem is a little twisted-I fused it with knit interfacing, ironed the hem fold, and topstitched very carefully, but it always ends up twisted, stretched and off grain. Anyone have any tips on how to avoid this?
I really, really like this top-it looks slightly dressy, despite the denim look. But I'll wear the heck out of it these coming weeks as the due date looms and belly blooms bigger!
The pattern for this top is definitely a winner. I would love to make a dress next-just need to draft a skirt for it. I'll also be making a post-birth pattern based on this. I love the way it fits, and the sleeves are perfect too! I've been wanting to draft a pattern for stretchy knits for ages, but fitting the sleeves always discouraged me. I'll use this pattern to develop other styles-maternity and non-maternity.
Till the next post!
Showing posts with label Burda Magazine. Show all posts
Thursday, October 18, 2012
Denim Jersey Burdastyle 131 Maternity Top
Wednesday, October 17, 2012
Red Burdastyle Maternity Top 131 June 2010 Tutorial
So. I'm pregnant again. And I'm less than 7 weeks away till bubba 3 pops out. I've been busy with my two toddlers. Monkey will be 3 soon, and Hippo will be 18 months in Dec. Things have been going really well I reckon. And I decided that it's been too long since I posted and I've been itching to sew something. I haven't sewn anything in ages, persuading myself that with two toddlers it would be next to impossible. But last week I suddenly felt my sewing mojo coming back, buckled down and picked out a Burda maternity pattern, decided that I was going to take my sweet time, and finished a top in 3 days. It helps when the little creatures have a good routine.
I had some red 4 way stretch jersey in my stash. I can't remember where I picked it up. But it was really soft and stretchy. I had used up quite a lot for an All Saints Day costume night, and I didn't think I'd have enough to make a top. But surprise, surprise! I needed only around 1 metre.
This post will be a tutorial on how I put this top together, as well as how to convert it to a nursing top with hidden access as well.
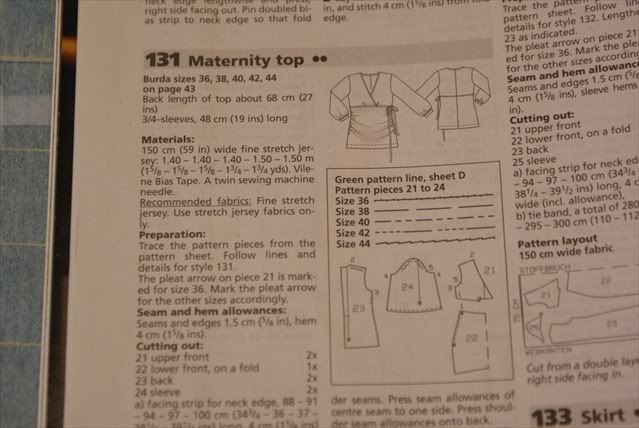
The Burda maternity top is from the June 2010 issue, number 131.
The sizing I chose was based on my high bust measurement (around the top of your ribcage rather than around the bustline). I cut out size 38, but had to shorten the length a total of 4cm, as it was drafted for a person much taller.
In the above, you can see where I slashed the pieces horizontally to reduce length at several different places, to distribute the adjustments more evenly. Also, I anticipated a gaping neckline, a problem I had before with a Burda top.
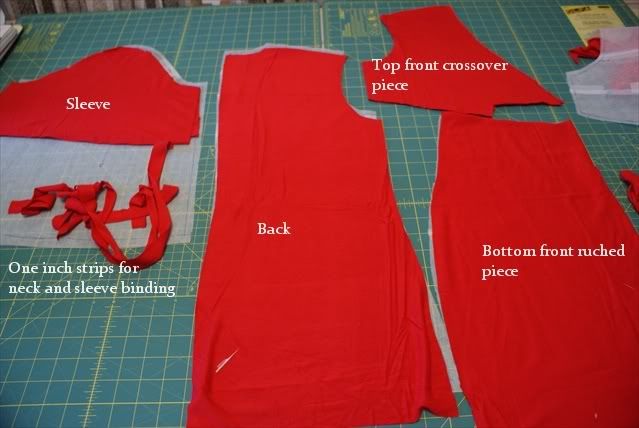
I cut out my pieces with a rotary cutter. Love that tool! Cutting out isn't a chore anymore. At this point I also decided to make this a nursing top, and I added a nursing panel.
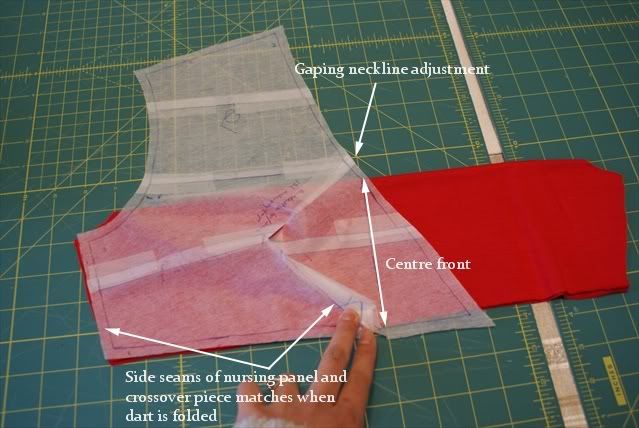
I didn't make a pattern for it, just based it on the crossover piece. I cut on folded lengthwise and width wise, with the latter fold on the centre front line of the crossover piece. The side seam was angled to match the side of the crossover piece once the dart was taken in.
Once you open it up, you can see that it matched the crossover piece at the side seams.
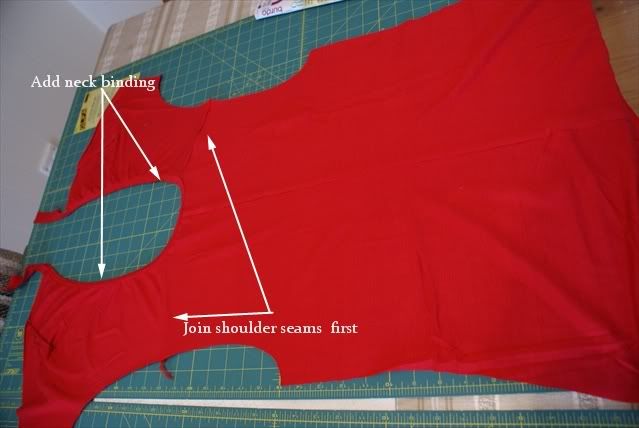
First step is to join the shoulder seams of the crossover pieces to the back piece. I wasn't very careful and stretched the jersey a bit here. In hindsight I would have used a walkingfoot on the sewing machine with long basting stitches, or handstiched it with backstitches at every inch interval.
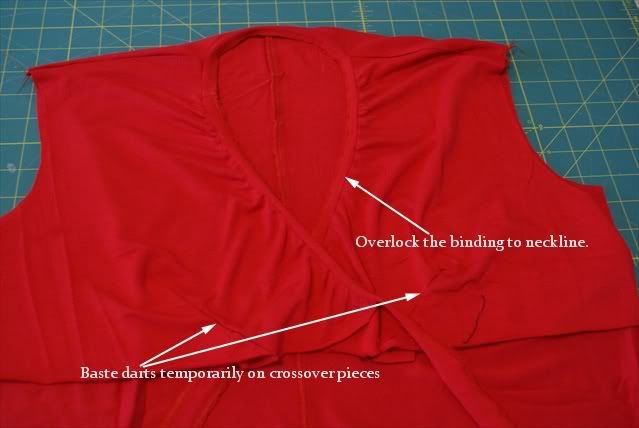
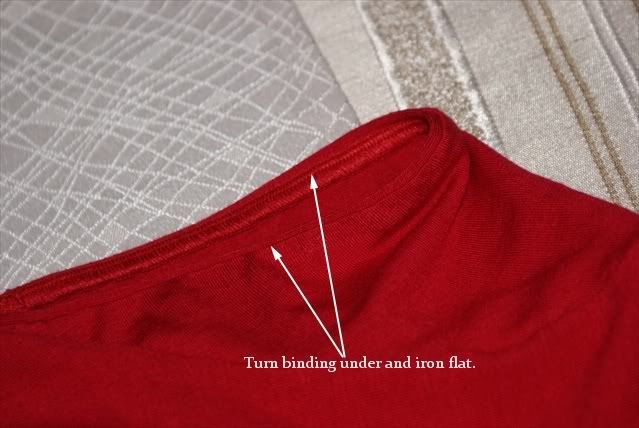
I also used the 1 inch strips, folded over and overlocked it to the neckline, binding on top. Then turn over and iron flat.
However, I made the mistake of stretching the binding as I sewed, which means that the neckline shrank too much. I had to compensate by using a decorative stretch stitch to even out the neck binding, stretching the neckline as I sewed.
The darts are then basted temporarily.
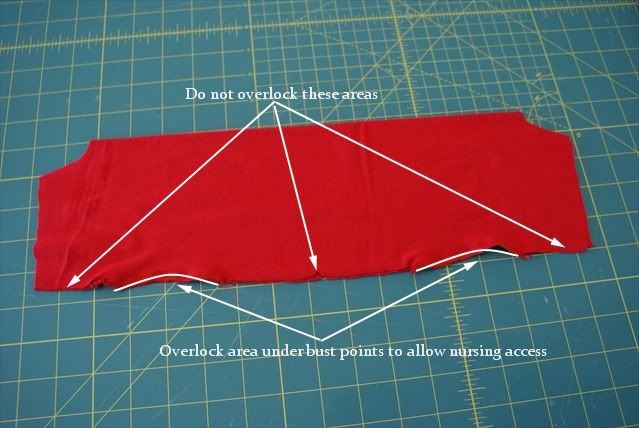
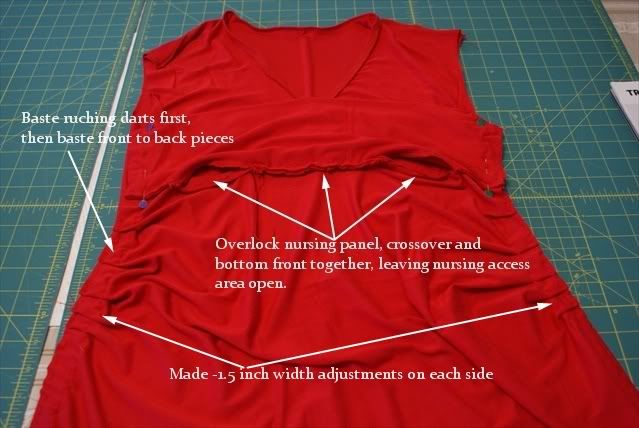
With the nursing panel, I overlocked around 3 inches of the bottom under the bust points. These areas will hang free, the other remaining areas will be sewn onto the crossover and bottom front ruched piece.
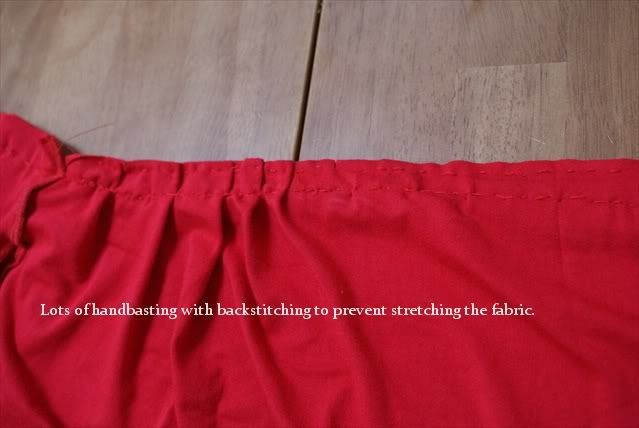
The ruched piece had to be gathered to produce the darts. I did this by handbasting and backstitching, adjusting it to fit the back pattern piece. The backstitching again helps to reduce stretching the fabric during overlocking.
Here I've attached the bottom front ruched piece to the crossover, as well as the nursing panel. But I hand basted the side seams first to try on the fit. It was too large, so I took in about 1 1/2 inches from both side seams. Also, I noticed that the underbust seam was stretched out, which made it look bunched up. There were 4 layers of fabric going under the overlocker and it shifted and stretched like crazy. At this point I decided to add a little belt under the bustline to hide the weird look going on there.
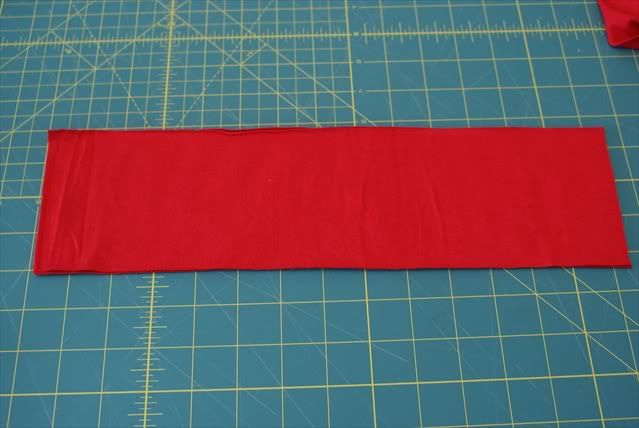
To make the belt, I just cut out a double layer of fabric, a little shorter in width to the underbust line, about 4 inches wide. Foldover (so that there is now 4 layers instead of just two), and overlock, then turn inside out. I chose to use 4 layers instead of 2 because I wanted it to maintain it's shape. I felt that having less layers would probably mean the belt will bunch up and fold onto itself, and lose definition.
I inserted the ends of the belt to the side seams, making sure that it was positioned to hide the ugly underbust seam.
I tried the fit and had to redo the side seams several times to get a really good fit. Basting is so important! It is easier to do by hand, because it is easier to rip out than machine stitching. Also, with handstitching, you control the stretch-machine stitching is liable to stretch the fabric out of shape.
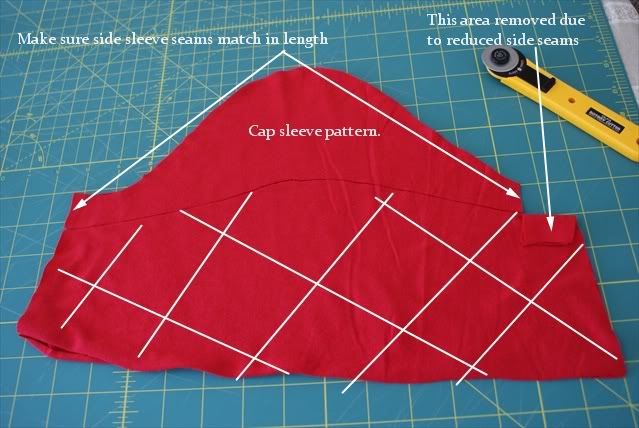
At this point I basted the sleeves and decided that I wanted cap sleeves instead of the original t-shirt sleeves I'd cut out. So I cut away the excess as per below.
Because the side seams of the main bodice had reduced substantially, I had to remove the under sleeve seam area too to match the new sleeve hole.
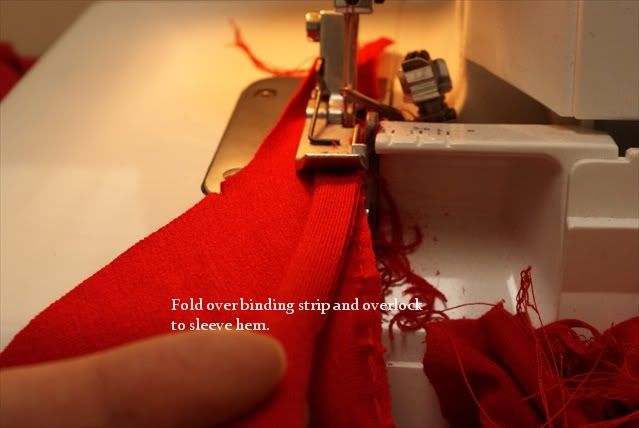
To make the sleeve, I folded the 1 inch strips over, and overlocked it to the sleeve, binding side up. Then iron flat.
Depending on the look you want, you can either stretch the binding as you sew, or not. If you stretch it out, the cap sleeve will look gathered. I decided not to. Here is what the sleeve looks like attached to the bodice.
To finish the hem, I cut out 1 inch bias strips of knit fusible interfacing, fused it to the hem, overlocked it, then foldover, and topstitch with twin needles.
And iron every seam.
Voila!
I'm very pleased with how this turned out. The little belt helps hide the major flaw in this top (due to my carelessness). I like how the cap sleeves turned out, and I'm very happy with the fit. The fabric is super comfy and very nice on the skin.
I hope to wear this after the birth-hopefully the bottom ruched bit won't sag too much! The nursing access would be really handy to have. Tops like these got for $70-80 at maternity boutiques, and around $30 at Target. So I've saved heaps!
I hope this tutorial was useful to you! If it was, please leave a comment! I'd love to hear from you!
I had some red 4 way stretch jersey in my stash. I can't remember where I picked it up. But it was really soft and stretchy. I had used up quite a lot for an All Saints Day costume night, and I didn't think I'd have enough to make a top. But surprise, surprise! I needed only around 1 metre.
This post will be a tutorial on how I put this top together, as well as how to convert it to a nursing top with hidden access as well.
The Burda maternity top is from the June 2010 issue, number 131.
The sizing I chose was based on my high bust measurement (around the top of your ribcage rather than around the bustline). I cut out size 38, but had to shorten the length a total of 4cm, as it was drafted for a person much taller.
In the above, you can see where I slashed the pieces horizontally to reduce length at several different places, to distribute the adjustments more evenly. Also, I anticipated a gaping neckline, a problem I had before with a Burda top.
I cut out my pieces with a rotary cutter. Love that tool! Cutting out isn't a chore anymore. At this point I also decided to make this a nursing top, and I added a nursing panel.
I didn't make a pattern for it, just based it on the crossover piece. I cut on folded lengthwise and width wise, with the latter fold on the centre front line of the crossover piece. The side seam was angled to match the side of the crossover piece once the dart was taken in.
Once you open it up, you can see that it matched the crossover piece at the side seams.
First step is to join the shoulder seams of the crossover pieces to the back piece. I wasn't very careful and stretched the jersey a bit here. In hindsight I would have used a walkingfoot on the sewing machine with long basting stitches, or handstiched it with backstitches at every inch interval.
I also used the 1 inch strips, folded over and overlocked it to the neckline, binding on top. Then turn over and iron flat.
However, I made the mistake of stretching the binding as I sewed, which means that the neckline shrank too much. I had to compensate by using a decorative stretch stitch to even out the neck binding, stretching the neckline as I sewed.
The darts are then basted temporarily.
With the nursing panel, I overlocked around 3 inches of the bottom under the bust points. These areas will hang free, the other remaining areas will be sewn onto the crossover and bottom front ruched piece.
The ruched piece had to be gathered to produce the darts. I did this by handbasting and backstitching, adjusting it to fit the back pattern piece. The backstitching again helps to reduce stretching the fabric during overlocking.
Here I've attached the bottom front ruched piece to the crossover, as well as the nursing panel. But I hand basted the side seams first to try on the fit. It was too large, so I took in about 1 1/2 inches from both side seams. Also, I noticed that the underbust seam was stretched out, which made it look bunched up. There were 4 layers of fabric going under the overlocker and it shifted and stretched like crazy. At this point I decided to add a little belt under the bustline to hide the weird look going on there.
To make the belt, I just cut out a double layer of fabric, a little shorter in width to the underbust line, about 4 inches wide. Foldover (so that there is now 4 layers instead of just two), and overlock, then turn inside out. I chose to use 4 layers instead of 2 because I wanted it to maintain it's shape. I felt that having less layers would probably mean the belt will bunch up and fold onto itself, and lose definition.
I inserted the ends of the belt to the side seams, making sure that it was positioned to hide the ugly underbust seam.
I tried the fit and had to redo the side seams several times to get a really good fit. Basting is so important! It is easier to do by hand, because it is easier to rip out than machine stitching. Also, with handstitching, you control the stretch-machine stitching is liable to stretch the fabric out of shape.
At this point I basted the sleeves and decided that I wanted cap sleeves instead of the original t-shirt sleeves I'd cut out. So I cut away the excess as per below.
Because the side seams of the main bodice had reduced substantially, I had to remove the under sleeve seam area too to match the new sleeve hole.
To make the sleeve, I folded the 1 inch strips over, and overlocked it to the sleeve, binding side up. Then iron flat.
Depending on the look you want, you can either stretch the binding as you sew, or not. If you stretch it out, the cap sleeve will look gathered. I decided not to. Here is what the sleeve looks like attached to the bodice.
To finish the hem, I cut out 1 inch bias strips of knit fusible interfacing, fused it to the hem, overlocked it, then foldover, and topstitch with twin needles.
And iron every seam.
Voila!
I'm very pleased with how this turned out. The little belt helps hide the major flaw in this top (due to my carelessness). I like how the cap sleeves turned out, and I'm very happy with the fit. The fabric is super comfy and very nice on the skin.
I hope to wear this after the birth-hopefully the bottom ruched bit won't sag too much! The nursing access would be really handy to have. Tops like these got for $70-80 at maternity boutiques, and around $30 at Target. So I've saved heaps!
I hope this tutorial was useful to you! If it was, please leave a comment! I'd love to hear from you!
Labels:
131 Burda,
Burda Magazine,
Maternity top,
Tutorial
Thursday, December 23, 2010
Black And White Smock/Maternity Top
My, it's been a while. And 2 days till Christmas! I've been busy busy busy-tidying up house, getting rid of unused things, doing some spring cleaning, running after my Little Wyld Man, who isn't so little anymore. And also, I'm pregnant again! In between getting all of these done, I managed to pull together a simple smock from a Burda magazine, using some left over material from my maternity/nursing cocktail dress.
I was itching to sew something, but was too lazy to draft from scratch, so I decided I must make something quick and simple. I had some Burda magazines from the library and this little number caught my eye.

I love the simple lines, the yoke, and the pleats, which will allow for a growing belly. This is how it was made up in the magazine-in plaid.

I wasn't too big on it, but I really liked the stylelines, and decided to make it.

This is the pattern sheet. You have to find the correct colour codes for the pattern which can get confusing. In this case, I'm using the patterns outlined in blue. Burda patterns come without seam allowances, so you have to add them yourself.

I traced out the pattern using some tracing paper, and added a 5/8 of an inch seam allowance. You can use anything see through that is big enough, such as cheap sew-in interfacing, or even freezer paper taped together.

I've cut out my pattern pieces. This is a simple pattern, so only 6 pieces altogether. Should come together pretty quickly. I've labelled each piece so that you'll know what I'm referring to below.
The pattern markings must be marked onto the fabric at this point. I used to use tailor's tacks, but now I just make a 3/5 inch snip into the seam allowance to mark centre points, pleating points, etc.

I've also cut out fusible interfacing for the facing front and back pieces, as well as the yoke. The fusible interfacing I'm using is a tricot knit, which is suitable for most light and medium weight materials. The interfacing serves to stabilise the area, and by this I mean that it will stop the fabric from stretching as you sew and handle it. It also prevents wrinkles and gives a bit more body to the fabric, although you don't want to use interfacing that is too heavy, as this will change the hand/feel of the fabric undesirably. The interfacing should be cut using the same pattern piece, or slightly smaller.
To fuse, press with an up-down motion on a steam and wool setting till it fuses to the fabric. Wait till cool before moving.
Before stitching anything together, I finish the edges with my overlocker. Or you can use a zigzag stitch with a normal sewing machine.

Here, I've stitched the pleats in the front first. My order of construction is always to finish the details on the front garment, piece all front pieces together, then finish back details such as the zipper, and joint the front to the back at the shoulder seams and side seams. The sleeves and hem are last.
In stitching the pleats, the pattern markings and centre points guide me and I don't struggle to measure the pleating afterwards. I stitch vertically at each pleat to keep the pleats together, then horizontally across the pleats and the whole neckline.

The front yoke is joined to the main front, matching the centre points in the middle. The seam allowance is pressed upwards at the back.

Here's I'm stitching the side seams. The shoulder seams are next. When this is done, test for fit. As this was a loose smock, the fit aside from the shoulders, weren't essential. This top was drafted with a zipper in the back. When I tried it on, I found that it slipped easily over my head and shoulders, so I decided to omit the zipper.
Press the seams open and flat.

Here, I'm stitching the back neck facings together at the centre back seam. Next the back neck facing is joined to the front neck facing at the shoulder seams.

This is what it looks like. Press the seams open and flat. Remember, sew and press as you go.

Join the facing to the main garment at the neck edge, lining shoulder seams on both facing and main garment together. Make sure the centre points of the facing matches the centre point on the main garment. Sew with 5/8 inch seam allowance.
When this is done, turn the facing underneath and this finishes the neckline edge. However, you will find that it flips upwards very inconveniently. To remedy, you'll need to understitch.

Open up the facing, and use your fingers to press the seam allowance towards the facing. Position your needle so that it is close to the seam line, but not on it, towards the facing. Sew the seam allowances to the facing. This is called understitching. This keeps the facing from flipping up a certain extent. However, you'll need to clip the seam allowance as per below.

Clip at 1 inch intervals, or less where there is a sharper curve. This releases the fabric and lets it lie flat when you turn the facing under. Be careful to clip close to, but not onto the stitching line.
Next, we finish the hem on the sleeve.

I'm doing a double rolled hem by hand-you can do it by a narrow hemming foot, but I wanted to try this technique instead. Turn the edge wrong sides together around 1/4 inch and sew close to the edge. Using the tailor's awl helps immensely as the sharp point guides the hem under the presser foot.

Now turn over the second time and do the same. Press the hem flat.
Before sewing the sleeve into the armhole, you have to prepare the sleeve for 'easing'. The sleeve cap is drafted with extra length, usually about 1-2 cm longer than the armhole. The extra fabric must be eased into the armhole without puckering. This can be a challenge, but with practice comes perfection. To prepare the sleeve, sew a gathering stitch (I use the longest stitch length) inside the seam allowance.

The pattern will have a dot/mark where easing begins. Sew from this point with big stitches. Do not backstitch. Leave a long thread length at each end.

Pull the gathering threads and gather the sleeve cap evenly. The gathers must be 'gentle' rather than 'hard'.

Pin the sleeve cap onto the armhole wtih as many pins as you need. As this is a cap sleeve, and not a full sleeve, find the markings on the armhole where the sleep cap begins and ends. The 1/3 of the lower armhole will be finished with a bias binding. Stitch sleeve to armhole at 5/8 inch seam allowance.

For the bias binding, I cut 1 inch strips on the bias, 16cm in length. These need to be folded in half and pressed. As this is on the bias, it is stretchy and can be shaped into a curve by pressing, as per below.

To attach the binding to the lower armhole, pin the so that the folded edge sits 2.7cm from the armhole edge.

Why 2.7cm? Because it is 5/8 inch plus 1cm. And when you stitch it in 5/8 inch from the armhole edge,and turn the bias binding under, it will match the finished edge of the cap sleeve perfectly. Magic!

Sew 5/8 inch from the edge of the armhole, catching the middle of the bias binding.

Trim aways the ends of the binding, and the seam allowance so that only 1/4 of the bias binding remains.

Turn under and edgestitch close to the edge, making sure the stitching catches and holds the bias binding underneath. Press flat.
Hem the bottom with a double rolled hem.
Finito!

Front view.

Back view.

Closeup of the front.
I'm rather pleased with this top. However, the neckline does gape a bit. So the next time I use this pattern, I'll do a slight gaposis adjustment. But for now, Merry Christmas everyone!
I was itching to sew something, but was too lazy to draft from scratch, so I decided I must make something quick and simple. I had some Burda magazines from the library and this little number caught my eye.
I love the simple lines, the yoke, and the pleats, which will allow for a growing belly. This is how it was made up in the magazine-in plaid.
I wasn't too big on it, but I really liked the stylelines, and decided to make it.
This is the pattern sheet. You have to find the correct colour codes for the pattern which can get confusing. In this case, I'm using the patterns outlined in blue. Burda patterns come without seam allowances, so you have to add them yourself.
I traced out the pattern using some tracing paper, and added a 5/8 of an inch seam allowance. You can use anything see through that is big enough, such as cheap sew-in interfacing, or even freezer paper taped together.
I've cut out my pattern pieces. This is a simple pattern, so only 6 pieces altogether. Should come together pretty quickly. I've labelled each piece so that you'll know what I'm referring to below.
The pattern markings must be marked onto the fabric at this point. I used to use tailor's tacks, but now I just make a 3/5 inch snip into the seam allowance to mark centre points, pleating points, etc.
I've also cut out fusible interfacing for the facing front and back pieces, as well as the yoke. The fusible interfacing I'm using is a tricot knit, which is suitable for most light and medium weight materials. The interfacing serves to stabilise the area, and by this I mean that it will stop the fabric from stretching as you sew and handle it. It also prevents wrinkles and gives a bit more body to the fabric, although you don't want to use interfacing that is too heavy, as this will change the hand/feel of the fabric undesirably. The interfacing should be cut using the same pattern piece, or slightly smaller.
To fuse, press with an up-down motion on a steam and wool setting till it fuses to the fabric. Wait till cool before moving.
Before stitching anything together, I finish the edges with my overlocker. Or you can use a zigzag stitch with a normal sewing machine.
Here, I've stitched the pleats in the front first. My order of construction is always to finish the details on the front garment, piece all front pieces together, then finish back details such as the zipper, and joint the front to the back at the shoulder seams and side seams. The sleeves and hem are last.
In stitching the pleats, the pattern markings and centre points guide me and I don't struggle to measure the pleating afterwards. I stitch vertically at each pleat to keep the pleats together, then horizontally across the pleats and the whole neckline.
The front yoke is joined to the main front, matching the centre points in the middle. The seam allowance is pressed upwards at the back.
Here's I'm stitching the side seams. The shoulder seams are next. When this is done, test for fit. As this was a loose smock, the fit aside from the shoulders, weren't essential. This top was drafted with a zipper in the back. When I tried it on, I found that it slipped easily over my head and shoulders, so I decided to omit the zipper.
Press the seams open and flat.
Here, I'm stitching the back neck facings together at the centre back seam. Next the back neck facing is joined to the front neck facing at the shoulder seams.
This is what it looks like. Press the seams open and flat. Remember, sew and press as you go.
Join the facing to the main garment at the neck edge, lining shoulder seams on both facing and main garment together. Make sure the centre points of the facing matches the centre point on the main garment. Sew with 5/8 inch seam allowance.
When this is done, turn the facing underneath and this finishes the neckline edge. However, you will find that it flips upwards very inconveniently. To remedy, you'll need to understitch.
Open up the facing, and use your fingers to press the seam allowance towards the facing. Position your needle so that it is close to the seam line, but not on it, towards the facing. Sew the seam allowances to the facing. This is called understitching. This keeps the facing from flipping up a certain extent. However, you'll need to clip the seam allowance as per below.
Clip at 1 inch intervals, or less where there is a sharper curve. This releases the fabric and lets it lie flat when you turn the facing under. Be careful to clip close to, but not onto the stitching line.
Next, we finish the hem on the sleeve.
I'm doing a double rolled hem by hand-you can do it by a narrow hemming foot, but I wanted to try this technique instead. Turn the edge wrong sides together around 1/4 inch and sew close to the edge. Using the tailor's awl helps immensely as the sharp point guides the hem under the presser foot.
Now turn over the second time and do the same. Press the hem flat.
Before sewing the sleeve into the armhole, you have to prepare the sleeve for 'easing'. The sleeve cap is drafted with extra length, usually about 1-2 cm longer than the armhole. The extra fabric must be eased into the armhole without puckering. This can be a challenge, but with practice comes perfection. To prepare the sleeve, sew a gathering stitch (I use the longest stitch length) inside the seam allowance.
The pattern will have a dot/mark where easing begins. Sew from this point with big stitches. Do not backstitch. Leave a long thread length at each end.
Pull the gathering threads and gather the sleeve cap evenly. The gathers must be 'gentle' rather than 'hard'.
Pin the sleeve cap onto the armhole wtih as many pins as you need. As this is a cap sleeve, and not a full sleeve, find the markings on the armhole where the sleep cap begins and ends. The 1/3 of the lower armhole will be finished with a bias binding. Stitch sleeve to armhole at 5/8 inch seam allowance.
For the bias binding, I cut 1 inch strips on the bias, 16cm in length. These need to be folded in half and pressed. As this is on the bias, it is stretchy and can be shaped into a curve by pressing, as per below.
To attach the binding to the lower armhole, pin the so that the folded edge sits 2.7cm from the armhole edge.
Why 2.7cm? Because it is 5/8 inch plus 1cm. And when you stitch it in 5/8 inch from the armhole edge,and turn the bias binding under, it will match the finished edge of the cap sleeve perfectly. Magic!
Sew 5/8 inch from the edge of the armhole, catching the middle of the bias binding.
Trim aways the ends of the binding, and the seam allowance so that only 1/4 of the bias binding remains.
Turn under and edgestitch close to the edge, making sure the stitching catches and holds the bias binding underneath. Press flat.
Hem the bottom with a double rolled hem.
Finito!
Front view.
Back view.
Closeup of the front.
I'm rather pleased with this top. However, the neckline does gape a bit. So the next time I use this pattern, I'll do a slight gaposis adjustment. But for now, Merry Christmas everyone!
Labels:
115A 5/2009,
Burda,
Burda Magazine,
Fashion,
Garment Construction,
Maternity,
Maternity Smock top,
Maternity Wear,
Sewing,
Top,
Tutorial
Friday, September 24, 2010
Burda 6/09 Sunburst Pleat Front Dress
I first read about Burda magazines in some sewing blog and was fascinated by the concept of a fashion magazine with real patterns. Since then I always kept a lookout for it at newsagents-not all stock them. Borders carried them till recently. I 've been hunting for back issues to read and found that the Payneham library carried them-so I bacame a member (despite already being able to borrow from 5 libraries.)
For those unfamiliar with it, Burda is a monthly German dress pattern magazine that has over 40 patterns in it which you can trace out and make. I don't usually buy it-to date I've only bought three issues. It's about $15.90 per mag and is good value for money if you make at least one garment from it every month. It has pictures of models wearing the designs, a page with line drawings, and an insert of patterns in various colours which you trace out. I like looking at the line drawings more than the pictures for the design ideas it inspires me to.
Of the 6 mags I borrowed, the June 09 issue had an interesting dress.
[caption id="" align="alignnone" width="440" caption="Burda 06/10"]
[/caption]
Pleat front jersey dress 102 Burda Jun 09
[caption id="" align="alignnone" width="224" caption="101 Burda 06/09 Pleat Front Dress"]
[/caption]
This is a clearer line drawing of it.
[caption id="" align="alignnone" width="400" caption="102 Line Drawing"]
[/caption]
I love the sunburst pleats and the pretty folds on the front. I formed an idea of a white dress with a black lace belt in this design and couldn't wait to get to it.
This is the instruction sheet in the magazine.
[caption id="" align="alignnone" width="426" caption="Instruction sheet"]
[/caption]
This is the pattern sheet. Each sheet is labelled alphabetically with patterns pieces printed on it. One sheet may have several garment patterns on it, and the patterns for different garments are differentiated with a different colour.
[caption id="" align="alignnone" width="450" caption="Pattern sheet"]
[/caption]
I trace out my pattern with sew-in interfacing, which is see-through and cheap. The Burda patterns do not have seam allowances added on to it, so here I am tracing around the patterns with a tracing tool-
[caption id="" align="alignnone" width="450" caption="Double pencils with a 5/8-inch spacer"]
[/caption]
-which I got at Lincraft.
I traced a size 38 all over, but I was actually a size 42 at the waist, and 40 at the hips. I was too lazy to grade up or down according the markings-it was hard to see and too tedious. I figured that since this is a stretch fabric, I'll just pin fit the sides later. Also, the patterns were drafted for an "average" person-but who is? I'm very short waisted, so you'll see in my pattern pieces below I've made a length adjustment by shortening it by 2cms.
[caption id="" align="alignnone" width="450" caption="Pattern pieces cut and altered."]
[/caption]
There are no construction photos-it was very quick to put together. The whole thing was sewn on my overlocker. The only thing that took some time was the front pleats.
The instructions said to baste the pleats together, and sew it onto the front lining piece and treat as one, and not to press the pleats. I was too lazy to baste and just sewed the pleats on permanently and pressed it anyway. But the effect aren't the soft folds as in the picture, which I do regret not following.
The instructions for the dress was for a zipper to be installed in the back. However, instead of cutting 2 back pieces, I cut it on the fold, so I decided to put an invisible zipper in the side seam.
One thing I found was that despite choosing the size 38, the whole dress was huge on me. I had to remove 2 inches on each side seam from top to bottom.
This is my finished dress.
[caption id="" align="alignnone" width="321" caption="Sunburst Pleated Dress"]
[/caption]
[caption id="" align="alignnone" width="321" caption="Back view"]
[/caption]
The lace belt is removable and this is what it looks like without it.
[caption id="" align="alignnone" width="301" caption="Dress plain."]
[/caption]
I wanted to be able to wear it casually, as well as to more dressy functions.
It didn't look so when the model wore it, but the neckline plunged too low for me. So I made a removable lace modesty panel.
[caption id="" align="alignnone" width="639" caption="Removable lace modesty panel"]
[/caption]
Here is a closeup of the lace belt, which is almost the favourite part of the dress for me. I wanted it to look like galoon lace, which I couldn't find at Spotlight, so I made do with what I had in my stash.
[caption id="" align="alignnone" width="639" caption="Lace belt"]
[/caption]
The belt was the hardest to do, as this is the first time I've dealt with lace in this context. This was actually a small fat quarter piece of lace that was given to me with one scalloped border. I decided to cut it down along a motif, baste it to a white sew-in interfacing (to show off the black lace), and then backed again with black knit fusible interfacing. The edges have been finished with an overcasting stitch through all three layers.
Here is a parting shot.
[caption id="" align="alignnone" width="321" caption="Front view"]
[/caption]
I really, REALLY like this dress, especially with the lace belt. Which one do you prefer?
For those unfamiliar with it, Burda is a monthly German dress pattern magazine that has over 40 patterns in it which you can trace out and make. I don't usually buy it-to date I've only bought three issues. It's about $15.90 per mag and is good value for money if you make at least one garment from it every month. It has pictures of models wearing the designs, a page with line drawings, and an insert of patterns in various colours which you trace out. I like looking at the line drawings more than the pictures for the design ideas it inspires me to.
Of the 6 mags I borrowed, the June 09 issue had an interesting dress.
[caption id="" align="alignnone" width="440" caption="Burda 06/10"]
Pleat front jersey dress 102 Burda Jun 09
[caption id="" align="alignnone" width="224" caption="101 Burda 06/09 Pleat Front Dress"]
This is a clearer line drawing of it.
[caption id="" align="alignnone" width="400" caption="102 Line Drawing"]
I love the sunburst pleats and the pretty folds on the front. I formed an idea of a white dress with a black lace belt in this design and couldn't wait to get to it.
This is the instruction sheet in the magazine.
[caption id="" align="alignnone" width="426" caption="Instruction sheet"]
This is the pattern sheet. Each sheet is labelled alphabetically with patterns pieces printed on it. One sheet may have several garment patterns on it, and the patterns for different garments are differentiated with a different colour.
[caption id="" align="alignnone" width="450" caption="Pattern sheet"]
I trace out my pattern with sew-in interfacing, which is see-through and cheap. The Burda patterns do not have seam allowances added on to it, so here I am tracing around the patterns with a tracing tool-
[caption id="" align="alignnone" width="450" caption="Double pencils with a 5/8-inch spacer"]
-which I got at Lincraft.
I traced a size 38 all over, but I was actually a size 42 at the waist, and 40 at the hips. I was too lazy to grade up or down according the markings-it was hard to see and too tedious. I figured that since this is a stretch fabric, I'll just pin fit the sides later. Also, the patterns were drafted for an "average" person-but who is? I'm very short waisted, so you'll see in my pattern pieces below I've made a length adjustment by shortening it by 2cms.
[caption id="" align="alignnone" width="450" caption="Pattern pieces cut and altered."]
There are no construction photos-it was very quick to put together. The whole thing was sewn on my overlocker. The only thing that took some time was the front pleats.
The instructions said to baste the pleats together, and sew it onto the front lining piece and treat as one, and not to press the pleats. I was too lazy to baste and just sewed the pleats on permanently and pressed it anyway. But the effect aren't the soft folds as in the picture, which I do regret not following.
The instructions for the dress was for a zipper to be installed in the back. However, instead of cutting 2 back pieces, I cut it on the fold, so I decided to put an invisible zipper in the side seam.
One thing I found was that despite choosing the size 38, the whole dress was huge on me. I had to remove 2 inches on each side seam from top to bottom.
This is my finished dress.
[caption id="" align="alignnone" width="321" caption="Sunburst Pleated Dress"]
[caption id="" align="alignnone" width="321" caption="Back view"]
The lace belt is removable and this is what it looks like without it.
[caption id="" align="alignnone" width="301" caption="Dress plain."]
I wanted to be able to wear it casually, as well as to more dressy functions.
It didn't look so when the model wore it, but the neckline plunged too low for me. So I made a removable lace modesty panel.
[caption id="" align="alignnone" width="639" caption="Removable lace modesty panel"]
Here is a closeup of the lace belt, which is almost the favourite part of the dress for me. I wanted it to look like galoon lace, which I couldn't find at Spotlight, so I made do with what I had in my stash.
[caption id="" align="alignnone" width="639" caption="Lace belt"]
The belt was the hardest to do, as this is the first time I've dealt with lace in this context. This was actually a small fat quarter piece of lace that was given to me with one scalloped border. I decided to cut it down along a motif, baste it to a white sew-in interfacing (to show off the black lace), and then backed again with black knit fusible interfacing. The edges have been finished with an overcasting stitch through all three layers.
Here is a parting shot.
[caption id="" align="alignnone" width="321" caption="Front view"]
I really, REALLY like this dress, especially with the lace belt. Which one do you prefer?
Labels:
101 June 2009,
Burda,
Burda Magazine,
Dress,
Fashion,
Lace belt,
Lace Modesty Panel,
Pattern Drafting Book,
Pleat Front Dress
Subscribe to:
Posts (Atom)