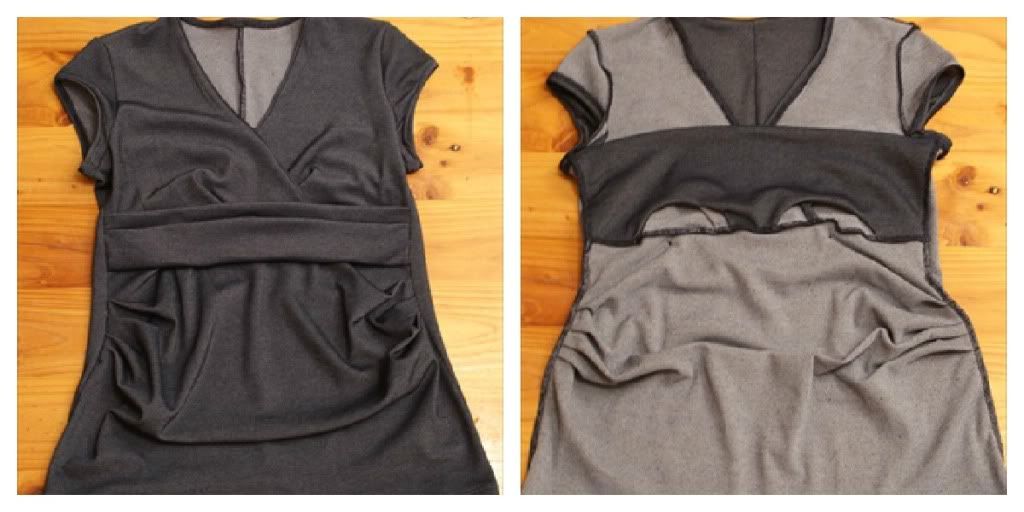
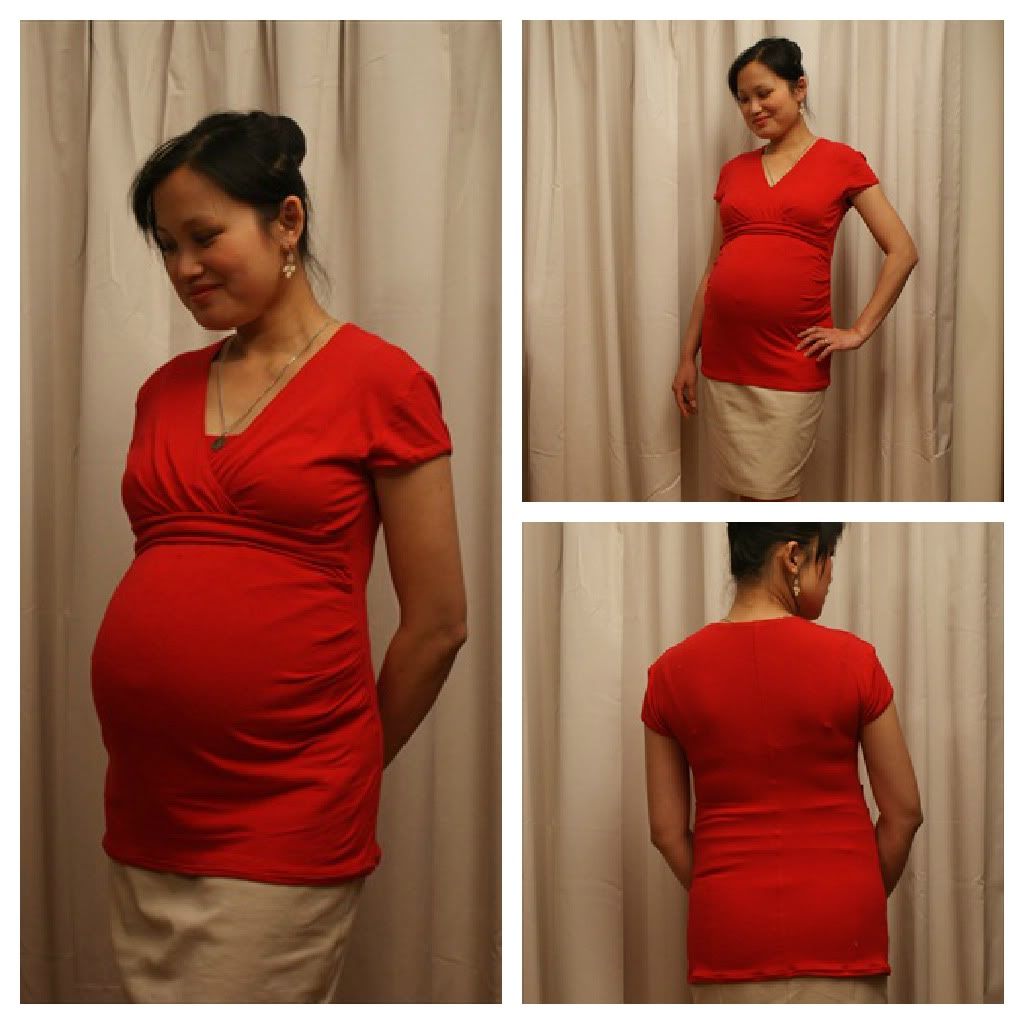
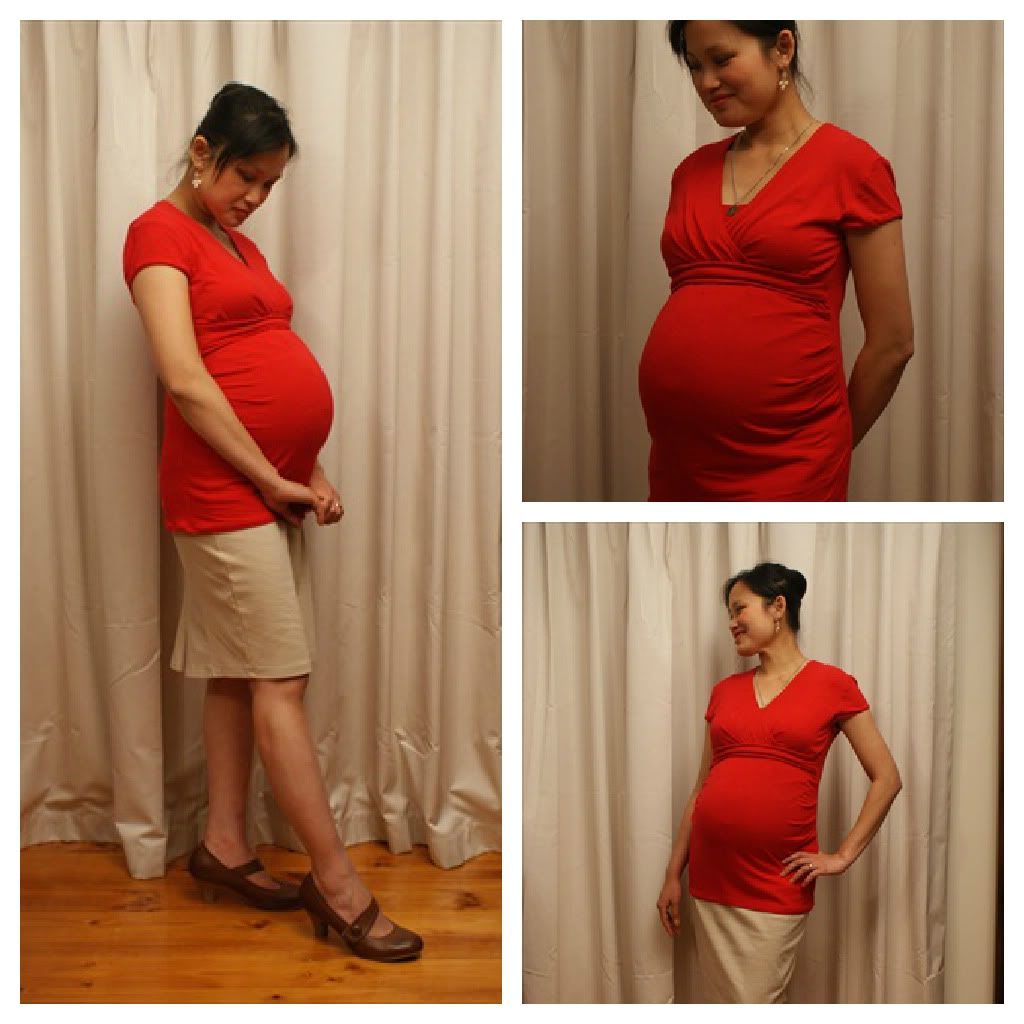
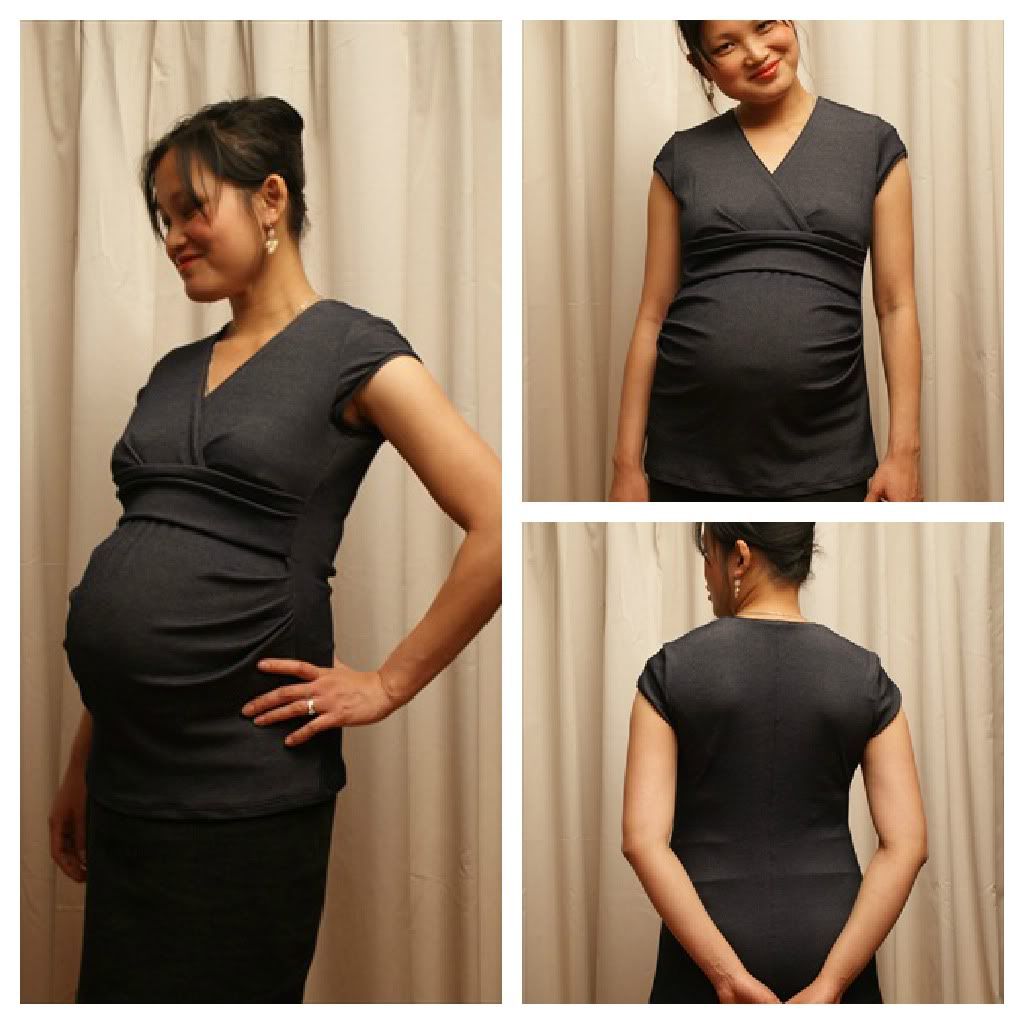
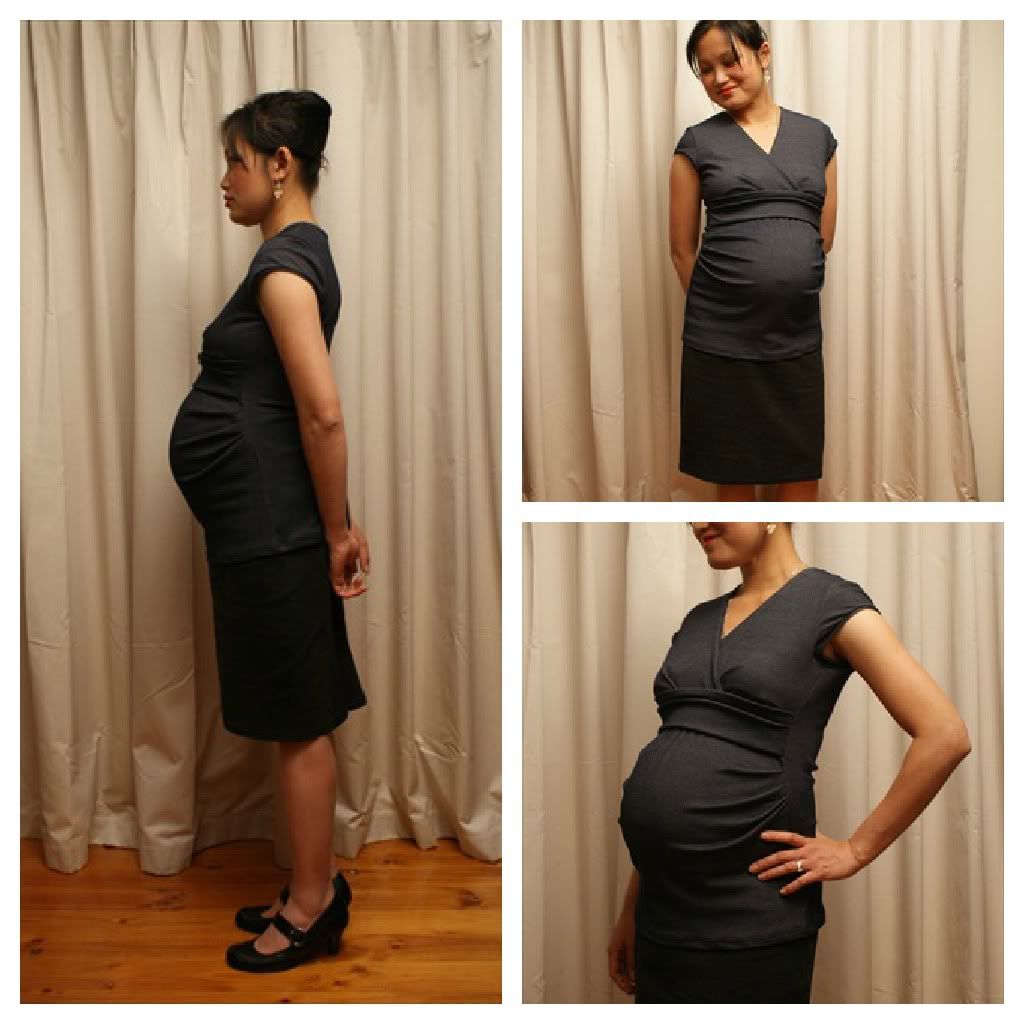
I loved how my red Burda maternity top turned out so much that I raided my stash and found something suitable to make another. I picked it up at Spotlight eons ago and meant to use it for the maternity panels in skirts. I did use up a tiny bit, but there was at least 1.4 metres of the stuff left. I'm not sure what it's made of, but it's a denim-look knit of medium weight.
Construction was very similar to the red Burda top, and I finished it in one day, despite massive amounts of handsewing.
The only real difference is the belt-I folded it so that it sort of looks like a cummerbund. Also, my nursing access is larger and neater, the latter because I sewed around the nursing area, then turned it inside out and ironed it, so that when you're looking at it from the inside, there are no raw edges.
However, my hem is a little twisted-I fused it with knit interfacing, ironed the hem fold, and topstitched very carefully, but it always ends up twisted, stretched and off grain. Anyone have any tips on how to avoid this?
I really, really like this top-it looks slightly dressy, despite the denim look. But I'll wear the heck out of it these coming weeks as the due date looms and belly blooms bigger!
The pattern for this top is definitely a winner. I would love to make a dress next-just need to draft a skirt for it. I'll also be making a post-birth pattern based on this. I love the way it fits, and the sleeves are perfect too! I've been wanting to draft a pattern for stretchy knits for ages, but fitting the sleeves always discouraged me. I'll use this pattern to develop other styles-maternity and non-maternity.
Till the next post!
Showing posts with label Maternity top. Show all posts
Thursday, October 18, 2012
Denim Jersey Burdastyle 131 Maternity Top
Wednesday, October 17, 2012
Red Burdastyle Maternity Top 131 June 2010 Tutorial
So. I'm pregnant again. And I'm less than 7 weeks away till bubba 3 pops out. I've been busy with my two toddlers. Monkey will be 3 soon, and Hippo will be 18 months in Dec. Things have been going really well I reckon. And I decided that it's been too long since I posted and I've been itching to sew something. I haven't sewn anything in ages, persuading myself that with two toddlers it would be next to impossible. But last week I suddenly felt my sewing mojo coming back, buckled down and picked out a Burda maternity pattern, decided that I was going to take my sweet time, and finished a top in 3 days. It helps when the little creatures have a good routine.
I had some red 4 way stretch jersey in my stash. I can't remember where I picked it up. But it was really soft and stretchy. I had used up quite a lot for an All Saints Day costume night, and I didn't think I'd have enough to make a top. But surprise, surprise! I needed only around 1 metre.
This post will be a tutorial on how I put this top together, as well as how to convert it to a nursing top with hidden access as well.
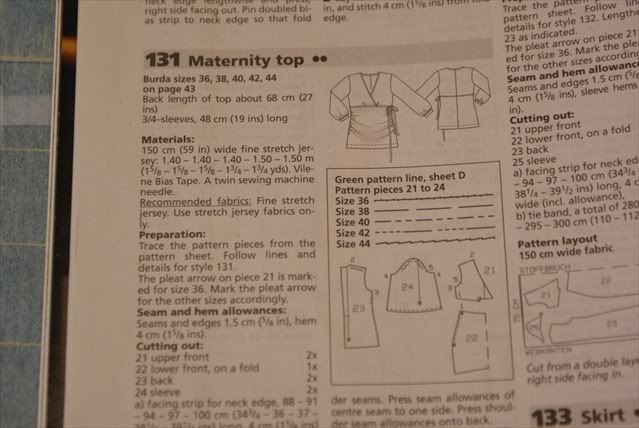
The Burda maternity top is from the June 2010 issue, number 131.
The sizing I chose was based on my high bust measurement (around the top of your ribcage rather than around the bustline). I cut out size 38, but had to shorten the length a total of 4cm, as it was drafted for a person much taller.
In the above, you can see where I slashed the pieces horizontally to reduce length at several different places, to distribute the adjustments more evenly. Also, I anticipated a gaping neckline, a problem I had before with a Burda top.
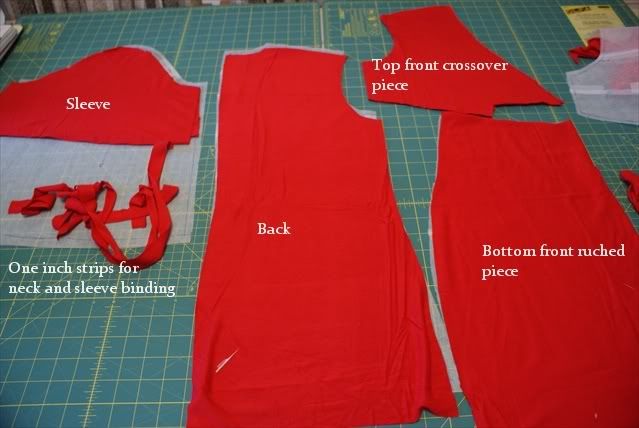
I cut out my pieces with a rotary cutter. Love that tool! Cutting out isn't a chore anymore. At this point I also decided to make this a nursing top, and I added a nursing panel.
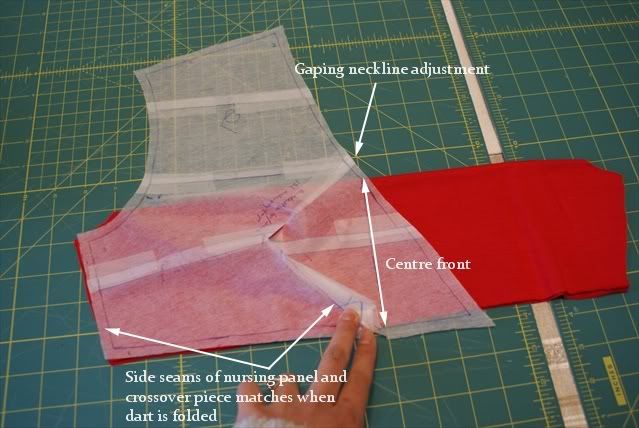
I didn't make a pattern for it, just based it on the crossover piece. I cut on folded lengthwise and width wise, with the latter fold on the centre front line of the crossover piece. The side seam was angled to match the side of the crossover piece once the dart was taken in.
Once you open it up, you can see that it matched the crossover piece at the side seams.
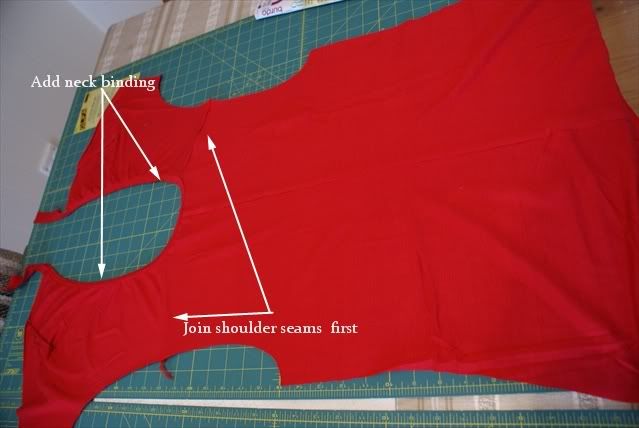
First step is to join the shoulder seams of the crossover pieces to the back piece. I wasn't very careful and stretched the jersey a bit here. In hindsight I would have used a walkingfoot on the sewing machine with long basting stitches, or handstiched it with backstitches at every inch interval.
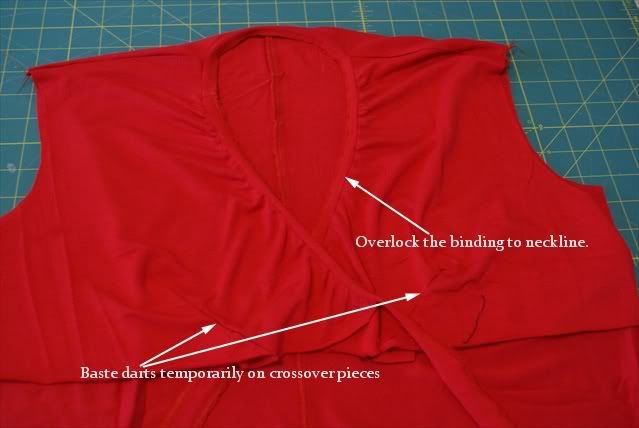
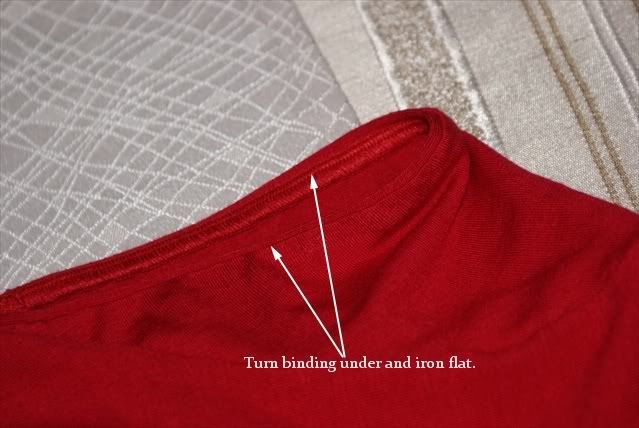
I also used the 1 inch strips, folded over and overlocked it to the neckline, binding on top. Then turn over and iron flat.
However, I made the mistake of stretching the binding as I sewed, which means that the neckline shrank too much. I had to compensate by using a decorative stretch stitch to even out the neck binding, stretching the neckline as I sewed.
The darts are then basted temporarily.
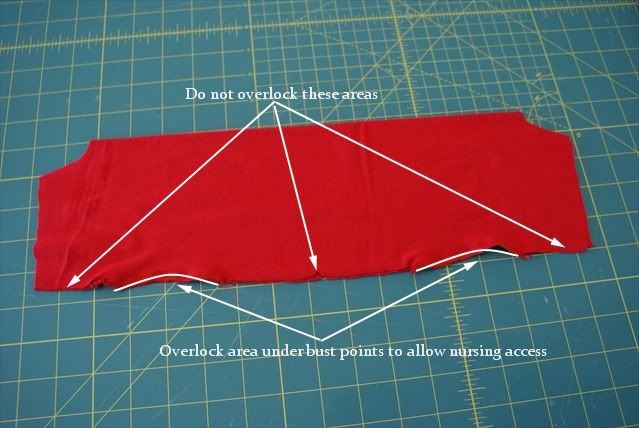
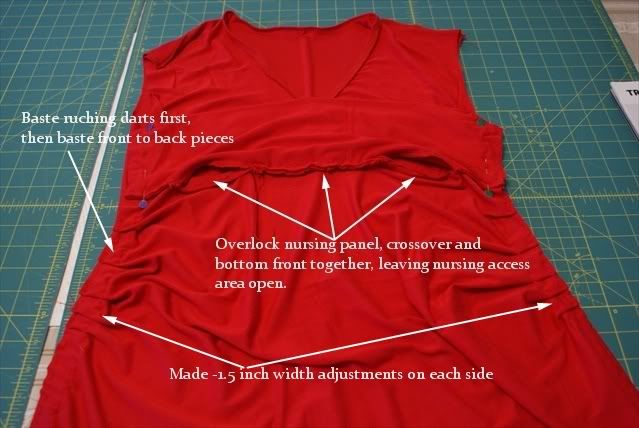
With the nursing panel, I overlocked around 3 inches of the bottom under the bust points. These areas will hang free, the other remaining areas will be sewn onto the crossover and bottom front ruched piece.
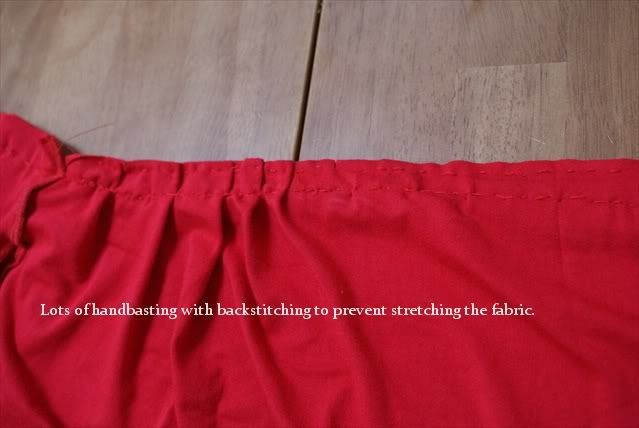
The ruched piece had to be gathered to produce the darts. I did this by handbasting and backstitching, adjusting it to fit the back pattern piece. The backstitching again helps to reduce stretching the fabric during overlocking.
Here I've attached the bottom front ruched piece to the crossover, as well as the nursing panel. But I hand basted the side seams first to try on the fit. It was too large, so I took in about 1 1/2 inches from both side seams. Also, I noticed that the underbust seam was stretched out, which made it look bunched up. There were 4 layers of fabric going under the overlocker and it shifted and stretched like crazy. At this point I decided to add a little belt under the bustline to hide the weird look going on there.
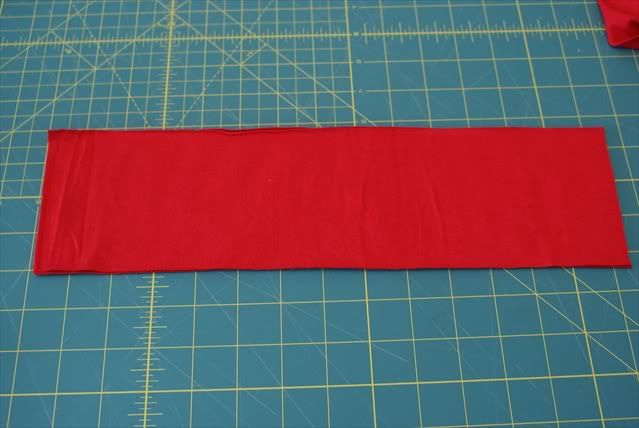
To make the belt, I just cut out a double layer of fabric, a little shorter in width to the underbust line, about 4 inches wide. Foldover (so that there is now 4 layers instead of just two), and overlock, then turn inside out. I chose to use 4 layers instead of 2 because I wanted it to maintain it's shape. I felt that having less layers would probably mean the belt will bunch up and fold onto itself, and lose definition.
I inserted the ends of the belt to the side seams, making sure that it was positioned to hide the ugly underbust seam.
I tried the fit and had to redo the side seams several times to get a really good fit. Basting is so important! It is easier to do by hand, because it is easier to rip out than machine stitching. Also, with handstitching, you control the stretch-machine stitching is liable to stretch the fabric out of shape.
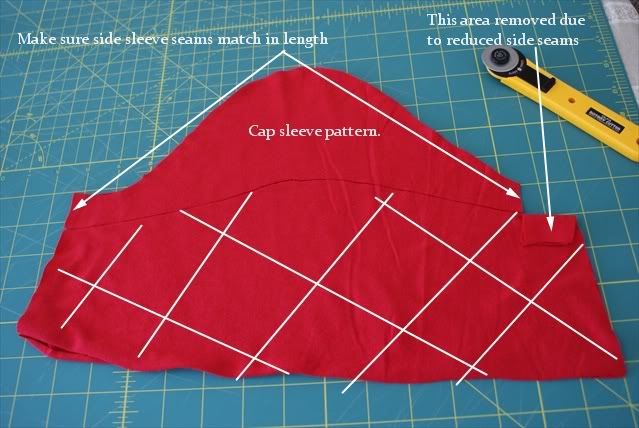
At this point I basted the sleeves and decided that I wanted cap sleeves instead of the original t-shirt sleeves I'd cut out. So I cut away the excess as per below.
Because the side seams of the main bodice had reduced substantially, I had to remove the under sleeve seam area too to match the new sleeve hole.
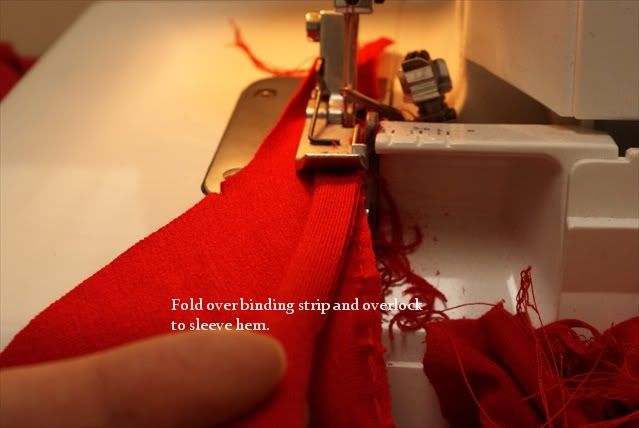
To make the sleeve, I folded the 1 inch strips over, and overlocked it to the sleeve, binding side up. Then iron flat.
Depending on the look you want, you can either stretch the binding as you sew, or not. If you stretch it out, the cap sleeve will look gathered. I decided not to. Here is what the sleeve looks like attached to the bodice.
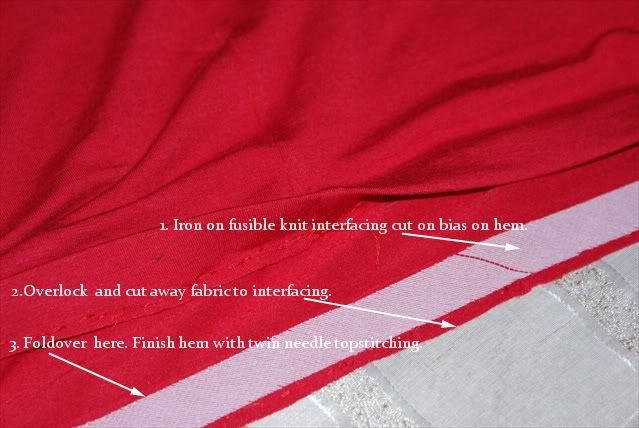
To finish the hem, I cut out 1 inch bias strips of knit fusible interfacing, fused it to the hem, overlocked it, then foldover, and topstitch with twin needles.
And iron every seam.
Voila!
I'm very pleased with how this turned out. The little belt helps hide the major flaw in this top (due to my carelessness). I like how the cap sleeves turned out, and I'm very happy with the fit. The fabric is super comfy and very nice on the skin.
I hope to wear this after the birth-hopefully the bottom ruched bit won't sag too much! The nursing access would be really handy to have. Tops like these got for $70-80 at maternity boutiques, and around $30 at Target. So I've saved heaps!
I hope this tutorial was useful to you! If it was, please leave a comment! I'd love to hear from you!
I had some red 4 way stretch jersey in my stash. I can't remember where I picked it up. But it was really soft and stretchy. I had used up quite a lot for an All Saints Day costume night, and I didn't think I'd have enough to make a top. But surprise, surprise! I needed only around 1 metre.
This post will be a tutorial on how I put this top together, as well as how to convert it to a nursing top with hidden access as well.
The Burda maternity top is from the June 2010 issue, number 131.
The sizing I chose was based on my high bust measurement (around the top of your ribcage rather than around the bustline). I cut out size 38, but had to shorten the length a total of 4cm, as it was drafted for a person much taller.
In the above, you can see where I slashed the pieces horizontally to reduce length at several different places, to distribute the adjustments more evenly. Also, I anticipated a gaping neckline, a problem I had before with a Burda top.
I cut out my pieces with a rotary cutter. Love that tool! Cutting out isn't a chore anymore. At this point I also decided to make this a nursing top, and I added a nursing panel.
I didn't make a pattern for it, just based it on the crossover piece. I cut on folded lengthwise and width wise, with the latter fold on the centre front line of the crossover piece. The side seam was angled to match the side of the crossover piece once the dart was taken in.
Once you open it up, you can see that it matched the crossover piece at the side seams.
First step is to join the shoulder seams of the crossover pieces to the back piece. I wasn't very careful and stretched the jersey a bit here. In hindsight I would have used a walkingfoot on the sewing machine with long basting stitches, or handstiched it with backstitches at every inch interval.
I also used the 1 inch strips, folded over and overlocked it to the neckline, binding on top. Then turn over and iron flat.
However, I made the mistake of stretching the binding as I sewed, which means that the neckline shrank too much. I had to compensate by using a decorative stretch stitch to even out the neck binding, stretching the neckline as I sewed.
The darts are then basted temporarily.
With the nursing panel, I overlocked around 3 inches of the bottom under the bust points. These areas will hang free, the other remaining areas will be sewn onto the crossover and bottom front ruched piece.
The ruched piece had to be gathered to produce the darts. I did this by handbasting and backstitching, adjusting it to fit the back pattern piece. The backstitching again helps to reduce stretching the fabric during overlocking.
Here I've attached the bottom front ruched piece to the crossover, as well as the nursing panel. But I hand basted the side seams first to try on the fit. It was too large, so I took in about 1 1/2 inches from both side seams. Also, I noticed that the underbust seam was stretched out, which made it look bunched up. There were 4 layers of fabric going under the overlocker and it shifted and stretched like crazy. At this point I decided to add a little belt under the bustline to hide the weird look going on there.
To make the belt, I just cut out a double layer of fabric, a little shorter in width to the underbust line, about 4 inches wide. Foldover (so that there is now 4 layers instead of just two), and overlock, then turn inside out. I chose to use 4 layers instead of 2 because I wanted it to maintain it's shape. I felt that having less layers would probably mean the belt will bunch up and fold onto itself, and lose definition.
I inserted the ends of the belt to the side seams, making sure that it was positioned to hide the ugly underbust seam.
I tried the fit and had to redo the side seams several times to get a really good fit. Basting is so important! It is easier to do by hand, because it is easier to rip out than machine stitching. Also, with handstitching, you control the stretch-machine stitching is liable to stretch the fabric out of shape.
At this point I basted the sleeves and decided that I wanted cap sleeves instead of the original t-shirt sleeves I'd cut out. So I cut away the excess as per below.
Because the side seams of the main bodice had reduced substantially, I had to remove the under sleeve seam area too to match the new sleeve hole.
To make the sleeve, I folded the 1 inch strips over, and overlocked it to the sleeve, binding side up. Then iron flat.
Depending on the look you want, you can either stretch the binding as you sew, or not. If you stretch it out, the cap sleeve will look gathered. I decided not to. Here is what the sleeve looks like attached to the bodice.
To finish the hem, I cut out 1 inch bias strips of knit fusible interfacing, fused it to the hem, overlocked it, then foldover, and topstitch with twin needles.
And iron every seam.
Voila!
I'm very pleased with how this turned out. The little belt helps hide the major flaw in this top (due to my carelessness). I like how the cap sleeves turned out, and I'm very happy with the fit. The fabric is super comfy and very nice on the skin.
I hope to wear this after the birth-hopefully the bottom ruched bit won't sag too much! The nursing access would be really handy to have. Tops like these got for $70-80 at maternity boutiques, and around $30 at Target. So I've saved heaps!
I hope this tutorial was useful to you! If it was, please leave a comment! I'd love to hear from you!
Labels:
131 Burda,
Burda Magazine,
Maternity top,
Tutorial
Tuesday, February 28, 2012
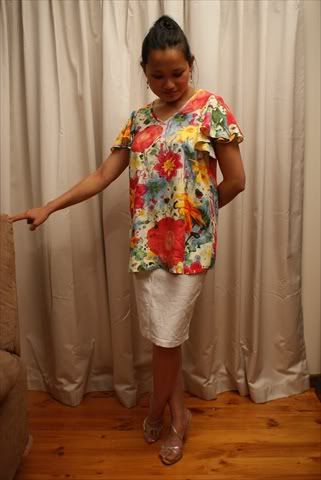
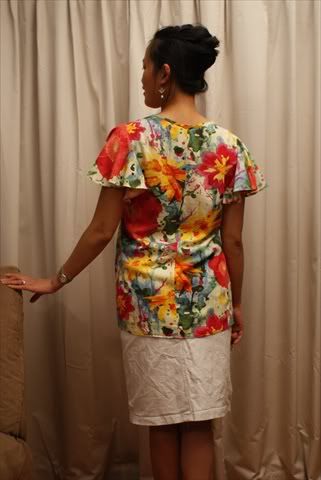
Floral Smock Top
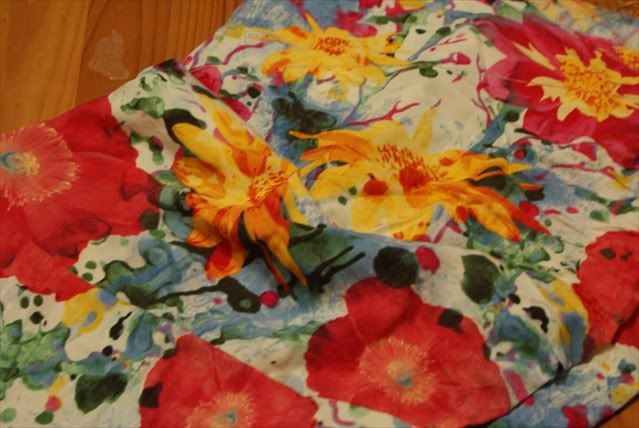
I made a top!!!! Spotlight had a fabric sale ages ago and they had this really pretty floral print in rayon.
I fell utterly in love with the print, but especially the feel of the rayon fabric. I always thought that rayon was a man-made fibre, but I was wrong-it's actually made of cellulose, a natural fibre from plants, and created as a cheaper alternative to silk. It is so light and breezy, breathes really well, very comfortable,and feels like a lightweight, really drapey silky cotton. When I first saw this fabric I persuaded myself that I did not need it. But I came back and got it after seeing it on the bolt a few times. I knew exactly what I would make with it, but after buying my 1.2 metres of it, I never got around to making anything for months and months (hint: I bought it last summer and this summer is almost at it's end!)
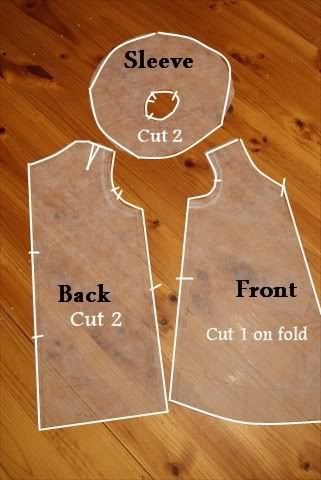
I wanted something really simple, no closures, minimal darts, no facings. I wanted it to be comfy, yet easy to wear and very feminine. So, I dug out my self-drafted maternity smock pattern. Even though it was drafted with a baby bump allowance, it is great as a loose smock top. And I love the version with the circular drape sleeves. This will be top number 4 that I've made with this pattern. See the other three in the link above.
Wyld Man was away for 5 days in Melbourne a couple of weekends ago, so I decided against feeling lonely and neglected (which I was for a couple of days-after the babies go to bed at 7pm, there's no one to talk to!) and sat down and cut and sewed everything in one night.
I used my brand new rotary cutter and self-healing mat to cut out. It is so quick! I don't think I'll be going back to scissors!
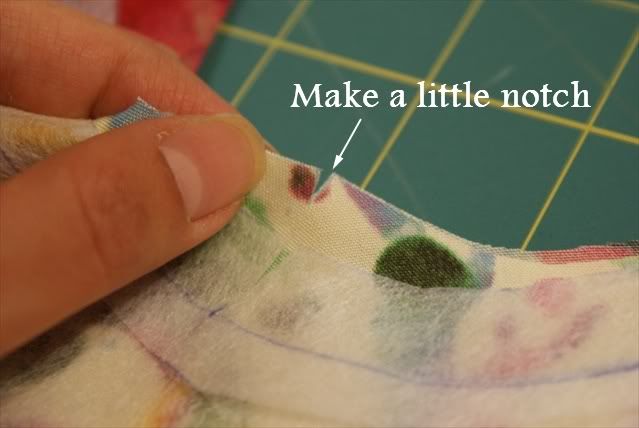
Make all the appropriate markings for darts and notches.
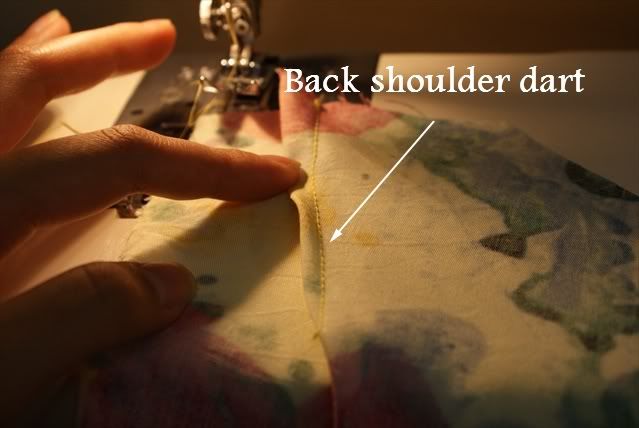
I sewed the back darts first.
Then I decided to use a french seam for this top-my overlocker has been acting up and wasn't available, and I wanted a neat finish inside. This is the first time I've use a french seam. I feel so chic! It looks really neat as it encloses all the raw edges. I prefer it to overlocking the edges-but I wouldn't use it on a thicker fabric.
To sew a flat-fell seam, put wrong sides of fabric together and sew 3/8 inches from the edge. I used this seam finish on the back centre seam, side seams and the shoulder seams.
Now press the seam open and flat, then press to one side, turn it over so that right sides are together and stitch 1/4 inch from the edge. Make sure the raw edge has been neatly trimmed and you don't catch any threads. So because my seam allowance was 5/8 inch, sewing the first seam at 3/8inch and the second seam at 1/4 inch makes 5/8 inch! I didn't figure that out till recently-duh! Press the seam to one side.
I'll show you the french seam later.
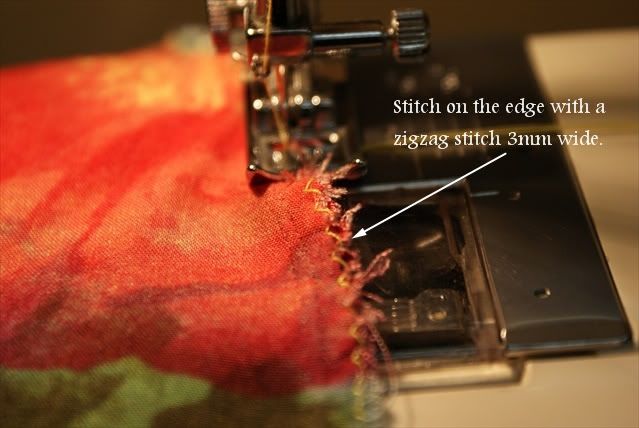
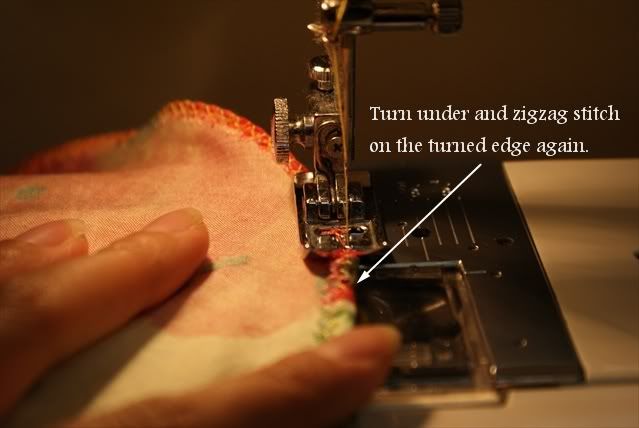
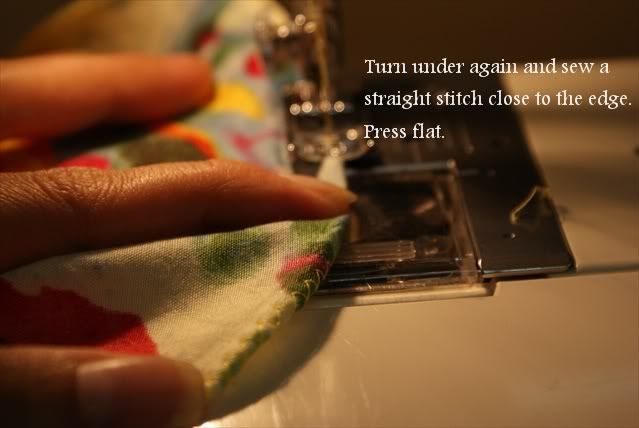
Now to hem the sleeves and the bottom of the main garment. For this fabric, which is terribly ravelly, I zig zag the edge, turn and zig zag again, then turn under again, and finally topstitch for a neat finish.
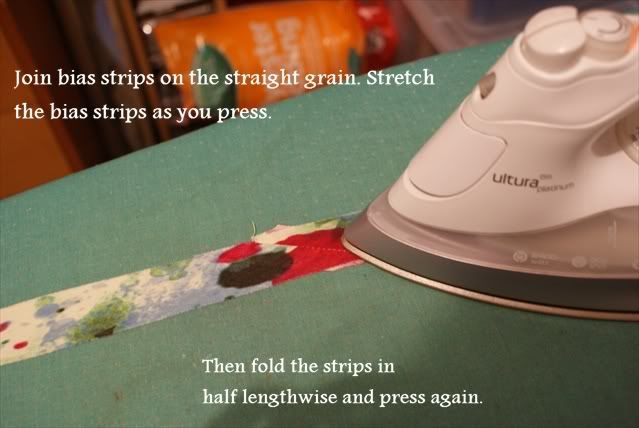
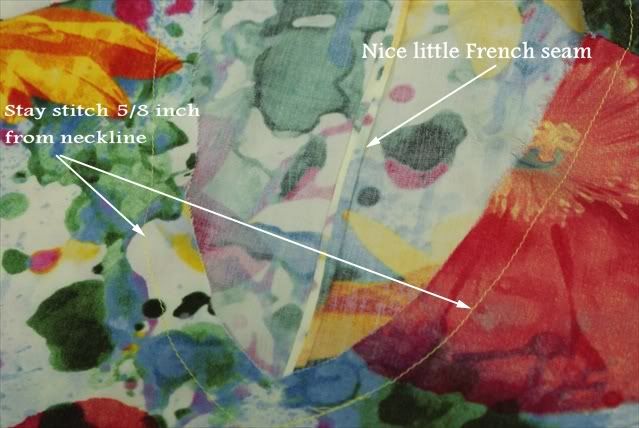
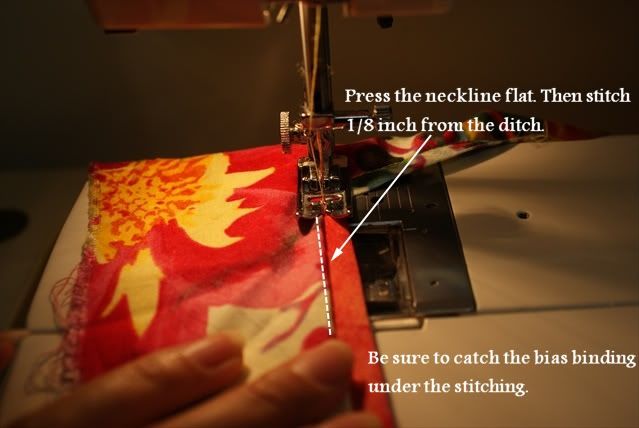
Now for the neckline. First we join the bias strips, making sure it is longer than the neckline. Then press it in half, stretching the bias as you press. It doesn't hurt to shape the bias binding in a curve too.
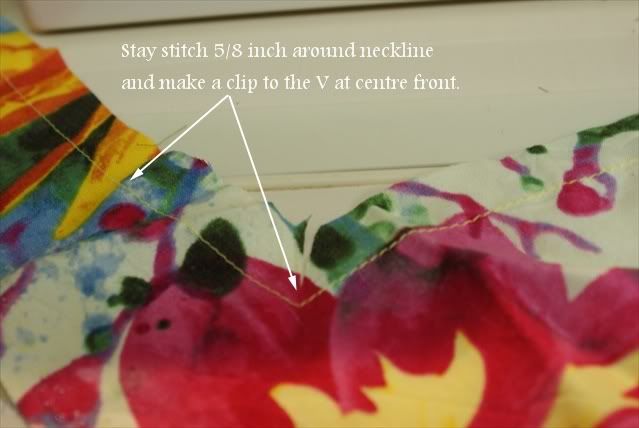
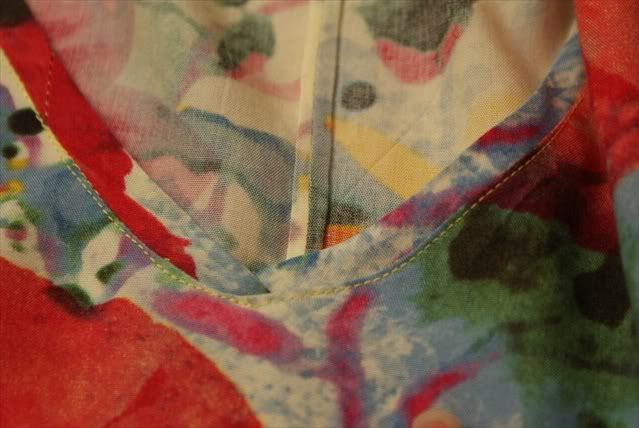
See the pretty little french seam? So neat! Now we stitch 5/8 inch all around the neckline-staystitching it to prevent the neckline stretching. This is because the neckline is cut curved which means it is off grain and on the bias and handling it will stretch the fabric, distorting the neckline.
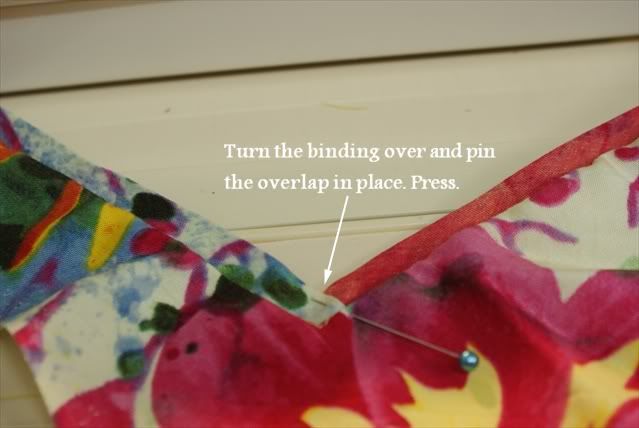
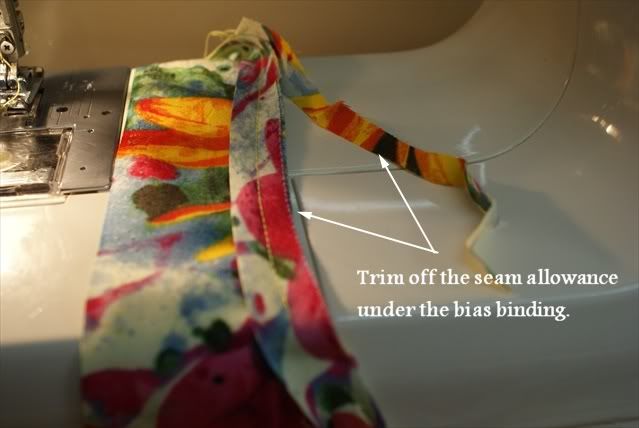
Sew the middle of the bias binding but stop 1 inch from either side of the centre front dot. Press the bias binding so that the folded edge is pointing north.
Woohoo! Done.
Monday, February 15, 2010
White Maternity Top
I had quite a lot of material left over from the white maternity skirt I finished 3 days ago, and decided to make a top to go with it. I also had Wyld Man's grandma's 80th birthday party to go to on Saturday, I thought to quickly whip a top up. I started with a sketch.
[caption id="" align="alignnone" width="426" caption="A sketch of my maternity outfit"]
[/caption]
[caption id="" align="alignnone" width="639" caption="Deciding on the style lines of the top"]
[/caption]
I had to draft this pattern from scratch. So out came my Aldrich block.
[caption id="" align="alignnone" width="639" caption="My Winifred Alrich Close Fitting Bodice Block in size 12"]
[/caption]
I needed to trace off a block on newspaper which I could cut out and move around to determine the style lines.
If you look closely, you will see an orange line above the waist line and below the armhole line-that's my maternity/empire waistline, under which I extend the pattern to accomodate a baby bump. Any pattern can be modified to become a maternity pattern. Just determine where the bump starts, and draw a line across-normally 2-3 inches below the bustline.
[caption id="" align="alignnone" width="639" caption="Getting ready to trace a block. Here, I layer carbon sheets on the bottom facing up, a large piece of newspaper, and the block which I want to trace off."]
[/caption]
[caption id="" align="alignnone" width="639" caption="Laying out my trusty pattern weights."]
[/caption]
[caption id="" align="alignnone" width="639" caption="Here you can just see the faint outline of the bodice I've traced. I'm going to cut it out."]
[/caption]
[caption id="" align="alignnone" width="639" caption="These are the top part of the pattern above the maternity line, cut with princess seams, without seam allowances."]
[/caption]
[caption id="" align="alignnone" width="639" caption="Here I've closed the bust dart with tape and drawn the style lines in red, which I will cut out."]
[/caption]
[caption id="" align="alignnone" width="639" caption="Cutting out the style lines"]
[/caption]
[caption id="" align="alignnone" width="639" caption="Here I am determining the length of the back shoulder seam, and drawing the back neckline."]
[/caption]
After cutting the style lines, I trace off the pattern pieces on a separate piece of newspaper with seam allowances.
[caption id="" align="alignnone" width="639" caption="Pattern pieces with seam allowances outlined in red."]
[/caption]
Next, the sleeves.
[caption id="" align="alignnone" width="639" caption="This is my one-piece sleeve block from my Aldrich book without seam allowances. Single noth denotes the front, double notch denotes the back."]
[/caption]
I wanted a slightly flared sleeve so...
[caption id="" align="alignnone" width="639" caption="I slashed the sleeve block to make a flared sleeve, and traced around the sleeve with seam allowances."]
[/caption]
I made facings for the front and back neckline-not shown here.
The bottom front and back panels were easy-not much manipulation involved, except for the fact that I extended the front centre line by about 5 inches to gathers. However, I later found that I had made a mistake and only extended the front by 1 inch-AFTER the material had been cut-don't know how that happened. So instead of gathers like in the sketch, I made an inverted pleat by cutting down the front centre line, and adding in a square of material into it.
[caption id="" align="alignnone" width="639" caption="Final pattern pieces all cut out."]
[/caption]
I decided to make a muslin (test garment) to try out the fit. I only needed to try the top of the blouse, so I cut out the top part of the pattern from an old bedsheet I picked up at an opshop. In hindsight, I should have made a muslin of the whole top, in order to catch the mistake on the front bottom panels where the gathers were supposed to be.
[caption id="" align="alignnone" width="639" caption="Laying out the pattern on the op shop bedsheet for my muslin."]
[/caption]
[caption id="" align="alignnone" width="639" caption="The cut pattern pieces for the muslin."]
[/caption]
I tacked all the important joining points for the muslin-princess seamlines are hard to put together without them.
[caption id="" align="alignnone" width="639" caption="The finished muslin."]
[/caption]
I tried it on and was quite happy with the fit, so I proceeded to cut it out of the white linen.
[caption id="" align="alignnone" width="639" caption="Laying out pattern pieces on the linen for cutting."]
[/caption]
[caption id="" align="alignnone" width="639" caption="The linen material all cut out."]
[/caption]
[caption id="" align="alignnone" width="639" caption="Tailor tacking all the points and notches to ease of joining all the pieces together EXACTLY."]
[/caption]
Now I need to finish the edges of all the cut material.
[caption id="" align="alignnone" width="639" caption="Overlocking all the edges of the material."]
[/caption]
I overlock all edges except the sleeve cap and the necklines on the main garment and the necklines of the facings. This is because the later seams will be enclosed, and the former will have the seam allowances trimmed off and reserged/re-overlocked.
I don't know what I'd do without my overlocker. For one, I wouldn't be sewing clothes at all-I'd still be stuck just sewing things like cloth nappies. I hate the look of raw unfinished edges on garments-didn't see any point attempting to make one at all if I couldn't finish the insides properly. And I don't suscribe to the pink and stitch school of things.
[caption id="" align="alignnone" width="639" caption="Here I've matched tailor tacks between the front top panel with the side panel."]
[/caption]
Tailor's tacks makes joining princess seams sooooo easy. I used to spend ages trying to get the two opposing curves on princess seams to match. This was a cinch.
[caption id="" align="alignnone" width="639" caption="I've also made little notches on the curves of the princess seams to ease it into the opposing seam."]
[/caption]
[caption id="" align="alignnone" width="639" caption="This is how the front top panel looks pin basted together."]
[/caption]
[caption id="" align="alignnone" width="639" caption="Ironing out the curved seam on a rolled up nappy."]
[/caption]
[caption id="" align="alignnone" width="639" caption="Here I've joined the armhole piece to the front top panel."]
[/caption]
At this point, I started joining the bottom extended panel to the top, but realised that there was only 2 inches of excess material for the gathers I had intended. I decided to make an inverted pleat instead of gathers by cutting down the centre front line of the bottom panel, and adding in 10 inches of fabric for an inverted pleat. However, before I did that, I finished making up the back panel pieces.
[caption id="" align="alignnone" width="639" caption="The back panel pieces."]
[/caption]
[caption id="" align="alignnone" width="639" caption="The 10 inch square of fabric I cut out for the inverted pleat. Had to overlock the edges of that."]
[/caption]
[caption id="" align="alignnone" width="639" caption="This is the finished front piece with the inverted pleat at the bottom"]
[/caption]
Next, I joined the shoulder seams and the side and back seams together.
Then, the facings.
[caption id="" align="alignnone" width="639" caption="I joined the neck facings together"]
[/caption]
[caption id="" align="alignnone" width="639" caption="Joining the facings to the neckline"]
[/caption]
[caption id="" align="alignnone" width="639" caption="Trimming the seam allowances under the facings to reduce bulk-also called grading."]
[/caption]
[caption id="" align="alignnone" width="639" caption="Here, I understitch the facing to the seam allowances to prevent the facings from turning upwards"]
[/caption]
Next up, the sleeves. Sleeve caps are normally 1-2 cms longer than the armhole length. This requires the excess fabric to be eased into the armhole. This has to be done without puckering, which is easy to do if unfamiliar with the technique outlined below.
[caption id="" align="alignnone" width="639" caption="Here I make a long running stitch between the notches on my sleeve cap and pull the threads to make a slight gather. This allows me to ease the sleeve into the armhole."]
[/caption]
[caption id="" align="alignnone" width="639" caption="Insert the sleeve into the armhole right sides together. Pin baste from the side seams up and distribute the gathers at the sleeve cap evenly. Pin in small intervals to ensure even easing of the sleeve into the armhole and to prevent puckering."]
[/caption]
[caption id="" align="alignnone" width="639" caption="Sew with the sleeve facing upwards and away from the needle plate."]
[/caption]
This prevents puckers from appearing, which is easy to do if the sleeve was facing downwards while you sew it into the armhole.
I'm almost finished!
[caption id="" align="alignnone" width="639" caption="Pinning up my hem"]
[/caption]
I'm making a blind hem, which require me to fold the hem twice, once unto the wrong side 5/8 inch up, and then back onto the opposing side, just enough for the overlocked edge to show, just like in the picture.
[caption id="" align="alignnone" width="639" caption="I use my adjustable blind hem foot and set the machine to do a blindhem stitch."]
[/caption]
I give the top a through press.
And I'm finished!
I've put both my maternity skirt and the top together for pictures.
[caption id="" align="alignnone" width="639" caption="Front view"]
[/caption]
[caption id="" align="alignnone" width="639" caption="Back view."]
[/caption]
[caption id="" align="alignnone" width="321" caption="My whole outfit"]
[/caption]
I decided that I needed a belt to break up the white-it looked a bit boring without it. But the top and the skirt are great separates for a mix and match look.
[caption id="" align="alignnone" width="426" caption="A sketch of my maternity outfit"]
[caption id="" align="alignnone" width="639" caption="Deciding on the style lines of the top"]
I had to draft this pattern from scratch. So out came my Aldrich block.
[caption id="" align="alignnone" width="639" caption="My Winifred Alrich Close Fitting Bodice Block in size 12"]
I needed to trace off a block on newspaper which I could cut out and move around to determine the style lines.
If you look closely, you will see an orange line above the waist line and below the armhole line-that's my maternity/empire waistline, under which I extend the pattern to accomodate a baby bump. Any pattern can be modified to become a maternity pattern. Just determine where the bump starts, and draw a line across-normally 2-3 inches below the bustline.
[caption id="" align="alignnone" width="639" caption="Getting ready to trace a block. Here, I layer carbon sheets on the bottom facing up, a large piece of newspaper, and the block which I want to trace off."]
[caption id="" align="alignnone" width="639" caption="Laying out my trusty pattern weights."]
[caption id="" align="alignnone" width="639" caption="Here you can just see the faint outline of the bodice I've traced. I'm going to cut it out."]
[caption id="" align="alignnone" width="639" caption="These are the top part of the pattern above the maternity line, cut with princess seams, without seam allowances."]
[caption id="" align="alignnone" width="639" caption="Here I've closed the bust dart with tape and drawn the style lines in red, which I will cut out."]
[caption id="" align="alignnone" width="639" caption="Cutting out the style lines"]
[caption id="" align="alignnone" width="639" caption="Here I am determining the length of the back shoulder seam, and drawing the back neckline."]
After cutting the style lines, I trace off the pattern pieces on a separate piece of newspaper with seam allowances.
[caption id="" align="alignnone" width="639" caption="Pattern pieces with seam allowances outlined in red."]
Next, the sleeves.
[caption id="" align="alignnone" width="639" caption="This is my one-piece sleeve block from my Aldrich book without seam allowances. Single noth denotes the front, double notch denotes the back."]
I wanted a slightly flared sleeve so...
[caption id="" align="alignnone" width="639" caption="I slashed the sleeve block to make a flared sleeve, and traced around the sleeve with seam allowances."]
I made facings for the front and back neckline-not shown here.
The bottom front and back panels were easy-not much manipulation involved, except for the fact that I extended the front centre line by about 5 inches to gathers. However, I later found that I had made a mistake and only extended the front by 1 inch-AFTER the material had been cut-don't know how that happened. So instead of gathers like in the sketch, I made an inverted pleat by cutting down the front centre line, and adding in a square of material into it.
[caption id="" align="alignnone" width="639" caption="Final pattern pieces all cut out."]
I decided to make a muslin (test garment) to try out the fit. I only needed to try the top of the blouse, so I cut out the top part of the pattern from an old bedsheet I picked up at an opshop. In hindsight, I should have made a muslin of the whole top, in order to catch the mistake on the front bottom panels where the gathers were supposed to be.
[caption id="" align="alignnone" width="639" caption="Laying out the pattern on the op shop bedsheet for my muslin."]
[caption id="" align="alignnone" width="639" caption="The cut pattern pieces for the muslin."]
I tacked all the important joining points for the muslin-princess seamlines are hard to put together without them.
[caption id="" align="alignnone" width="639" caption="The finished muslin."]
I tried it on and was quite happy with the fit, so I proceeded to cut it out of the white linen.
[caption id="" align="alignnone" width="639" caption="Laying out pattern pieces on the linen for cutting."]
[caption id="" align="alignnone" width="639" caption="The linen material all cut out."]
[caption id="" align="alignnone" width="639" caption="Tailor tacking all the points and notches to ease of joining all the pieces together EXACTLY."]
Now I need to finish the edges of all the cut material.
[caption id="" align="alignnone" width="639" caption="Overlocking all the edges of the material."]
I overlock all edges except the sleeve cap and the necklines on the main garment and the necklines of the facings. This is because the later seams will be enclosed, and the former will have the seam allowances trimmed off and reserged/re-overlocked.
I don't know what I'd do without my overlocker. For one, I wouldn't be sewing clothes at all-I'd still be stuck just sewing things like cloth nappies. I hate the look of raw unfinished edges on garments-didn't see any point attempting to make one at all if I couldn't finish the insides properly. And I don't suscribe to the pink and stitch school of things.
[caption id="" align="alignnone" width="639" caption="Here I've matched tailor tacks between the front top panel with the side panel."]
Tailor's tacks makes joining princess seams sooooo easy. I used to spend ages trying to get the two opposing curves on princess seams to match. This was a cinch.
[caption id="" align="alignnone" width="639" caption="I've also made little notches on the curves of the princess seams to ease it into the opposing seam."]
[caption id="" align="alignnone" width="639" caption="This is how the front top panel looks pin basted together."]
[caption id="" align="alignnone" width="639" caption="Ironing out the curved seam on a rolled up nappy."]
[caption id="" align="alignnone" width="639" caption="Here I've joined the armhole piece to the front top panel."]
At this point, I started joining the bottom extended panel to the top, but realised that there was only 2 inches of excess material for the gathers I had intended. I decided to make an inverted pleat instead of gathers by cutting down the centre front line of the bottom panel, and adding in 10 inches of fabric for an inverted pleat. However, before I did that, I finished making up the back panel pieces.
[caption id="" align="alignnone" width="639" caption="The back panel pieces."]
[caption id="" align="alignnone" width="639" caption="The 10 inch square of fabric I cut out for the inverted pleat. Had to overlock the edges of that."]
[caption id="" align="alignnone" width="639" caption="This is the finished front piece with the inverted pleat at the bottom"]
Next, I joined the shoulder seams and the side and back seams together.
Then, the facings.
[caption id="" align="alignnone" width="639" caption="I joined the neck facings together"]
[caption id="" align="alignnone" width="639" caption="Joining the facings to the neckline"]
[caption id="" align="alignnone" width="639" caption="Trimming the seam allowances under the facings to reduce bulk-also called grading."]
[caption id="" align="alignnone" width="639" caption="Here, I understitch the facing to the seam allowances to prevent the facings from turning upwards"]
Next up, the sleeves. Sleeve caps are normally 1-2 cms longer than the armhole length. This requires the excess fabric to be eased into the armhole. This has to be done without puckering, which is easy to do if unfamiliar with the technique outlined below.
[caption id="" align="alignnone" width="639" caption="Here I make a long running stitch between the notches on my sleeve cap and pull the threads to make a slight gather. This allows me to ease the sleeve into the armhole."]
[caption id="" align="alignnone" width="639" caption="Insert the sleeve into the armhole right sides together. Pin baste from the side seams up and distribute the gathers at the sleeve cap evenly. Pin in small intervals to ensure even easing of the sleeve into the armhole and to prevent puckering."]
[caption id="" align="alignnone" width="639" caption="Sew with the sleeve facing upwards and away from the needle plate."]
This prevents puckers from appearing, which is easy to do if the sleeve was facing downwards while you sew it into the armhole.
I'm almost finished!
[caption id="" align="alignnone" width="639" caption="Pinning up my hem"]
I'm making a blind hem, which require me to fold the hem twice, once unto the wrong side 5/8 inch up, and then back onto the opposing side, just enough for the overlocked edge to show, just like in the picture.
[caption id="" align="alignnone" width="639" caption="I use my adjustable blind hem foot and set the machine to do a blindhem stitch."]
I give the top a through press.
And I'm finished!
I've put both my maternity skirt and the top together for pictures.
[caption id="" align="alignnone" width="639" caption="Front view"]
[caption id="" align="alignnone" width="639" caption="Back view."]
[caption id="" align="alignnone" width="321" caption="My whole outfit"]
I decided that I needed a belt to break up the white-it looked a bit boring without it. But the top and the skirt are great separates for a mix and match look.
Labels:
blind hem,
empire waist line,
Fashion,
Garment Construction,
Maternity,
Maternity Skirt,
Maternity top,
Maternity Wear,
Pattern Drafting,
princess seam,
Setting in a sleeve,
Sewing,
Tutorial
Subscribe to:
Posts (Atom)