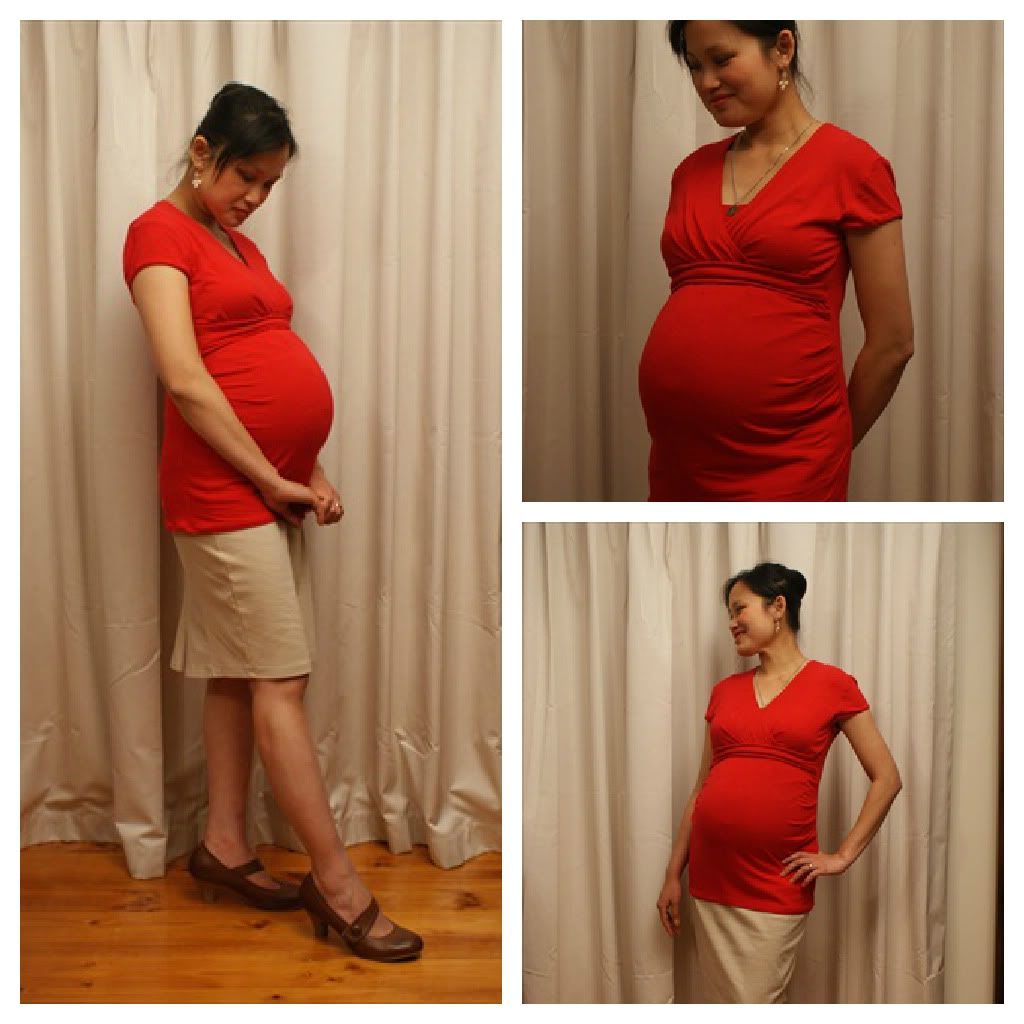
So. I'm pregnant again. And I'm less than 7 weeks away till bubba 3 pops out. I've been busy with my two toddlers. Monkey will be 3 soon, and Hippo will be 18 months in Dec. Things have been going really well I reckon. And I decided that it's been too long since I posted and I've been itching to sew something. I haven't sewn anything in ages, persuading myself that with two toddlers it would be next to impossible. But last week I suddenly felt my sewing mojo coming back, buckled down and picked out a Burda maternity pattern, decided that I was going to take my sweet time, and finished a top in 3 days. It helps when the little creatures have a good routine.
I had some red 4 way stretch jersey in my stash. I can't remember where I picked it up. But it was really soft and stretchy. I had used up quite a lot for an All Saints Day costume night, and I didn't think I'd have enough to make a top. But surprise, surprise! I needed only around 1 metre.
This post will be a tutorial on how I put this top together, as well as how to convert it to a nursing top with hidden access as well.
The Burda maternity top is from the June 2010 issue, number 131.
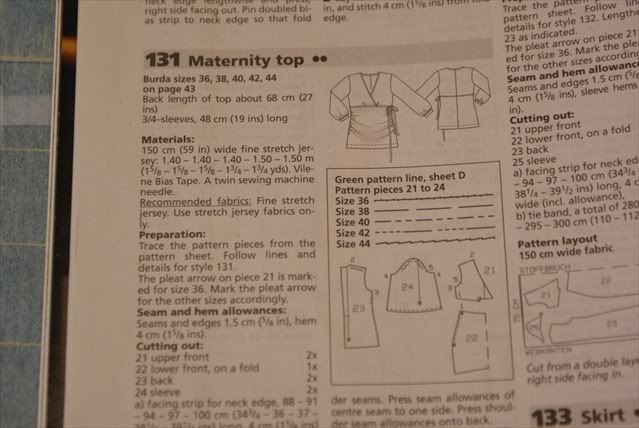
The sizing I chose was based on my high bust measurement (around the top of your ribcage rather than around the bustline). I cut out size 38, but had to shorten the length a total of 4cm, as it was drafted for a person much taller.
In the above, you can see where I slashed the pieces horizontally to reduce length at several different places, to distribute the adjustments more evenly. Also, I anticipated a gaping neckline, a problem I had before with a Burda top.
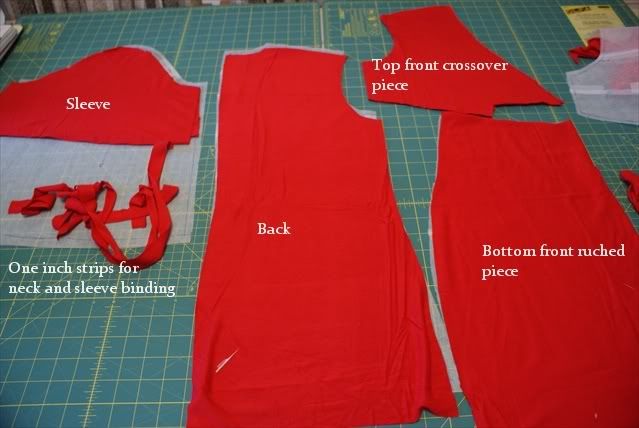
I cut out my pieces with a rotary cutter. Love that tool! Cutting out isn't a chore anymore. At this point I also decided to make this a nursing top, and I added a nursing panel.
I didn't make a pattern for it, just based it on the crossover piece. I cut on folded lengthwise and width wise, with the latter fold on the centre front line of the crossover piece. The side seam was angled to match the side of the crossover piece once the dart was taken in.
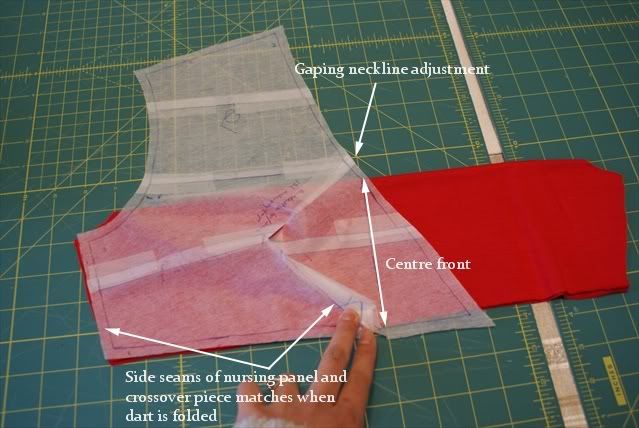
Once you open it up, you can see that it matched the crossover piece at the side seams.
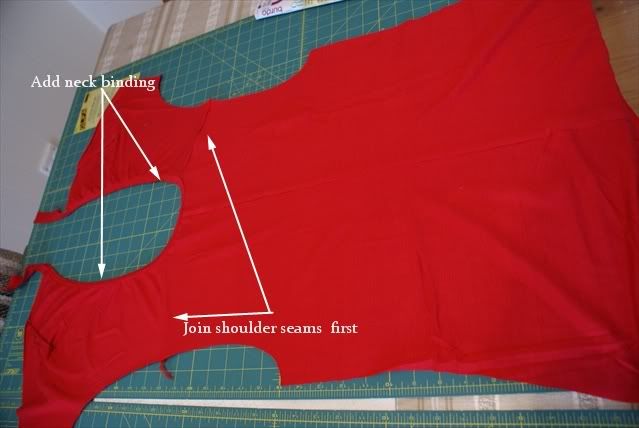
First step is to join the shoulder seams of the crossover pieces to the back piece. I wasn't very careful and stretched the jersey a bit here. In hindsight I would have used a walkingfoot on the sewing machine with long basting stitches, or handstiched it with backstitches at every inch interval.
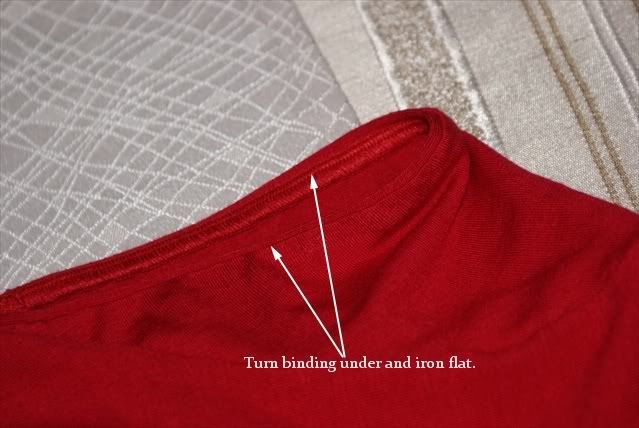
I also used the 1 inch strips, folded over and overlocked it to the neckline, binding on top. Then turn over and iron flat.
However, I made the mistake of stretching the binding as I sewed, which means that the neckline shrank too much. I had to compensate by using a decorative stretch stitch to even out the neck binding, stretching the neckline as I sewed.
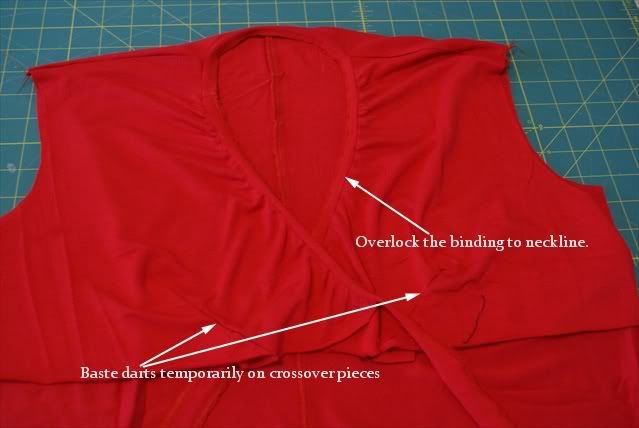
The darts are then basted temporarily.
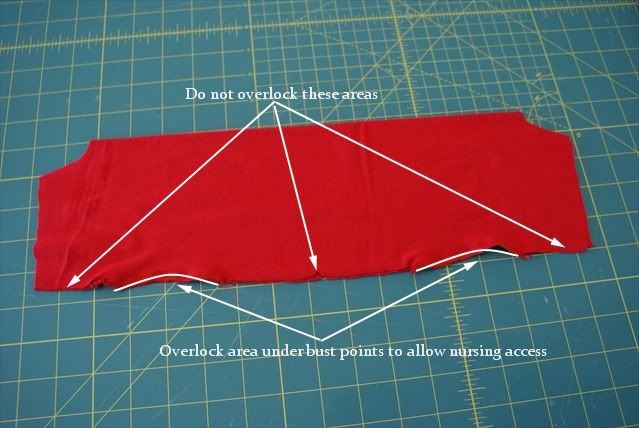
With the nursing panel, I overlocked around 3 inches of the bottom under the bust points. These areas will hang free, the other remaining areas will be sewn onto the crossover and bottom front ruched piece.
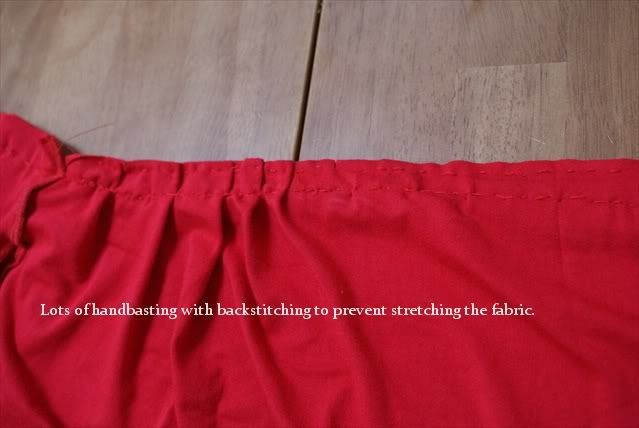
The ruched piece had to be gathered to produce the darts. I did this by handbasting and backstitching, adjusting it to fit the back pattern piece. The backstitching again helps to reduce stretching the fabric during overlocking.
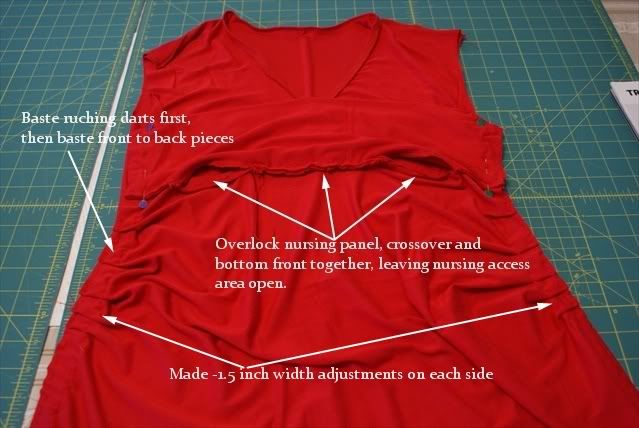
Here I've attached the bottom front ruched piece to the crossover, as well as the nursing panel. But I hand basted the side seams first to try on the fit. It was too large, so I took in about 1 1/2 inches from both side seams. Also, I noticed that the underbust seam was stretched out, which made it look bunched up. There were 4 layers of fabric going under the overlocker and it shifted and stretched like crazy. At this point I decided to add a little belt under the bustline to hide the weird look going on there.
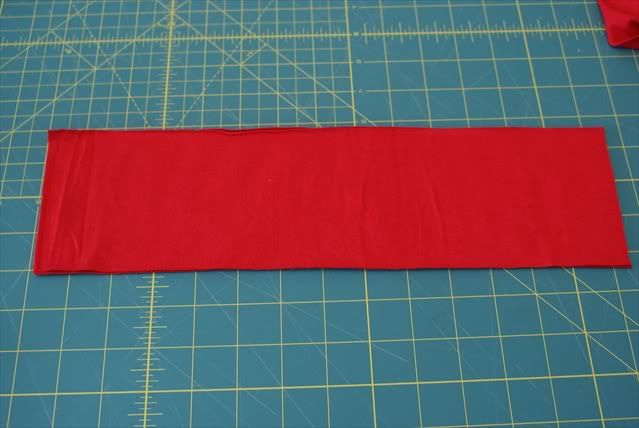
To make the belt, I just cut out a double layer of fabric, a little shorter in width to the underbust line, about 4 inches wide. Foldover (so that there is now 4 layers instead of just two), and overlock, then turn inside out. I chose to use 4 layers instead of 2 because I wanted it to maintain it's shape. I felt that having less layers would probably mean the belt will bunch up and fold onto itself, and lose definition.
I inserted the ends of the belt to the side seams, making sure that it was positioned to hide the ugly underbust seam.
I tried the fit and had to redo the side seams several times to get a really good fit. Basting is so important! It is easier to do by hand, because it is easier to rip out than machine stitching. Also, with handstitching, you control the stretch-machine stitching is liable to stretch the fabric out of shape.
At this point I basted the sleeves and decided that I wanted cap sleeves instead of the original t-shirt sleeves I'd cut out. So I cut away the excess as per below.
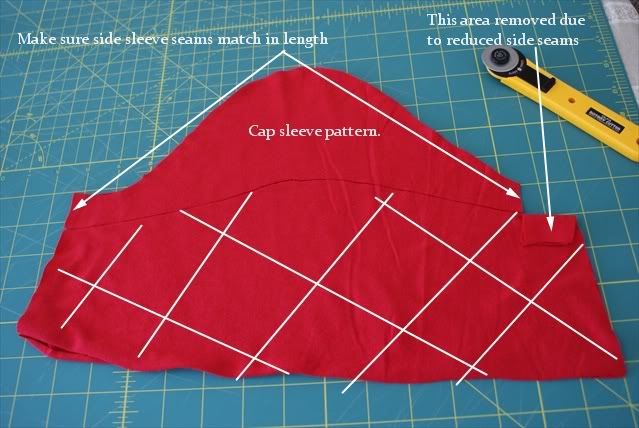
Because the side seams of the main bodice had reduced substantially, I had to remove the under sleeve seam area too to match the new sleeve hole.
To make the sleeve, I folded the 1 inch strips over, and overlocked it to the sleeve, binding side up. Then iron flat.
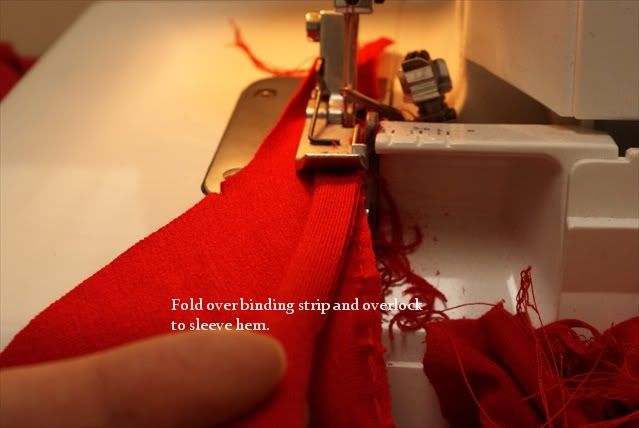
Depending on the look you want, you can either stretch the binding as you sew, or not. If you stretch it out, the cap sleeve will look gathered. I decided not to. Here is what the sleeve looks like attached to the bodice.
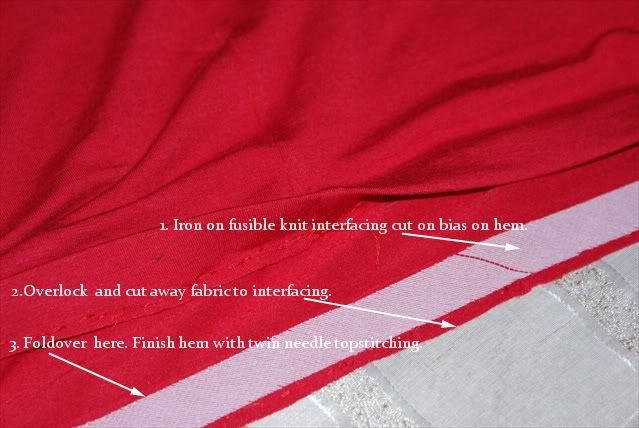
To finish the hem, I cut out 1 inch bias strips of knit fusible interfacing, fused it to the hem, overlocked it, then foldover, and topstitch with twin needles.
And iron every seam.
Voila!
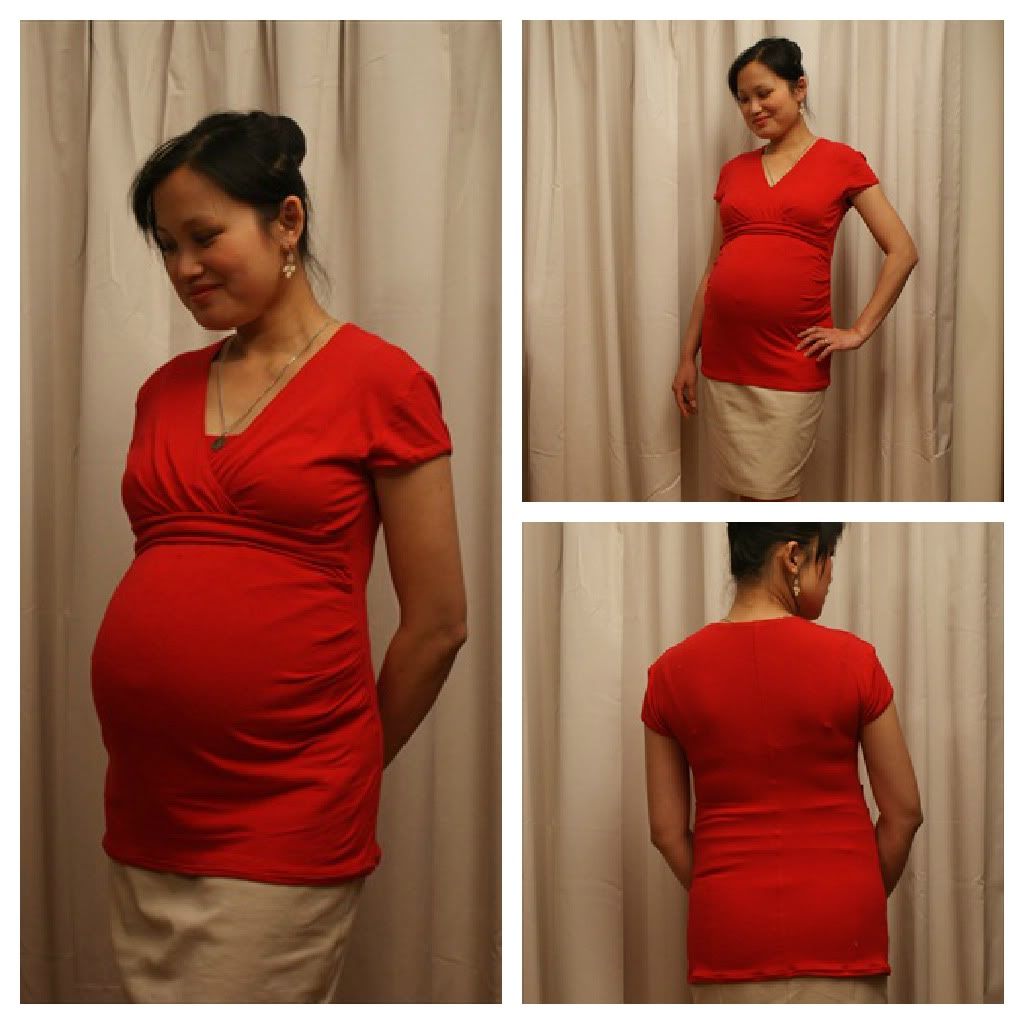
I'm very pleased with how this turned out. The little belt helps hide the major flaw in this top (due to my carelessness). I like how the cap sleeves turned out, and I'm very happy with the fit. The fabric is super comfy and very nice on the skin.
I hope to wear this after the birth-hopefully the bottom ruched bit won't sag too much! The nursing access would be really handy to have. Tops like these got for $70-80 at maternity boutiques, and around $30 at Target. So I've saved heaps!
I hope this tutorial was useful to you! If it was, please leave a comment! I'd love to hear from you!
Showing posts with label Tutorial. Show all posts
Wednesday, October 17, 2012
Thursday, December 23, 2010
Black And White Smock/Maternity Top
My, it's been a while. And 2 days till Christmas! I've been busy busy busy-tidying up house, getting rid of unused things, doing some spring cleaning, running after my Little Wyld Man, who isn't so little anymore. And also, I'm pregnant again! In between getting all of these done, I managed to pull together a simple smock from a Burda magazine, using some left over material from my maternity/nursing cocktail dress.
I was itching to sew something, but was too lazy to draft from scratch, so I decided I must make something quick and simple. I had some Burda magazines from the library and this little number caught my eye.

I love the simple lines, the yoke, and the pleats, which will allow for a growing belly. This is how it was made up in the magazine-in plaid.

I wasn't too big on it, but I really liked the stylelines, and decided to make it.

This is the pattern sheet. You have to find the correct colour codes for the pattern which can get confusing. In this case, I'm using the patterns outlined in blue. Burda patterns come without seam allowances, so you have to add them yourself.

I traced out the pattern using some tracing paper, and added a 5/8 of an inch seam allowance. You can use anything see through that is big enough, such as cheap sew-in interfacing, or even freezer paper taped together.

I've cut out my pattern pieces. This is a simple pattern, so only 6 pieces altogether. Should come together pretty quickly. I've labelled each piece so that you'll know what I'm referring to below.
The pattern markings must be marked onto the fabric at this point. I used to use tailor's tacks, but now I just make a 3/5 inch snip into the seam allowance to mark centre points, pleating points, etc.

I've also cut out fusible interfacing for the facing front and back pieces, as well as the yoke. The fusible interfacing I'm using is a tricot knit, which is suitable for most light and medium weight materials. The interfacing serves to stabilise the area, and by this I mean that it will stop the fabric from stretching as you sew and handle it. It also prevents wrinkles and gives a bit more body to the fabric, although you don't want to use interfacing that is too heavy, as this will change the hand/feel of the fabric undesirably. The interfacing should be cut using the same pattern piece, or slightly smaller.
To fuse, press with an up-down motion on a steam and wool setting till it fuses to the fabric. Wait till cool before moving.
Before stitching anything together, I finish the edges with my overlocker. Or you can use a zigzag stitch with a normal sewing machine.

Here, I've stitched the pleats in the front first. My order of construction is always to finish the details on the front garment, piece all front pieces together, then finish back details such as the zipper, and joint the front to the back at the shoulder seams and side seams. The sleeves and hem are last.
In stitching the pleats, the pattern markings and centre points guide me and I don't struggle to measure the pleating afterwards. I stitch vertically at each pleat to keep the pleats together, then horizontally across the pleats and the whole neckline.

The front yoke is joined to the main front, matching the centre points in the middle. The seam allowance is pressed upwards at the back.

Here's I'm stitching the side seams. The shoulder seams are next. When this is done, test for fit. As this was a loose smock, the fit aside from the shoulders, weren't essential. This top was drafted with a zipper in the back. When I tried it on, I found that it slipped easily over my head and shoulders, so I decided to omit the zipper.
Press the seams open and flat.

Here, I'm stitching the back neck facings together at the centre back seam. Next the back neck facing is joined to the front neck facing at the shoulder seams.

This is what it looks like. Press the seams open and flat. Remember, sew and press as you go.

Join the facing to the main garment at the neck edge, lining shoulder seams on both facing and main garment together. Make sure the centre points of the facing matches the centre point on the main garment. Sew with 5/8 inch seam allowance.
When this is done, turn the facing underneath and this finishes the neckline edge. However, you will find that it flips upwards very inconveniently. To remedy, you'll need to understitch.

Open up the facing, and use your fingers to press the seam allowance towards the facing. Position your needle so that it is close to the seam line, but not on it, towards the facing. Sew the seam allowances to the facing. This is called understitching. This keeps the facing from flipping up a certain extent. However, you'll need to clip the seam allowance as per below.

Clip at 1 inch intervals, or less where there is a sharper curve. This releases the fabric and lets it lie flat when you turn the facing under. Be careful to clip close to, but not onto the stitching line.
Next, we finish the hem on the sleeve.

I'm doing a double rolled hem by hand-you can do it by a narrow hemming foot, but I wanted to try this technique instead. Turn the edge wrong sides together around 1/4 inch and sew close to the edge. Using the tailor's awl helps immensely as the sharp point guides the hem under the presser foot.

Now turn over the second time and do the same. Press the hem flat.
Before sewing the sleeve into the armhole, you have to prepare the sleeve for 'easing'. The sleeve cap is drafted with extra length, usually about 1-2 cm longer than the armhole. The extra fabric must be eased into the armhole without puckering. This can be a challenge, but with practice comes perfection. To prepare the sleeve, sew a gathering stitch (I use the longest stitch length) inside the seam allowance.

The pattern will have a dot/mark where easing begins. Sew from this point with big stitches. Do not backstitch. Leave a long thread length at each end.

Pull the gathering threads and gather the sleeve cap evenly. The gathers must be 'gentle' rather than 'hard'.

Pin the sleeve cap onto the armhole wtih as many pins as you need. As this is a cap sleeve, and not a full sleeve, find the markings on the armhole where the sleep cap begins and ends. The 1/3 of the lower armhole will be finished with a bias binding. Stitch sleeve to armhole at 5/8 inch seam allowance.

For the bias binding, I cut 1 inch strips on the bias, 16cm in length. These need to be folded in half and pressed. As this is on the bias, it is stretchy and can be shaped into a curve by pressing, as per below.

To attach the binding to the lower armhole, pin the so that the folded edge sits 2.7cm from the armhole edge.

Why 2.7cm? Because it is 5/8 inch plus 1cm. And when you stitch it in 5/8 inch from the armhole edge,and turn the bias binding under, it will match the finished edge of the cap sleeve perfectly. Magic!

Sew 5/8 inch from the edge of the armhole, catching the middle of the bias binding.

Trim aways the ends of the binding, and the seam allowance so that only 1/4 of the bias binding remains.

Turn under and edgestitch close to the edge, making sure the stitching catches and holds the bias binding underneath. Press flat.
Hem the bottom with a double rolled hem.
Finito!

Front view.

Back view.

Closeup of the front.
I'm rather pleased with this top. However, the neckline does gape a bit. So the next time I use this pattern, I'll do a slight gaposis adjustment. But for now, Merry Christmas everyone!
I was itching to sew something, but was too lazy to draft from scratch, so I decided I must make something quick and simple. I had some Burda magazines from the library and this little number caught my eye.
I love the simple lines, the yoke, and the pleats, which will allow for a growing belly. This is how it was made up in the magazine-in plaid.
I wasn't too big on it, but I really liked the stylelines, and decided to make it.
This is the pattern sheet. You have to find the correct colour codes for the pattern which can get confusing. In this case, I'm using the patterns outlined in blue. Burda patterns come without seam allowances, so you have to add them yourself.
I traced out the pattern using some tracing paper, and added a 5/8 of an inch seam allowance. You can use anything see through that is big enough, such as cheap sew-in interfacing, or even freezer paper taped together.
I've cut out my pattern pieces. This is a simple pattern, so only 6 pieces altogether. Should come together pretty quickly. I've labelled each piece so that you'll know what I'm referring to below.
The pattern markings must be marked onto the fabric at this point. I used to use tailor's tacks, but now I just make a 3/5 inch snip into the seam allowance to mark centre points, pleating points, etc.
I've also cut out fusible interfacing for the facing front and back pieces, as well as the yoke. The fusible interfacing I'm using is a tricot knit, which is suitable for most light and medium weight materials. The interfacing serves to stabilise the area, and by this I mean that it will stop the fabric from stretching as you sew and handle it. It also prevents wrinkles and gives a bit more body to the fabric, although you don't want to use interfacing that is too heavy, as this will change the hand/feel of the fabric undesirably. The interfacing should be cut using the same pattern piece, or slightly smaller.
To fuse, press with an up-down motion on a steam and wool setting till it fuses to the fabric. Wait till cool before moving.
Before stitching anything together, I finish the edges with my overlocker. Or you can use a zigzag stitch with a normal sewing machine.
Here, I've stitched the pleats in the front first. My order of construction is always to finish the details on the front garment, piece all front pieces together, then finish back details such as the zipper, and joint the front to the back at the shoulder seams and side seams. The sleeves and hem are last.
In stitching the pleats, the pattern markings and centre points guide me and I don't struggle to measure the pleating afterwards. I stitch vertically at each pleat to keep the pleats together, then horizontally across the pleats and the whole neckline.
The front yoke is joined to the main front, matching the centre points in the middle. The seam allowance is pressed upwards at the back.
Here's I'm stitching the side seams. The shoulder seams are next. When this is done, test for fit. As this was a loose smock, the fit aside from the shoulders, weren't essential. This top was drafted with a zipper in the back. When I tried it on, I found that it slipped easily over my head and shoulders, so I decided to omit the zipper.
Press the seams open and flat.
Here, I'm stitching the back neck facings together at the centre back seam. Next the back neck facing is joined to the front neck facing at the shoulder seams.
This is what it looks like. Press the seams open and flat. Remember, sew and press as you go.
Join the facing to the main garment at the neck edge, lining shoulder seams on both facing and main garment together. Make sure the centre points of the facing matches the centre point on the main garment. Sew with 5/8 inch seam allowance.
When this is done, turn the facing underneath and this finishes the neckline edge. However, you will find that it flips upwards very inconveniently. To remedy, you'll need to understitch.
Open up the facing, and use your fingers to press the seam allowance towards the facing. Position your needle so that it is close to the seam line, but not on it, towards the facing. Sew the seam allowances to the facing. This is called understitching. This keeps the facing from flipping up a certain extent. However, you'll need to clip the seam allowance as per below.
Clip at 1 inch intervals, or less where there is a sharper curve. This releases the fabric and lets it lie flat when you turn the facing under. Be careful to clip close to, but not onto the stitching line.
Next, we finish the hem on the sleeve.
I'm doing a double rolled hem by hand-you can do it by a narrow hemming foot, but I wanted to try this technique instead. Turn the edge wrong sides together around 1/4 inch and sew close to the edge. Using the tailor's awl helps immensely as the sharp point guides the hem under the presser foot.
Now turn over the second time and do the same. Press the hem flat.
Before sewing the sleeve into the armhole, you have to prepare the sleeve for 'easing'. The sleeve cap is drafted with extra length, usually about 1-2 cm longer than the armhole. The extra fabric must be eased into the armhole without puckering. This can be a challenge, but with practice comes perfection. To prepare the sleeve, sew a gathering stitch (I use the longest stitch length) inside the seam allowance.
The pattern will have a dot/mark where easing begins. Sew from this point with big stitches. Do not backstitch. Leave a long thread length at each end.
Pull the gathering threads and gather the sleeve cap evenly. The gathers must be 'gentle' rather than 'hard'.
Pin the sleeve cap onto the armhole wtih as many pins as you need. As this is a cap sleeve, and not a full sleeve, find the markings on the armhole where the sleep cap begins and ends. The 1/3 of the lower armhole will be finished with a bias binding. Stitch sleeve to armhole at 5/8 inch seam allowance.
For the bias binding, I cut 1 inch strips on the bias, 16cm in length. These need to be folded in half and pressed. As this is on the bias, it is stretchy and can be shaped into a curve by pressing, as per below.
To attach the binding to the lower armhole, pin the so that the folded edge sits 2.7cm from the armhole edge.
Why 2.7cm? Because it is 5/8 inch plus 1cm. And when you stitch it in 5/8 inch from the armhole edge,and turn the bias binding under, it will match the finished edge of the cap sleeve perfectly. Magic!
Sew 5/8 inch from the edge of the armhole, catching the middle of the bias binding.
Trim aways the ends of the binding, and the seam allowance so that only 1/4 of the bias binding remains.
Turn under and edgestitch close to the edge, making sure the stitching catches and holds the bias binding underneath. Press flat.
Hem the bottom with a double rolled hem.
Finito!
Front view.
Back view.
Closeup of the front.
I'm rather pleased with this top. However, the neckline does gape a bit. So the next time I use this pattern, I'll do a slight gaposis adjustment. But for now, Merry Christmas everyone!
Labels:
115A 5/2009,
Burda,
Burda Magazine,
Fashion,
Garment Construction,
Maternity,
Maternity Smock top,
Maternity Wear,
Sewing,
Top,
Tutorial
Monday, October 4, 2010
Vintage Jocardi Camel Coat Relined
In one of my previous posts, I talked about my expanding vintage winter coat collection. One of my favourites is a vintage camel coat which I found at a Salvos opshop a couple of months ago. It was in beautiful condition, and guessing from the cut it was probably of a 50's-60's vintage. The brand was Jocardi, and the only reference I could find online was from a 1957 book about an Italian who had worked in the Jocardi Coat Factory in Canada.
[caption id="" align="alignnone" width="321" caption="Vintage Camel Coat"]
[/caption]
The coat is cut in a very flattering princess style, with topstitching, welt pockets, and a military-looking sleeve head.
[caption id="" align="alignnone" width="639" caption="Interesting sleevehead"]
[/caption]
Being interested in patternmaking myself, I was fascinated with the cut of the sleeve, which is half set-in sleeve, and half whatchacallit. The whole cut of the coat was very feminine. You wouldn't be able to get anything like it at the shops today. I especially love the way the skirt flares out.
However, the lining was in pitiful state. It was moth-eaten, ripped under the sleeves, threadbare, stained and torn in a few places. And it was a really awful pink typical of that vintage. Not to mention that it smelled something horrible.
But when I tried it on, I fell in love with the way it looked on me-it fitted me exactly, and I didn't have that colour coat in my collection. The price tag on it was $35-which was a little high for an opshop, and I hesitated when I thought about the lining. But I convinced myself that it could be easily relined. The clincher came when I realised that it had a purple tag and it was half price day for purple tags! My parents were with me at the time and my dad offered to pay for it. So sweet of him. They both said the coat looked beautiful. And you don't argue with your parents on that one.
So I got back home and sat on it for a week and studied it inside and out. And proceeded to rip the lining out and apart.
[caption id="" align="alignnone" width="639" caption="Lining front"]
[/caption]
[caption id="" align="alignnone" width="639" caption="Lining back"]
[/caption]
As you can see, the lining has an underlining made of cotton flannel, and the back has a rectangle of suede sewn onto it. I took pictures of how the lining inside was constructed and attached and made notes so as to guide me later. My plan was to rip one side of the lining apart at the seams, and leave the other side intact, then use the lining pieces as a pattern for the new lining.
[caption id="" align="alignnone" width="639" caption="Lining pattern pieces"]
[/caption]
The lining pieces had to be ironed flat first. And I had to measure the seam allowance on it to determine how much to sew on the new lining.
I was set on a really funky lining, and had in mind some loud polyester fabric leftover from a maternity dress, which I got from the bargain table at Spotlight.
[caption id="" align="alignnone" width="556" caption="Print maternity dress (See the Wyld Maternity Collection 2009 here)"]
[/caption]
To underline it, I used some tan wool crepe in my stash (which again came from an opshop). It wasn't an attractive colour, and had some holes in it, but being an underlining, it didn't matter too much. I but both lining and underlining using the old lining pattern pieces.
[caption id="" align="alignnone" width="639" caption="New lining pieces"]
[/caption]
I made sure to mark the darks on both fabrics, then sewed the outline of the darts through both fabric layers.
[caption id="" align="alignnone" width="639" caption="Dart outline"]
[/caption]
I also sewed around the edges of all the lining and underlining pieces together, treating them both as a single layer from then on. For the back panels however, I joined the centre back seam of both fabrics together, but before sewing the edges of both fabrics, I sewed the suede rectangle onto the underlining. Then I sewed the edges of the lining and underlining together, treating it as a single layer from then on. I then proceed to join all the pieces together, as well as attaching the sleeves.
Now comes the big part-joining the lining to the coat. I sewed the lining edge to the coat facing, right sides together, all around from the middle of the collar down one side, and then down the other. This ensures that you don't end up with one side of the lining longer or shorter than the other. It also means that the middle of the collar of the lining and the coat will match up. Now all that is needed is the hemming of sleeve and hem.
The sleeves were 1 1/2 inches too short-so I lengthened it. Luckily the hem inside was quite generous which allowed me to do that. Otherwise it would have looked a bit funny on me. I had cut the sleeve lining longer to accomodate that alteration.
And this is the finished product.
[caption id="" align="alignnone" width="639" caption="New lining"]
[/caption]
[caption id="" align="alignnone" width="321" caption="Front view"]
[/caption]
[caption id="" align="alignnone" width="321" caption="Inside view"]
With the leftovers of the print lining, I made a square scarf to match (edges finished with a rolled hem on the overlocker) and a hair scrunchy.
I sent the coat to be drycleaned before I wore it. And I have worn it many many times over the last two months. I love this coat, and especially the lining. I feel like I've got a wonderful secret hidden under a demure coat. The loud print sings to me and to anyone I've shown it to.
Take note however that if you remove the labels from the old lining to insert the care instructions for the coat into the new lining, because the dry cleaners might make you sign a waiver/indemnity in case of possible damage due to there being no care label.
This was a quick project and very satisfying. And it's not that hard to do. So next time you see a beautiful coat with an old lining, rescue it and give it an internal facelift.
[caption id="" align="alignnone" width="321" caption="Vintage Camel Coat"]
The coat is cut in a very flattering princess style, with topstitching, welt pockets, and a military-looking sleeve head.
[caption id="" align="alignnone" width="639" caption="Interesting sleevehead"]
Being interested in patternmaking myself, I was fascinated with the cut of the sleeve, which is half set-in sleeve, and half whatchacallit. The whole cut of the coat was very feminine. You wouldn't be able to get anything like it at the shops today. I especially love the way the skirt flares out.
However, the lining was in pitiful state. It was moth-eaten, ripped under the sleeves, threadbare, stained and torn in a few places. And it was a really awful pink typical of that vintage. Not to mention that it smelled something horrible.
But when I tried it on, I fell in love with the way it looked on me-it fitted me exactly, and I didn't have that colour coat in my collection. The price tag on it was $35-which was a little high for an opshop, and I hesitated when I thought about the lining. But I convinced myself that it could be easily relined. The clincher came when I realised that it had a purple tag and it was half price day for purple tags! My parents were with me at the time and my dad offered to pay for it. So sweet of him. They both said the coat looked beautiful. And you don't argue with your parents on that one.
So I got back home and sat on it for a week and studied it inside and out. And proceeded to rip the lining out and apart.
[caption id="" align="alignnone" width="639" caption="Lining front"]
[caption id="" align="alignnone" width="639" caption="Lining back"]
As you can see, the lining has an underlining made of cotton flannel, and the back has a rectangle of suede sewn onto it. I took pictures of how the lining inside was constructed and attached and made notes so as to guide me later. My plan was to rip one side of the lining apart at the seams, and leave the other side intact, then use the lining pieces as a pattern for the new lining.
[caption id="" align="alignnone" width="639" caption="Lining pattern pieces"]
The lining pieces had to be ironed flat first. And I had to measure the seam allowance on it to determine how much to sew on the new lining.
I was set on a really funky lining, and had in mind some loud polyester fabric leftover from a maternity dress, which I got from the bargain table at Spotlight.
[caption id="" align="alignnone" width="556" caption="Print maternity dress (See the Wyld Maternity Collection 2009 here)"]
To underline it, I used some tan wool crepe in my stash (which again came from an opshop). It wasn't an attractive colour, and had some holes in it, but being an underlining, it didn't matter too much. I but both lining and underlining using the old lining pattern pieces.
[caption id="" align="alignnone" width="639" caption="New lining pieces"]
I made sure to mark the darks on both fabrics, then sewed the outline of the darts through both fabric layers.
[caption id="" align="alignnone" width="639" caption="Dart outline"]
I also sewed around the edges of all the lining and underlining pieces together, treating them both as a single layer from then on. For the back panels however, I joined the centre back seam of both fabrics together, but before sewing the edges of both fabrics, I sewed the suede rectangle onto the underlining. Then I sewed the edges of the lining and underlining together, treating it as a single layer from then on. I then proceed to join all the pieces together, as well as attaching the sleeves.
Now comes the big part-joining the lining to the coat. I sewed the lining edge to the coat facing, right sides together, all around from the middle of the collar down one side, and then down the other. This ensures that you don't end up with one side of the lining longer or shorter than the other. It also means that the middle of the collar of the lining and the coat will match up. Now all that is needed is the hemming of sleeve and hem.
The sleeves were 1 1/2 inches too short-so I lengthened it. Luckily the hem inside was quite generous which allowed me to do that. Otherwise it would have looked a bit funny on me. I had cut the sleeve lining longer to accomodate that alteration.
And this is the finished product.
[caption id="" align="alignnone" width="639" caption="New lining"]
[caption id="" align="alignnone" width="321" caption="Front view"]
[caption id="" align="alignnone" width="321" caption="Inside view"]
[/caption]
With the leftovers of the print lining, I made a square scarf to match (edges finished with a rolled hem on the overlocker) and a hair scrunchy.
I sent the coat to be drycleaned before I wore it. And I have worn it many many times over the last two months. I love this coat, and especially the lining. I feel like I've got a wonderful secret hidden under a demure coat. The loud print sings to me and to anyone I've shown it to.
Take note however that if you remove the labels from the old lining to insert the care instructions for the coat into the new lining, because the dry cleaners might make you sign a waiver/indemnity in case of possible damage due to there being no care label.
This was a quick project and very satisfying. And it's not that hard to do. So next time you see a beautiful coat with an old lining, rescue it and give it an internal facelift.
Subscribe to:
Posts (Atom)